
Use IE9 to delete history so that no one can trace what you were doing. The methods to delete history in Internet Explorer 9 (IE9) are same as in IE8. We discuss different methods, including a method that automatically clears browsing history.
IE9 Delete History - How to Manually Delete History for Privacy
Using IE9 to delete history is one way to preserve your privacy. Though there are external programs other than the Internet Explorer 9 you can use for the purpose, using IE9 to delete history offers you a method to keep what you want and to delete what you wish to hide from others.
To delete history using Internet Explorer 9, open Internet Options from Control Panel. You can also access Internet Options from the Tools icon towards the top-right corner of the IE9 window. In the General tab of the Internet Explorer , you will find options to delete browsing history.
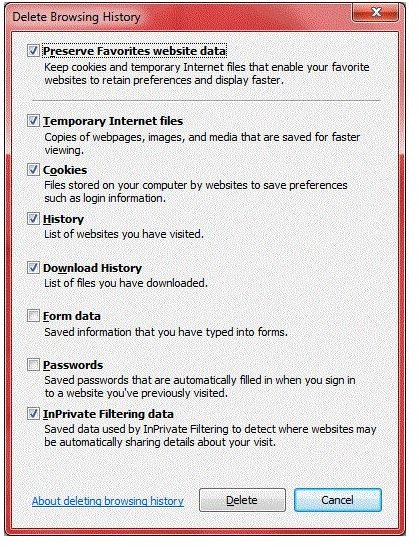
Under Browsing History on the General tab of Internet Options, you can see a button labeled Delete. Once you click on the Delete button, you are presented with a dialog. This dialog contains several choices that allow you to delete just what you wish to erase from the computer.
As shown in the figure below, you can delete cookies, history of websites you visited, passwords, form data (data that IE9 automatically fills in when you are presented with a form on any website), and more. Just select the ones that you want IE9 to remove from the computer and click on Delete. Remember that the first option in the Delete Browsing History Dialog is to keep the cookies for sites that you have marked as favorite. Internet Explorer offers this option so that you can select the option to keep the cookies and thereby, not having to type in the ID and password for these favorite sites. If you feel that it is a threat, you can go ahead and uncheck the option to delete the login information.
Once you click on Delete, IE9 will take few seconds to erase the data off your computer. You can also use third party junk cleaners such as CCleaner or Comodo System Cleaner to delete history. However, these third party junk cleaners don’t give you the option to keep the cookies containing login information for your favorite sites. If you are using third party cleaners and you wish to keep the login information, you have to change the settings of these programs to keep all the cookies.
Having understood using IE9 to delete history, let us now talk about using InPrivate browsing that claims to leave no traces of browsing history.
IE9 Delete History - Using InPrivate Browsing
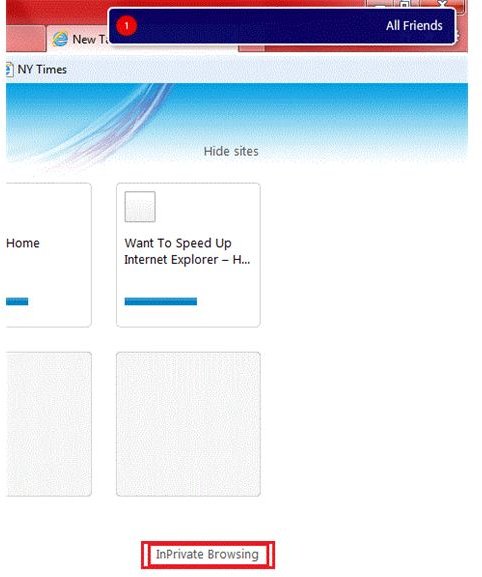
The easiest way to force IE9 to delete history is to use InPrivate Browsing. This feature prevents IE from collecting any data for local storage and even if it needs to store any data, it has to delete the data as soon as you close the InPrivate browsing window. To initiate InPrivate browsing , open a new tab and click on InPrivate Browsing towards the bottom-left corner of the new tab window in IE9.
The trick is to set the IE9 home page to something common such as Google or MSN so that when you open the browser, it shows only the home page. Without performing any activity on the home page, open a new tab and click on InPrivate Filtering. This opens a new window where you can browse without any fear whatsoever about leaving behind traces. When you are done, simply close the Internet Explorer Windows. No clues are left behind!
IE9 Delete History - Set Up IE to Automatically Remove Traces of Browsing History
If you do not wish to use InPrivate Filtering, you can set up IE9 to delete history automatically. All it takes is few changes to some of the settings of the browser. Let us check them out in this section.
Open the Internet Options dialog from Control Panel or from the Tools icon at the top-right corner of the Internet Explorer 9 window. Once the Internet Options dialog is open, perform the following steps:
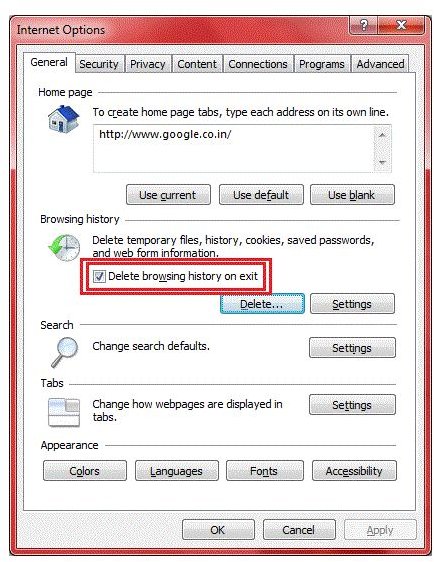
Go to the General Tab. Click to select Delete Browsing History on Exit under Browsing History. Click on Delete… and select the objects that you want IE9 to delete when you close it. The first time you select the objects - cookies, temporarily files, history, etc - you have to select Delete. Make sure you check Temporary Internet Files, History, and Download History. If not checked, these easily give out information on what you have been doing on the Internet. When you click on Delete to close the dialog, IE9 privacy tools delete the selected objects. This is similar to the process discussed in section one of this article.
As you have checked Delete Browsing History on Exit, you need not repeat the process every time. Next, click on the button that says Settings, next to the Delete… button. This opens up a dialog asking you when to update cached pages and how long to store Temporary Internet Files.
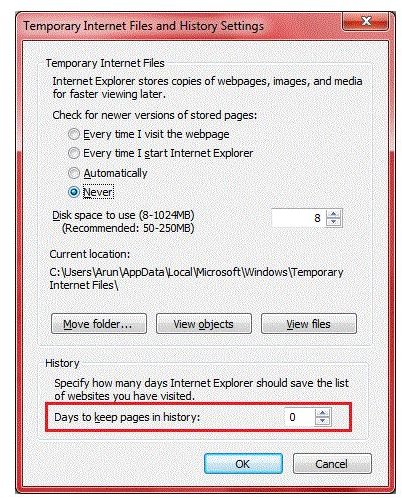
Reach out to the lower part of the dialog that says History. Type 0 in the box saying Days to Keep Pages in History.
Click OK to close the dialog.
IE9 Privacy and Security
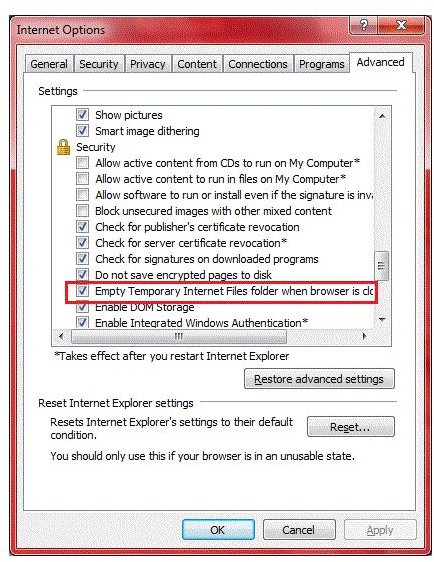
Now that we are done with the General tab, click to select the Advanced tab without closing the Internet Options dialog. Under Settings, scroll to Security and look for Empty Temporary Internet Files Folder When Browser is Closed. Click to check the option. This forces IE9 to delete history by way of deleting all the offline pages that it might have saved for faster access in future. Most browsers are configured to save primary webpages to your hard disk so that they present you with the site more quickly when you visit it again. IE9 is no exception in this case unless you use the InPrivate browsing as mentioned in the previous page. Selecting this option helps you secure your privacy even more should anyone try to open the Temporary Internet Explorer folder to see what you have been doing on the Internet.
Once you set the options discussed in both sections, you can browse without any tension as you are forcing IE9 to delete history as soon as you close the browser. Just remember to close the Internet Explorer 9 after you are done with browsing.
Note: The negative effect of selecting the options in this page is that you will not be able to see the recently visited pages in the new tab window of IE9 as the cache is cleared when you close it. As a workaround, you can always favorite the website or pin it to Windows (if you are using Windows 7). For details on pinning websites, please read our article Pin the Tab to the Taskbar in IE9 Beta .
This post is part of the series: Internet Explorer 9 - Tips and Tricks
This series on Internet Explorer 9 offers you several tips and tricks to enhance your browsing experience. It tells you how to make Google the default search provider, how to use the Address bar for convenient browsing, and covers IE9 shortcuts key among other information.


