This Excel tutorial takes a look at the different ways to add the date and/or time to a cell in a spreadsheet. One method will keep this information fixed, and the other will allow these values to be updated whenever the spreadsheet is recalculated.
Inserting Current Date and Time
There are a few different ways to insert the current date and time into an Excel spreadsheet. Before choosing a method, you should first decide if you want that date and time to be updated each time the spreadsheet is recalculated. That is, do you want whatever is entered now to remain fixed as a mark of the date and time that a task was accomplished? Or, do you want the cell to refresh with new data each time the spreadsheet is used? We’ll look at both cases.
Method 1: Adding a Fixed Date and Time
If you want to input the current date and/or time into a cell of an Excel spreadsheet in such a manner that it does not update whenever changes are made to that sheet, you can use one of the following command sequences.
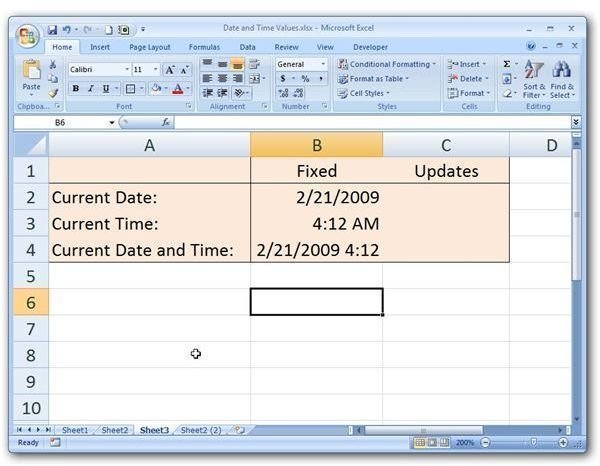
Date Only – Select the cell to which you want to add the date, press Ctrl + ; (the semi-colon key), and then hit Enter.
Time Only – Select the cell, press Ctrl + Shift + ; and then hit Enter.
Date and Time – If you want both the current date and time to appear in the cell, press Ctrl + ; (semi-colon) and then hit the space bar. Next, press Ctrl + Shift + ; and hit Enter.
Note that these values will be displayed in the default format shown in the screenshot below. (Click any image for a larger view.)
If you want to change these formats, you can do so in the standard manner. See the article Changing Date Formats in Excel for more information.
Method 2: Automatically Updating Date and Time Stamp
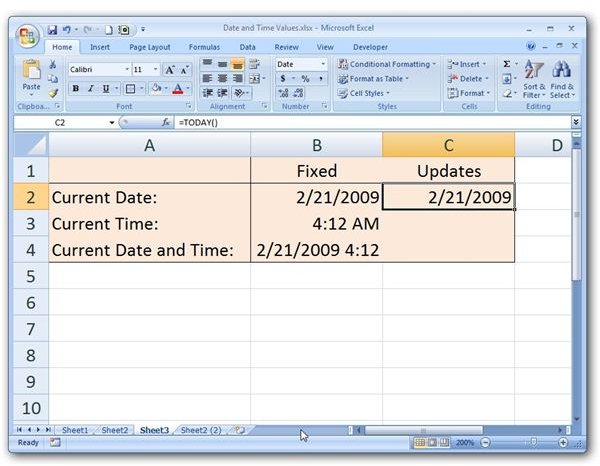
There are other times when you may want to enter the current date and/or time so that it updates whenever the spreadsheet is recalculated. For these cases, we can use the TODAY and NOW functions.
The TODAY function has a very simple syntax: TODAY( ). It will display the current date as shown below.
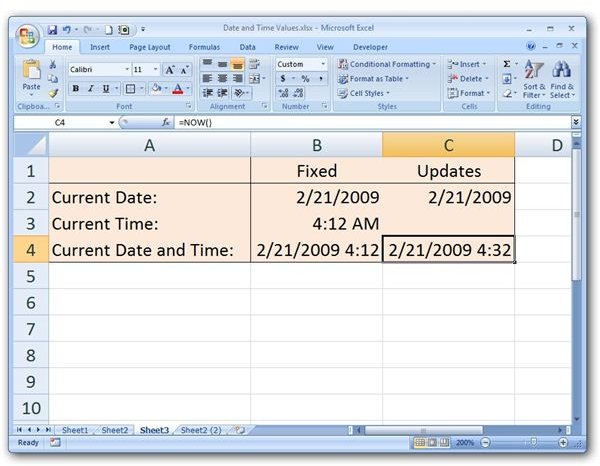
Similarly, the NOW function uses the syntax NOW( ), and it displays both the date and time.
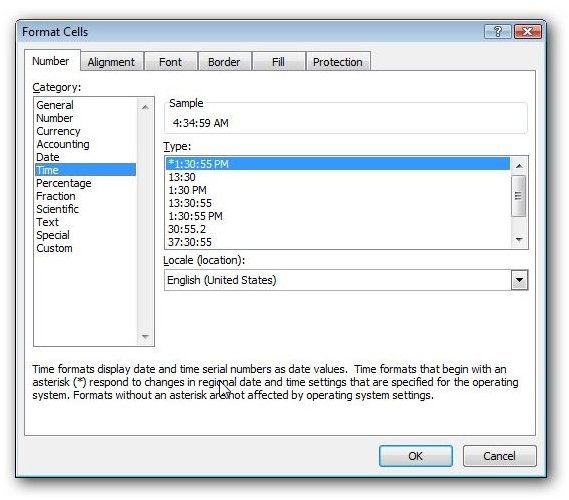
If you only want to display the time, you can still use the NOW function and reformat the cell so that only the time portion of the information appears. That is, after entering NOW( ), right-click on the cell and select Format Cells. When the Format Cells window appears on your screen, click on the Number tab and select Time from the Category list. Scroll through the options, pick the format you want, and then click OK.
For more tips and tricks, take a look at the other items in Bright Hub’s collection of Microsoft Excel user guides and tutorials, including this Excel function guide . Find out how to use the various lookup and reference functions , learn about constructing charts and graphs , read up on data validation tools , and more. Additional items are being added on a regular basis, so be sure to check back often.


