AKVIS Retoucher is a restoration plugin compatible with Photoshop and Paint Shop Pro. In addition to its digital photograph restoration abilities, Retoucher is also capable of removing unwanted items like date stamps. How well does it work?
Preserving Old Photographs
One great way to preserve old photographs is to scan them and turn them into digital photographs. Unfortunately, a lot of priceless old photos have had some pretty rough lives, and it’s not uncommon for these heirlooms to be torn and stained. While it’s possible to fix up these images with photo editing software, restoration techniques can often be extremely time-consuming, complex, and painstaking work.
There are several software applications on the market that are specifically designed to simplify the photo restoration process, and one of these is AKVIS Retoucher, a plugin that is compatible with Photoshop and Paint Shop Pro as well as several other photo editing applications. (See this table for a full list of photo editors that support Retoucher.)
How well does it work? I found an old photograph of Franklin D. Roosevelt and family at the National Archives and Records Administration that seemed a perfect candidate on which to test the plugin since it had a very visible crease mark in addition to a lot of dust-speckled areas. The images below show the photo before and after using Retoucher.
(Click any image for a larger view.)
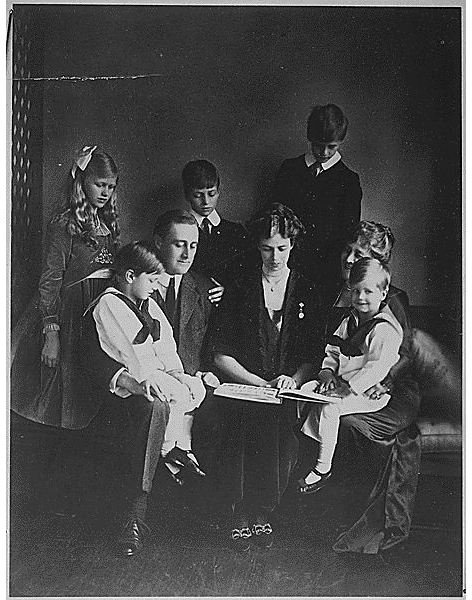

That is a definite improvement, but we still need to determine whether these results are better than what can be accomplished without using Retoucher, how easy the plugin is to use, and a few other matters. Although there is both a Windows and a Mac version of the plugin, we’ll only be looking at the one developed for Windows and testing it in Paint Shop Pro.
Download and Installation (5 out of 5)
Everything went fine with the download and installation of Retoucher. Once it is installed, you may have to add it to your list of recognized plugin locations in order for your photo editing software to recognize it.
Ease of Use (5 out of 5)
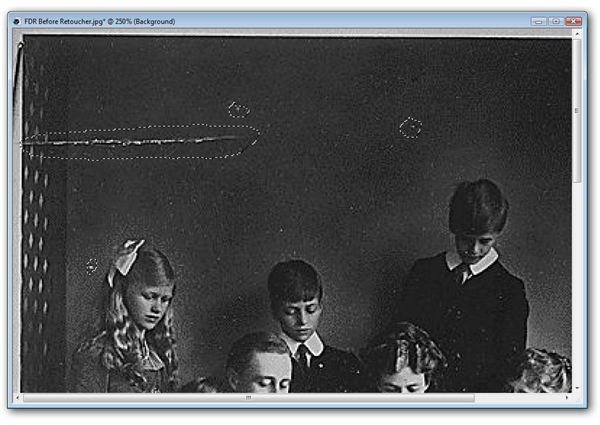
AKVIS Retoucher has a very simple user interface, and it’s fairly straightforward to apply. Before calling in the plugin, you do have to select the areas of the photograph that you want to fix. You can select them and correct them one at a time, but it will save some time if you select multiple areas at once.
After selecting the problem areas, you can access the plugin which will open in a new window.
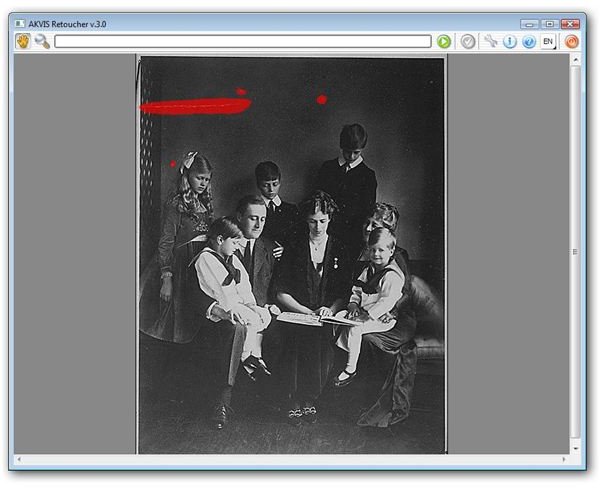
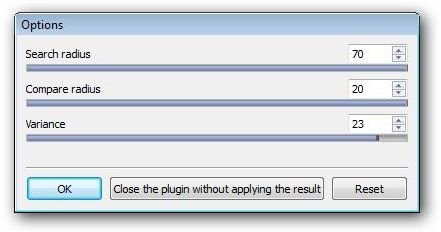
From here, all you have to do is click the green “restore” button to apply the changes if you want to use the default settings. There are only three settings you have to worry about modifying here – search radius, compare radius, and variance.
When you’re ready to apply the changes, just click the “apply button” and you’ll be returned to your image editor with the modified photography. All in all, it’s a very quick and easy process.
Performance (5 out of 5)
In addition to removing stains, tears, and scratches from photographs, Retoucher is capable of getting rid of other flaws, such as date stamps, wires, and unwanted objects as well. To test this out, I used a photograph my mother emailed me (her pictures always have date stamps).

Getting rid of the date stamp itself is pretty easy, but reconstructing the area of the photo that it used to occupy is what can cause problems when only using basic editing tools, especially in this particular photo where the background behind the date stamp is somewhat complex. Here’s the result I obtained after selecting the date stamp as a single object and applying Retoucher.
Again, that’s a pretty decent result, but how does it compare with other editing tools like the object remover tool in Paint Shop Pro ? The problem with trying to use the object remover tool here is that the background is complex enough that the date stamp would need to be broken down in a whole lot of little parts, one for each change in texture and color of the background. This process could take an hour or more. In contrast, the entire date stamp could be selected when using Retoucher. With Retoucher, removing the date stamp took less than a minute.
I also tried using the scratch remover and blemish removal tool to see how they would fare in this photo. Just as with the object remover, both could probably do the trick if you had an hour or more to spend, but neither was offering any real shortcuts.
Price to Value (3 out of 5)
The Home license for AKVIS Retoucher is $87, and the Business license runs $98 for either the Mac or Windows version. Each license does allow you to install the plugin on two separate machines so that does help mitigate the price a bit.
While this wouldn’t be a bad price at all if Retoucher was available as a standalone product like AKVIS Magnifier , it is somewhat on the high side for a plugin. However, it is excellent at what it does, and if you do a lot of restoration work, the time saved by Retoucher could easily make the price worthwhile.
Overall Rating (4 out of 5)
The performance of AKVIS Retoucher is extremely impressive, and it’s one of the easiest plugins to use on the market today. The only thing holding me back from giving this a 5 as an overall rating is the price, which isn’t that bad if you’re able to get a lot of use out of the product, but does push the application out of buying range for the casual user.
If you want to try Retoucher out for yourself, you can download a free trial of the plugin from the AKVIS web site. This 10-day trial version is fully functional, so you’ll be able to see everything it’s capable of before deciding to buy.
Also, be sure to check out the other items in Bright Hub’s collection of Paint Shop Pro tutorials and plugin reviews to find out about more tools available for your photo editing projects.


