
If you need to display text larger than the default sizes there are various ways to do this in Microsoft Office and Windows 7.
Large Text is Not a Problem in MS Office 2010
If you’re expecting to share your work with people who require large text to be able to read clearly, Microsoft Office 2010 will allow you to configure this in just a couple of keystrokes.
However, it is much easier to fit this formatting change into a Microsoft Word document than into an Excel document. While a PowerPoint presentation will be projected onto a screen in most cases and will therefore be easy to read, an Excel spreadsheet will more than likely lose its layout and formatting in order for the large print to be displayed clearly – or else have no text in it at all!
Therefore the key is in finding the right balance between applying large fonts and using Windows accessibility options.
Applying Large Print in Microsoft Office Word 2010
There are different ways of improving the visibility of text in Microsoft Word 2010 to make it suitable for different situations.
For instance, if you are interested only in increasing the size of the text while you are editing a document you can use the Zoom in tool in the lower-right of the window (something that is present across Microsoft Office applications), a function that is replicated by holding down CTRL and rolling your mouse wheel back and forth.
The most obvious way of applying large text in Microsoft Office Word 2010 – possibly in advance of printing a document that would need to be in large text – would be to press CTRL+A to select all text in the document and then use the Home > Font > Font Size tool, perhaps changing from the default 10pt font size to 18pt or 20pt.
Note that as you hover your mouse over these other options, the new size will be previewed.
Using Windows Accessibility Options
Various accessibility options can be applied to assist with the viewing of large print or simply clear text in Windows and Microsoft Office. By default, Windows 7 offers a keyboard shortcut that can be used to apply a high contrast mode (basically it flips the colors so the white Microsoft Word background becomes black and the text white, for instance) and this can be activated and deactivated by pressing left ALT+SHIFT+PRINT SCREEN.
Meanwhile a much more effective general magnification option is also available, something that makes viewing Excel spreadsheets and Access databases much easier than resizing or zooming.
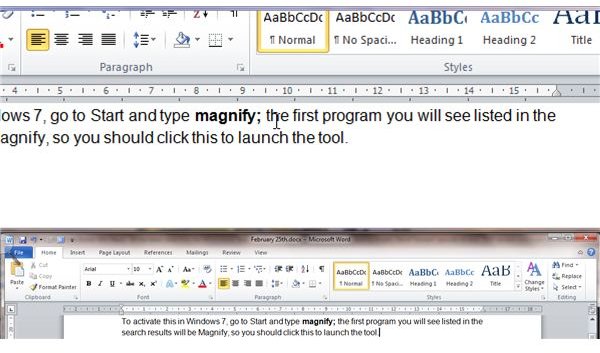
To activate this in Windows 7, go to Start and type magnify. The first program you will see listed in the search results will be Magnify, so you should click this to launch the tool.
Magnify has three modes, activated via the Views drop down menu: Full Screen, Lens and Docked. Full screen means that you will need to move your mouse around in order to enjoy the full screen as everything is magnified, while Lens mode only displays magnification around your mouse pointer.
Probably the best option for Microsoft Office tasks is Docked, which you can see in action in the image on the right. Docked mode displays the area around your mouse pointer in a docked area at the top of your desktop area, allowing for easy display of large print in your Microsoft Office 2010 application or indeed any standard Windows software.
References
All references and screenshots: Microsoft Office Word 2010 and Windows 7


