The answer to the everlasting question: How can I make my computer load faster? A few tips and tricks to help you make your Windows 7 operating system boot faster and smoother.
Windows 7 Optimization Tips
It has been a while since Windows 7 was released by Microsoft and many people are now using the operating systems. As we all know, the longer you use an operating system like Windows, the longer it will take to start it up as you gradually install more applications, games and utilities. We all remember the first time we have started up our new freshly installed Windows 7 computer and we loved the way it started up for the first time getting to the graphic interface within a few seconds.
Many of you are trying to answer the never ending question: How can I make my computer load faster? In this article I will try to give you a few tips on how to make your windows boot faster and use less resources in order to minimize the boot time and make your computer run faster and smoother.
BIOS Optimization Steps
A good place to start with the optimization would be the BIOS . Even if you did not think of it, the BIOS of your computer plays also a role in how fast your operating system, in our case Windows 7, will load and start up.
Typically, right after you power up the system, a short message will be displayed. Something like :
- Press F10 to enter setup
- Enter BIOS by pressing F2
- Press DEL to enter BIOS setup
You will then enter into a menu where you can change a variety of settings for your computer.
A few things that you could look after in the BIOS are:
- Quick Boot Optimization - Enable it if it is there
- Serial Ports - Disable them if you do not use any serial device
- Parallel Ports - Disable them if you don’t use them
- Boot up Floppy seek - Disable this option because no one uses Floppy Disk Drives anymore
- Disable any built in components that you are not using
This are just a few general tips that might not be available on all the computers, please refer to your user manual for any other features that your BIOS might have, in order to optimize the performance.
Some more advanced users might also choose to perform a BIOS upgrade with a new firmware that might introduce new features in order to increase the system performance.
Optimize your Hard Disk Drive
A very important component in the boot process it is the hard drive of your computer. A faster hard drive will decrease the boot time of your operating system and increase performance. Also a clean and defragmented hard drive will make the computer load faster and run better, therefore an important part of the optimization it is the Hard Drive defragmentation process.
In Windows 7, this can be simply done from the graphical interface as follows :
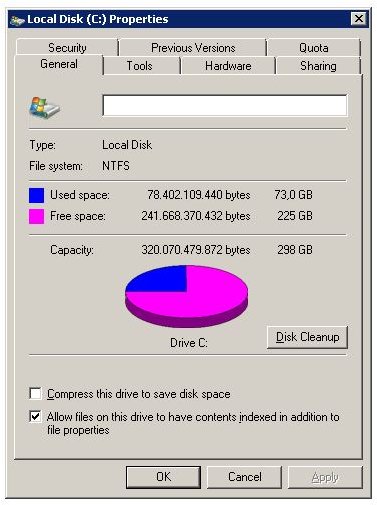
Press the “Windows Key” + D. This will bring you to your desktop. Double click the “Computer” icon. This will bring up the list with your disk drives. Let’s assume that your system drive it is “C:” . Select the “C:” drive, right click it and select “Properties”.
You will see something like the image on the right side.
As a first step you can click the “Disk Cleanup ” button. A new window will open where you have the possibility to choose some options for your disk cleanup process.Beside the default selected options I would recommend selecting also:
- Temporary Internet Files
- Offline Web Pages
- Recycle Bin
Now press “OK” then on the next dialog press “Delete Files”. The cleanup process might take some time so please be patient. If you are using your system mainly for games and do not tend to search items on your hard drive so often, another thing you could do is to disable the disk indexing. This can be dine by unclicking “Allow files on this drive to have contents indexed in addition to file properties”
After the process is completed you will be returned to the first screen with the Hard Disk properties. Go to the “Tools” tab and press “Defragment Now ”.
A new window will now appear showing you the disks available on the system and the last date they have been defragmented. Select your “C:” drive and just press “Defragment Disk ”. Depending on your hard drive size this might take a couple of hours to complete.
Keep your Windows Registry cleaner than others
Windows registry is a database that contains a lists with all the settings and configurations of your operating system and it’s determining what your system should act like and run. After longer periods of time, when you install and again uninstall software, make changes to your system, settings that are no longer used may still be hold within this database that will grow in time. This unused entries can be removed in order to increase the performance.
For previous operating system, the registry defragmentation has been an important step into speeding up your computer start-up time but with Windows 7 the things changed a bit and Windows handles this job quite well by itself, so we won’t quite need to defragment the registry but we could optimize them and remove any unnecessary entries that would slow down our computer.
For this job I would recommend using CCleaner which does this job quite smooth and it is also a freeware. You can read more about this wonderful tool here .
Use the Microsoft System Configuration Utility
Like in the Windows XP, the Windows 7 Operating System has also built in the “Microsoft System Configuration Utility” or better known as “Msconfig”. MSConfig can help you modify which programs run at start up in order to decrease start up time and free some up some system resources. With more programs loading at startup, more resources are used and it will take longer time for your computer to load slower. In order to make your computer faster and decrease the startup time we can use MSConfig to remove any unnecessary entries from your startup configuration.
To launch MsConfig , simply go to “Start” and type “Msconfig” in the search field and double click the “msconfig.exe”. If you have the “Run” option enabled, just type “msconfig” in the “Run” field.
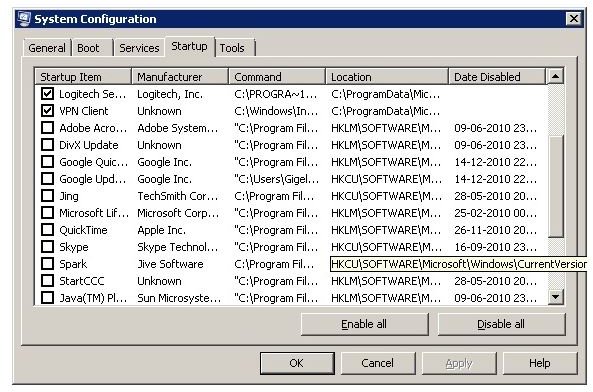
Navigate to the “Startup” tab and check what programs it’s your system loading at startup. Disable any programs that you don’t want to start up automatically every time you start up your computer. Some examples might be :
- Itunes Helper - Maybe you don’t use your iPod every time you start up your machine
- Programs that check for updates for some software that you only use once in a while
- Quicktime
- RealPlayer update software
- Skype - if you don’t use your Skype every time you machine starts up
- Java TM Platform
- Video Camera software
- Any other software that does not need to start up every time your machine is loading the operating system
After you removed the unnecessary entries just press “Apply” or “OK”. Next time your computer is starting up it will no longer load this programs which will render your startup faster and boot time shorter.
Optimize your Windows Services
By default, Windows 7 will start many services at startup. Some of the services are necessary in order for the system to run properly but others can be safely disabled or set to start manually instead of automatically. Disabling the unnecessary services will increase the computer performance and make windows load faster which is also our goal.
To view the list of services running on the machine simply go to Start and type “services.msc” in your search field, then press Enter. A new window will pop up showing you a list of services available on your computer. Some of them are in the Running state, some are stopped, showing nothing under the status. Now in order to change the change the Startup type of a service, select it, right click it and select Properties. There you will have the option to choose between 4 Startup types: Automatic (Delayed Start), Automatic, Manual and Disabled. You will also have 4 buttons where you can Start / Stop / Pause or Resume the service.
For safety reasons I recommend setting the services to Manual startup and not to Disabled.
In order to set the service to Manual startup you can select Startup Type: Manual and then stop the service.
If your computer is not used to share files and resources with other computers in your home you can safely change the following services to manual startup:
- Distributed Link Tracking Client
- Computer browser
- Routing and Remote Access
- Function Discovery Provider Host
- Function Discovery Resource Publication
- Internet Connection Sharing (ICS)
If you are not planing to share and stream media files from your computer you can also safely set the following services to manual:
- Media Center Extender Service - Allows Media Center Extenders to locate and connect to the computer.
- Windows Media Player Network Sharing Service
If you are not using IPV6 , you can also safely disable the IP Helper service**.** If any of the services became necessary for the system they will be started up by the system or the startup mode will be changed accordingly by an automated configuration.
Some other services that can be safely changed to Manual startup are :
- Application Experience
- Diagnostic Policy Service
- Portable Device Enumerator Service
- Print Spooler
- Remote Registry
- Tablet PC Input Service
- TCP/IP NetBIOS Helper
- Windows Search
If you are not using any Themes you can also stop and set the “Themes” service to manual. Please note that all of the Themes and Visual effects you are using on your system will take up some of your system performance.
Optimize your System Performance
I know that one of the reasons many of you have upgraded to Windows 7 from Windows XP are all the new cool features and gadgets that Windows 7 has to offer, but let’s not forget that everything comes with a cost. The more gadgets you run and the more customizations you employ, the more resources it will consume in the process of making the Windows 7 graphic interface more pleasant to your eye.

Go to “Start” and go with the mouse over your “Computer” and select “Properties” or press Windows Key + D, select “Computer”, right click it and select “Properties”.
You will see an image like to the one shown here on the right side. Now go and press “Advanced System Settings”, select the “Advanced” tab and for the “Performance” menu press “Settings”. You will have some options to adjust the Visual Effects your machine. Go on and select “Adjust for best performance”, then click Apply. Windows will now adjust the visual effects of your machine in order for you to get the best performance out of the system.
Summary and a Few Last Tips
Now, I have given you a few simple tips on how to optimize your machine to increase the boot time and performance. There are many other things you can change to your system in order to make it faster but this article was meant for the simple computer user that wants to squeeze some more performance out of their home computer.
The basics of having a machine load fast, boot fast, run smooth, are quite simple:
- Keep your machine updated with the latest updates from Microsoft
- Keep your Hard Disk defragmented and clean your temporary files often
- Keep your browser cache size to minimum
- Uninstall any unnecessary software and unused programs from your machine
- Limit the number of programs that start up at the same time with the operating system
- Scan your computer for malware and trojans


