You have your first telescope. Whether it was a gift or you purchased it yourself, there is a curve to learning to use your instrument. You need tips on learning to use your telescope so you can enjoy it faster, and get the greatest pleasure from seeing the wonders of the heavens.
Get Familiar with Your Telescope
I know you’re anxious to point your ‘scope to the heavens and see the celestial wonders. But let’s first gain some familiarity with it so we have a modicum of understanding of how to use it.
I hope you have a reflector, as that gives you more light gathering bang for your buck. Still, what we say about using a telescope applies to both reflectors and refractors.
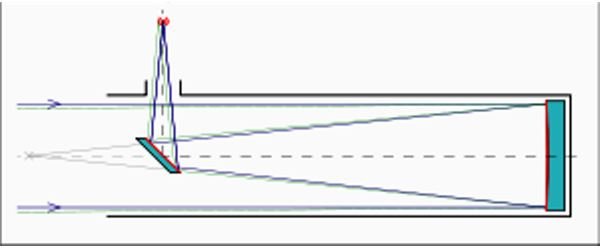
With a reflector , light is gathered by a mirror and reflected to another small secondary mirror that directs it to the eyepiece. The eyepiece is a very important component, and we will discuss it later. In a refractor , light is gathered by a lens at the front of the ‘scope which directs it to the eyepiece at the rear.
The eyepiece is held in an eyepiece holder that has a rack-and-pinion movement. You use this to move the eyepiece up and down to focus the image.
There are two terms you need to be familiar with related to your telescope. These are aperture and focal length (fl). Aperture is the size of the mirror or lens. Focal length is the distance the light travels from the mirror or lens to its focal point at the eyepiece, referred to as its f-number. You multiply the f-number by the aperture to get the focal length. A typical reflector has a six to eight inch mirror and is an f6 or f8. The f6 then would have a fl of 36 inches; the f8 of 48 inches.
The typical refractor has a 60 mm lens—about 2 inches, and is an f10. This gives it a fl of 20.
Where the Stars Are
Well, of course they’re in the sky. But there’s a way to find individual stars—and planets. On Earth, we navigate by longitude and latitude. Longitude gives us our position as we travel east and west by a series of imaginary lines drawn from pole to pole. Latitude gives us our position as we travel north and south by another set of imaginary lines parallel to the equator.
We can transfer these imaginary lines to the sky, as shown below. But impressed upon the heavens they are called Declination and Right Ascension, or RA. Declination equates to latitude, RA to longitude. On the celestial sphere, declination is measured in degrees, minutes (’) and seconds ("). RA in hours, minutes (’) and seconds ("), as shown below.
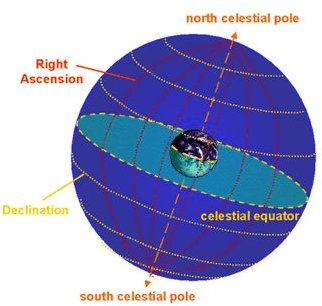
It is important that you know these terms because star finder charts give you the location of stars in declination and RA. To find specific stars or star groups, such as Orion or Gemini , you will point your telescope to those coordinates. The chart below shows the location of Sirius .

Your Telescope Mount
Unless you purchased a hand held Rich Field instrument your telescope came with a mount—that is, some device that supports it and puts it at an easy viewing height. If it is a less expensive ‘scope, it most likely came with a variation of a camera-type tripod. This is an altazimuth mount. That’s a contraction of altitude and azimuth, meaning the telescope can move up and down and left and right.
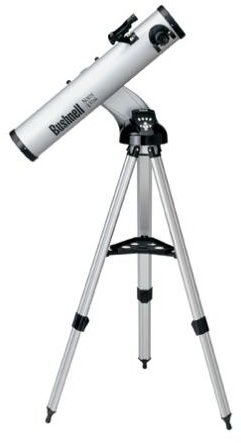
This is the simplest type of mount, and fairly easy to set up and use. It probably came with setting circles showing declination and RA, so you can point your ‘scope to a specific object.
However, to use the setting circles, the mount must be pointed true north—at the North Star, Polaris . (This is true of any type mount, as we will see.) This can sometimes be difficult to do. It sounds simple enough. Find the Big Dipper —always easy—draw an imaginary line between the two outer stars of the bowl and continue the line until you intersect with a bright star. You’ve found Polaris!
But there are some latitudes at which Polaris is difficult to find during some parts of the year—mine for one.
A big advantage of an altazimuth mount is that you don’t have to do all this to enjoy your telescope at first. You can just point it at a celestial object and enjoy the excitement of seeing a planet or nebula as more than a point of light (but please don’t expect what you see to look like Hubble pictures).
But the altazimuth has a related disadvantage. Because it moves in two directions unrelated to the way the heavens precess across the sky, any object in your field of view will quickly move out of view. And for the same reason, it is difficult for you to follow the movement of an object. Now you can buy computerized motorized drives for altazimuth mounts that track the motion of the celestial sphere and so keep an object in view. FYI—they cost more than your telescope did—by a lot.
There is one type of altazimuth mount that is much simpler to use than the tripod based mount. It is a Dobsonian.
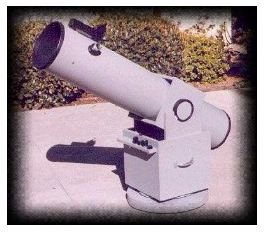
This is used strictly for larger reflector ‘scopes. The mirror end of the ‘scope rests on the mount, and it is very easy to move in any direction. It too can be motorized, and the drives for Dobsonians are less expensive in general.
Equatorial Mounts
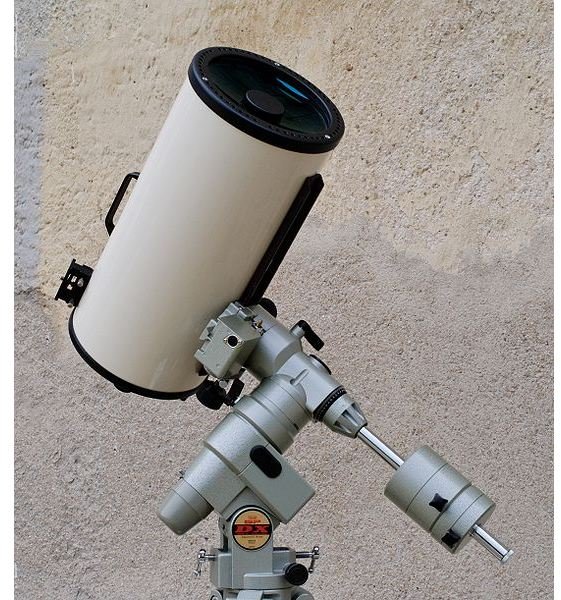
The most popular, and best type mount for any small telescope is an equatorial mount. This type mount is designed to track an object with just a single movement, making it quite easy to keep an object in your field of view.
There are several types of equatorial mounts—the fork mount, the yoke mount, etc. But the most popular for amateur astronomy—and unfortunately the most expensive and most difficult to use—is the German mount. This is a T-shaped structure that rotates about the RA axis. You set it up at your exact latitude, point it at Polaris, and you can easily follow any object with just one movement in RA.
Of course, if you’re using a reflector, you must get used to the fact that the image you are viewing is reversed. If the image is moving to the right, move the ‘scope left.
The Eyepiece
The eyepiece is the part of your ‘scope that sends the light to your eye and magnifies the image so you can see the craters and mountains of the Moon, the rings of Saturn, and the Orion nebula as more than just a hazy blob.
We all want high magnification, but we are at the bottom of 120 miles of active atmosphere, and disturbances in those 120 miles limit the magnification we can achieve to about twice the aperture. .
It is likely you will find that once you have made your trek through the Solar System, you will want to turn your scope to the cosmos, viewing star fields, nebulae, double stars and all the wonders the heavens offer. Now those are views you will never forget. And you don’t want high magnification for that. You want as wide angle a view as possible.
The Learning Curve is Worth it
These tips on using a telescope should make your beginning forays into the cosmos a bit easier. Believe me, the initial work is well worth it in the long run.
Credits
Reflector telescope: Wikipedia https://en.wikipedia.org/wiki/File:Newton-Teleskop.svg
Altazimuth mount: https://www.amazon.com/gp/product/B000087BCB/ref=olp _product_details?ie=UTF8&me=&seller=
Dobsonian mount: https://www.phys.vt.edu/~jhs/dobsonian.html
German mount: Wikipedia https://en.wikipedia.org/wiki/Equatorial _mount
Eyepiece: https://www.skiesunlimited.net/index.php?CategoryID=56
Declination/RA: Swineburn University https://astronomy.swin.edu.au/cosmos/R/Right+Ascension
Sirius star chart: University of Tennesee at Knoxville https://csep10.phys.utk.edu/astr161/lect/time/coordinates.html
.