Here is a look at the process of bringing WMV files into your Final Cut Pro project.
FCP Media Types
Final Cut Pro is one of the most accessible and quickest growing non-linear video editing systems because of its ease of start and ability to work with a variety of media types. Apple lists Final Cut Pro as having a huge range of accepted media file types from Apple QuickTime -wrapped XDCAM EX media to Sony XDCAM HD to Apple ProRes footage. One thing that Final Cut Pro has had trouble with is the Windows Media Video files, mainly because Final Cut Pro is from Apple and for Mac systems exclusively. If you have tried importing WMV files into Final Cut Pro you will find that this is easier said than done, and you need an exterior process to make this work. Here is an easy tutorial on importing WMV files into Final Cut Pro in a trouble-free way.
HandBrake
The simple answer to importing WMV files into Final Cut Pro is that you cannot do so without first converting it. This is an easy process, and you will likely want to convert WMV files to MP4 as long as they are not DRM. To do this, you will want to use an outside video compression program, and one that is built to convert WMV files to MP4 right from the start.
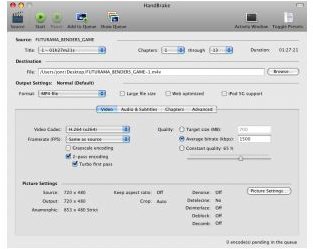
HandBrake, which is often only used to rip DVDs to your computer , is actually at its core an easy to use video conversion software. As one of its built-in presets, it is designed to convert WMV files to MP4, which will quickly solve your video editing problem. Once you download HandBrake for free, go ahead and identify the file that you want to convert to MP4. This will essentially allow you to select the preset file type that you want, which is MP4, and a location to export it to. You can also adjust the output video’s specs, but you really want to maintain both the perspective and quality of the original file. Though this type of conversion is often called “lossless” to indicate that there is no quality loss, you are not going to get everything as it was. To maintain this, you want to make sure that the highest possible settings are there for the conversion.
Import to Final Cut Pro
Once the converted MP4 file is exported from HandBrake, you will want to import it into Final Cut Pro to make sure that it has transferred over
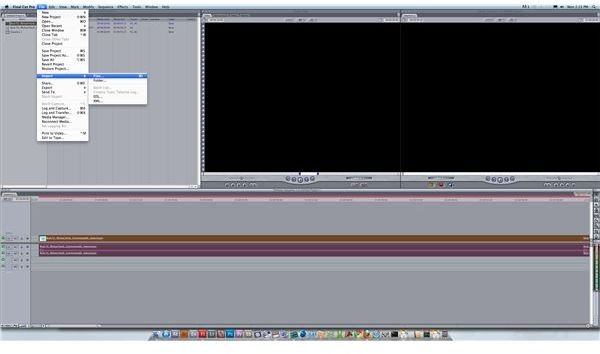
correctly. There are times that this can be an issue, especially around audio, so you want to check it as soon as it has finished. In general, you should have a comparable file and you can go ahead and work with it in your editing process just as you would with the WMV file. You should test it out before you set a batch of WMV files to convert to MP4.
References
Based on author’s own experience.
Final Cut Pro technical specifications: https://www.apple.com/finalcutstudio/specs/
Photos: Screenshots by Shane Burley.
This post is part of the series: The Best Final Cut Pro Tutorials
Here is a look at even more Final Cut Pro tutorials to get you started.


