
Looking to learn a new trick in Photoshop? Trying to get yourself a little more comfortable with the program? Great! This tutorial combines tricks taught in previous Photoshop Basics lessons. Follow along with this Photoshop chain tutorial as I teach you how to make a great looking realistic chain.
Looking to combine some of the lessons you’ve learned in Photoshop to actually create something? This Photoshop chain tutorial will teach you how to combine basic steps such as setting up a grid and using layers and layer styles to create a realistic chain that can be used for several different projects. This tutorial was written using Photoshop CS4, but will easily work for all versions from Photoshop 7 and upward. Let’s begin!
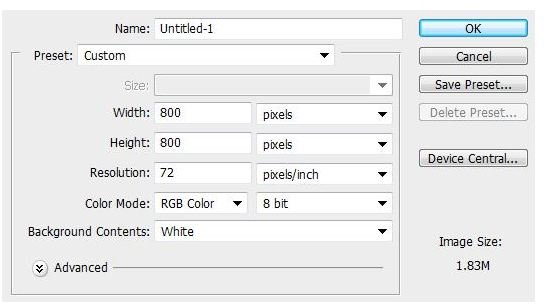
Open a new document, and make it 800 by 800 pixels so you can follow along as I go.
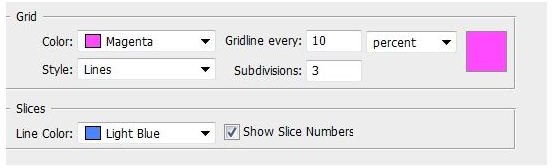
Now, set up your grid to have a gridline every 10 pixels and 3 subdivisions. (Note: You don’t have to make your grid pink. I just think it stands out a little better against the grey lines of the paths that we’ll be using later.) If you’re unsure of how to set up your grid, check out my Photoshop grid tutorial.
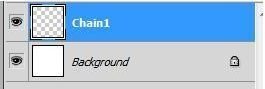
Create a new layer and name it Chain1. This is to help you keep things organized for later on. If you’re not sure how to set up layers, check out my Photoshop layers tutorial as well.
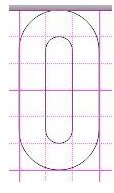
With Chain1 selected as your active layer, grab your rounded rectangle tool and set it to “Paths” with a radius of 40 pixels

.
Now, all you have to do is click and drag your rounded rectangle in one of the boxes in the grid. Start at the top corner of a box, and drag downward so it is one box (three subdivisions) wide, and two boxes (six subdivisions) tall. See picture below for example.
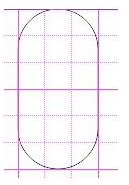
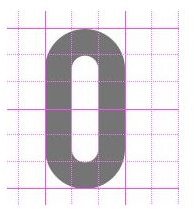
Now, inside of the chain, create another rounded rectangle. This time, start in the middle subdivision square and drag it only one subdivision wide. See the picture below for the example:
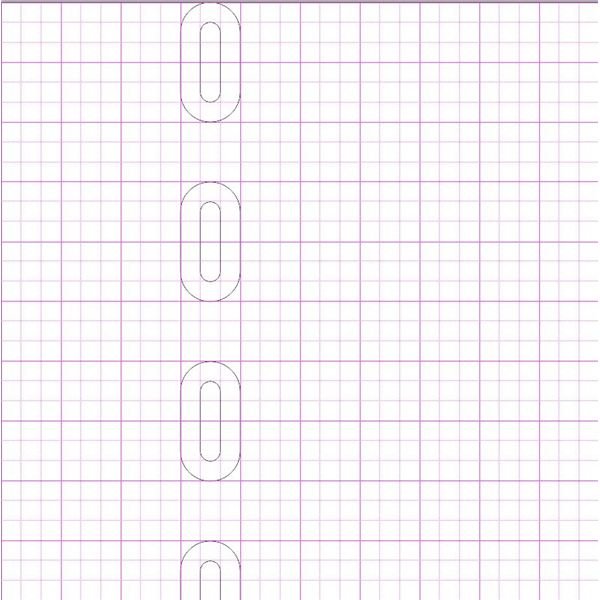
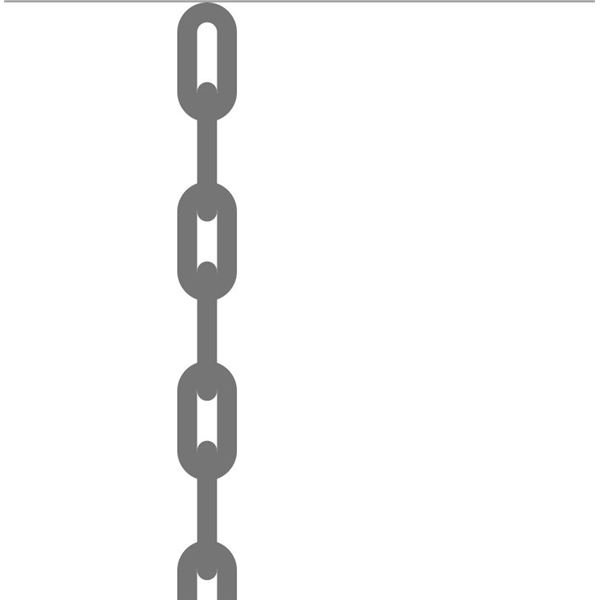
See how this looks like a completed chain link? Great! Now, skip the next one grid box (three subdivisions), and create another. Continue until you run out of space. It should look like this. (You should get three and a half links in total!)
Now, fill in your path with a grey color. If you want to follow me exactly to the T, you can use #757575, but it’s not required. Go with what you like!
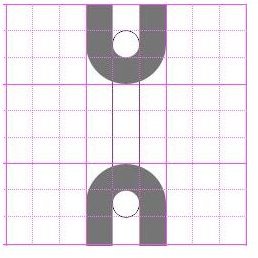
Create a new layer named Chain2, and make sure it’s your active layer. Then, take your Rounded Rectangle Tool again, and drag it from the bottom of one chain to the top of the other. It should overlap slightly, as though the chain links are connected. See the picture below for example:
Do this for all of your chain links, and then fill them with the same grey as before. You’ll now have a rather flat chain to work with. (By the way, from this point on out, you can feel free to turn off the grid if it helps you work better. It does for me!)
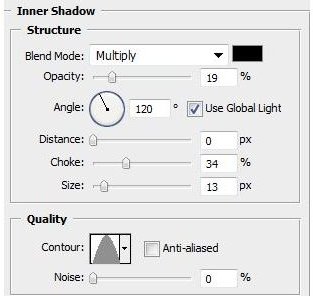
To add a slight amount of realism and make the links stand out better, I’ll show you some nice layer styles to add. Open your Layer Style panel and change the following settings in your Inner Shadow tab:
Opacity: 19%
Distance: 0px
Choke: 34%
Size: 13px
Contour: Rounded cone
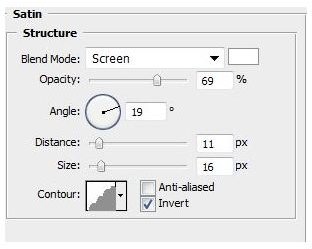
In your Satin tab, change the following settings:
Blend Mode: Screen
Color: #FFFFFF
Distance: 11px
Size: 16px
Contour: Rounded Steps
Now, copy the layer style and paste it onto the Chain2 layer. That concludes this Photoshop Chain Tutorial! Your finished product will look like this:


