The more you use Adobe Photoshop, the more uses you find for it. Learning how to use Photoshop is a process that might never end. In this Adobe Photoshop tutorial, you will learn how to use Photoshop to create a name badge. Your Photoshop name badge will reflect your creativity in a new way.
Getting Started
A Photoshop name badge will distinguish you and your team from the ordinary “Sharpie” based name tags found at so many events. You can take a variety of approaches with your badges: you could make badges that fit on buttons, labels, or use them as inserts for pin-on devices. In any case you can create fabulous name badges in Photoshop to change what is often an ordinary and ugly part of a meeting into something creative and fun.
To get started, you will need a computer that meets the minimum requirements for Adobe Photoshop. This Photoshop tutorial uses Photoshop CS4 running on Windows 7, but users with other versions should be able to follow along. There are a lot of different was to make name badges: this is just one example.
Create Your Photoshop Name Badge
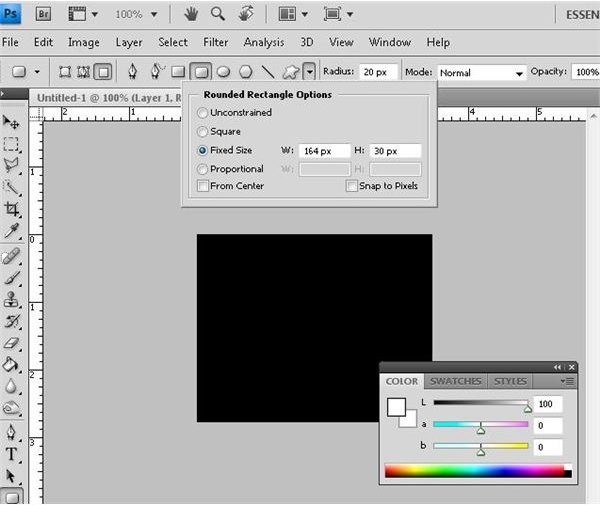
Begin this tutorial with a black art board create a rounded rectangle 164 pixels wide and 30 pixels tall. Give it a radius of 20 pixels, anti aliased. Use the “Rounded Rectangle Options” window to do this.
Once your options are set, click on the art board to place the rounded rectangle.
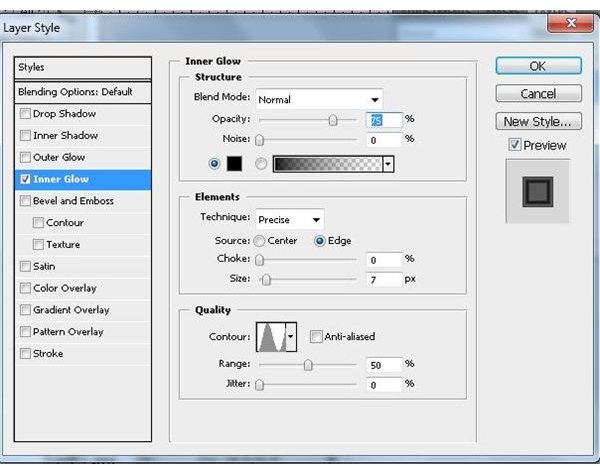
Set the layer style to “Inner Glow” and set “Blend Mode” to “Normal,” “Opacity” to “100%,” “Glow Color” to black, “Technique” to “Precise,” “Size” to “7 px” and contour to “Ring.”
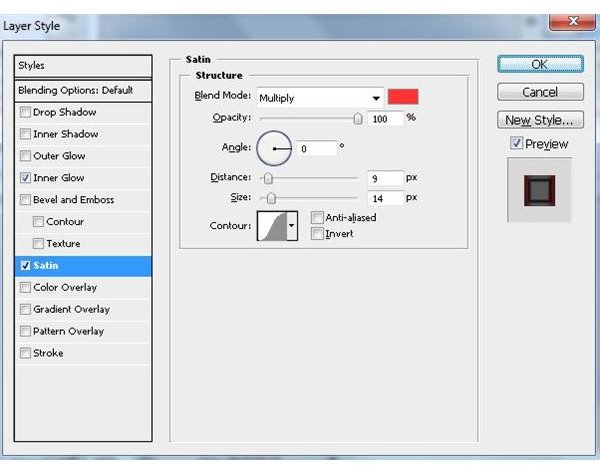
Next, set the “Satin” layer style. Set “Blend Mode” to “Multiply.” Set the color to red. “Opacity” should be “100%,” “Angle” should be “0,” “Distance” should be “9,” and “Size” is “14.” Set “Contour” to “Gaussian.” Uncheck the “Invert” box.
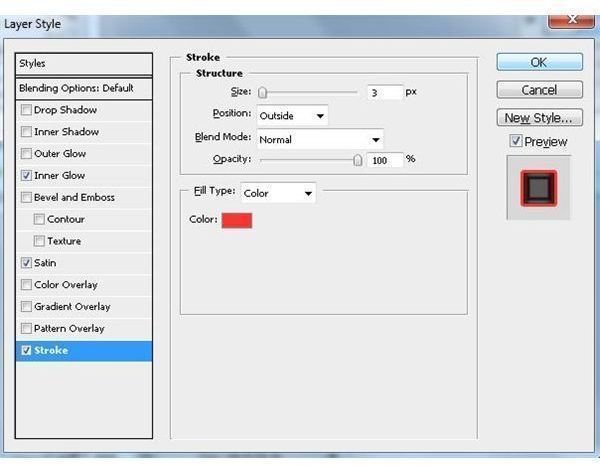
Now, add the “Stroke” style to the layer. Set “Size” to “3,” and fill color to red.
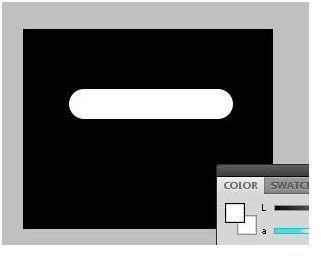
This is what your Photoshop name badge should look like now.

All you have to do now is add your name. Do this by adding a new layer and then typing the name so it fits in the inner white portion of the badge.

Once you add your name, you can alter the colors and make other changes that you would like. If you need more space, make the rounded rectangle taller so you can add a second line. Once your design has been finalized, you can print your name badge on labels or on perforated sheets.
Now that you know how to use Photoshop to make a stylish Photoshop name badge, try different layer effects and styles to see how they change the appearance of the badge. If space permits, you could expand the size of the rounded rectangle to allow placement of a logo, photo, or other image. The powerful tools available in Photoshop explain why it is one of the best image editing products available.
Image Credits: Screenshots taken by Bruce Tyson


