
Create your own personalized postcards for Christmas. In this tutorial, I will show you how to create Santa Claus and Puppy Dog postcards for Christmas.
Christmas Postcards Step by Step
In this tutorial, I will show you how to create Santa Claus and Puppy Dog Christmas Postcards using Microsoft Word. These postcards have a cute graphic of Santa Claus delivering a present with a puppy dog biting his tail. It is really cute. The edge of the postcards are trimmed in a red border.
This is a three part tutorial. In part one, I will show you how to create the table and border part of the postcards. In part two, I will show you how to insert the graphic, add the text, and create more postcards on the same page. In part three of the tutorial, I will show you how to create matching envelopes for the postcards. Bear in mind, you can choose any Christmas graphic you like and follow these same steps.
Step 1 – Saving the Graphic to Your Computer

The first step is to save the graphic to your computer. Look above and you will see the Santa Claus graphic. Click the graphic to open it. Then right click on the graphic and click Save As or Save Image As from the menu that drops down. When the box opens, save the file as santaclaus or something along those lines. Then click the Save button.
Step 2 – Creating a Table and Border for the Postcard
Open your Microsoft Word program and insert a new table. Go to the top of your window and click Table > Insert > Table. In the table properties box, change the number of columns to two and rows to one. Click OK to insert it.
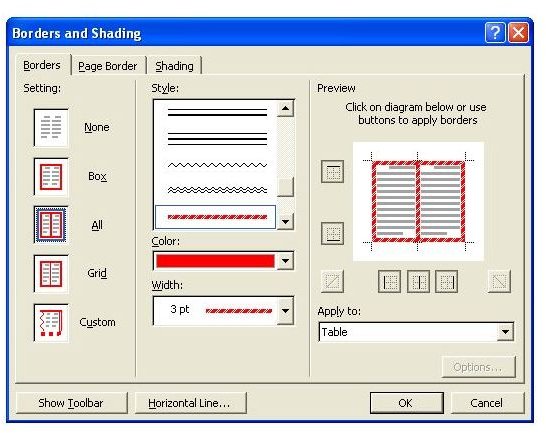
Now you will need to change the border properties of the table. Right click in the table cell and click Borders and Shading in the menu that drops down. In the borders and shading box, you will need to click the Border tab at the top of the window. Then you will need to apply the following to the fields. If you get lost, please click the image to the left to get a visual of how the properties should look.
Settings – Click the All box.
Style – Please see the image for this option. It has no name.
Color – Red
Width – 3pt
Apply To – Drop the box down and select Table.
Click OK once you have your properties changed. That is your Santa Claus and Puppy Dog Christmas Postcard boder.
Please continue on to part two of this tutorial to learn how to insert the graphic, add the text, and create more postcards on the same page.
This post is part of the series: Christmas Postcards and Envelopes in Microsoft Word
This series will show you how to create personalized Christmas postcards and matching envelopes in Microsoft Word.


