
The spiral tool is what allows you to create different types of vines and swirls. In this tutorial, I am going to introduce you to the spiral tool in Illustrator. I will show you how to use the spiral tool, change the color of the spiral tool, and more.
Illustrator Swirl Tool
The Spiral Tool is often used to create vines and floral graphics. You can use the Swirl Tool for other things too. This tutorial will show you how to create a swirl, change the color of a swirl, and change the form of the swirl. I will also explain the options in the swirl box. Take a look at the image to the left to get an idea of what you can do with the swirl tool. Open Adobe Illustrator and create a new document to work on.
Locating the Swirl Tool and Understanding The Swirl Options

First, we will need to locate the Swirl Tool. In the toolbar on the left, you will see the Line Tool. Click the Line Tool and hold it with your mouse. After a second or two, the menu will expand. In the menu you will see the Spiral Tool. Click the Spiral Tool to select it.
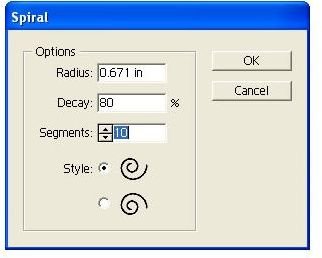
Now we will take a look at the Swirl Tool Options box. Click your mouse on the document and the swirl tool options box will open. You will see three fields in this box, the radius, decay, and segments. Below that you will see the style field.
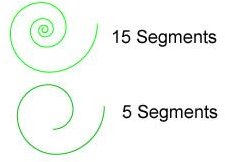
The radius determines the size of the swirl. If you enter 80 in this field, you will have a large swirl. If you enter 20 in this field, you will have a small swirl. The decay field determines how curly the swirl will be. The higher the number, the curlier the swirl. The segments field determines how many points you will have in the swirl. The more points, the more swirls you will have. Look at the image to the right to see the difference in points. The style field determines which way the swirl will start.
Drawing a Swirl
Now we will draw a swirl. With the properties box open, enter the following in the fields. Radius – 1in, Decay – 80%, Segments – 10, Style – First Field, click OK on the box. There is your swirl. Now you can draw a swirl using your mouse. Click your mouse on the document and start dragging it. You will see the swirl while you are drawing it.
Changing the Color of the Swirl
You can use a color fill and color stroke on the swirl but most swirls are created with just a stroke color and no color fill. To apply a color fill, click the swirl, double click the color fill box and select the color that you want to use. Do the same for the stroke color. Instead of clicking the color fill box, click the stroke color box. To apply only a stroke color, change the color fill to transparent.
Applying Brushes to the Swirls
You can also apply a brush style to the swirls. Open your Brush Panel and locate the brush that you want to use. Click the swirl to select it, then click the brush that you want to apply to it. You can change the size of the swirl by changing the stroke size in the stroke panel. To find out more about using brushes, please see this tutorial .
Note:
When entering a size for the radius, make sure you type in for inches or px for pixels. There is a big difference. If you type 80in, you will have a huge spiral, where as 80 pixels, is a fairly decent size.
Image Credits
Swirl Background - https://www.scenicreflections.com/files/Flowers _and_vines_Wallpaper_1rgxi.jpg
All screenshots were taken by the author for educational purposes only.


