In this part of the Illustrator series, I am going to show you how to use the gradient tool found in Illustrator. At first glance, it will appear difficult, but I assure you it is not difficult at all.
Getting Started
The gradient tool in Adobe Illustrator may seem a bit difficult to new users. It sure was for me, but once you use the gradient tool one time, you will be applying gradients to everything. This tutorial will show you how to use your gradient tool in Adobe Illustrator. First, you will need to open your program and create a new document to work on. Go ahead and draw a square to use for this tutorial. We will apply the gradient to the square.
Locating and Understanding Your Gradient Tool Box
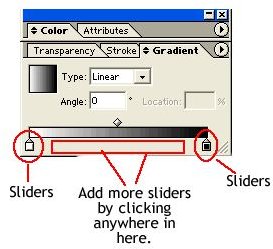
Your Gradient Toolbox is on the right side of your screen. You will need to click the Gradient Tab and then click the two arrows beside it to expand the options. If your Gradient Toolbox is not opened, go to the top of your window and click Window > Gradients. That will open the gradient toolbox.
In your gradient toolbox you will see the Type field, this field allows you to choose what type of gradient you want. You have two choices, you can select the Linear or the Radial. The angle determines how your gradient will be applied. With the Radial type, the angle field will not be useable.
The bottom bar is your gradient bar. Below the bar you will see the two arrows which are often referred to as sliders. The sliders are how you will change the color of the gradient. You can add more sliders by clicking somewhere in between the two original sliders. You can also move the sliders with your mouse.
To apply a gradient, all you have to do is click the gradient bar. That will apply the gradient to the object that you have selected. Then you can change the color , angle, and type of gradient that you want to use. To get a visual of the gradient box and what it does, take a look at the Gradient Box image.
Using Gradients and Changing the Colors
To use a gradient, click the object that you want to apply the gradient too. Then click the gradient bar in the gradient box. That will apply the gradient. Select the type of gradient that you want to use. If you are selecting a Linear, change the angle to what you want.
Now we will change the color of the gradient. There are two ways to change the color of the gradient. First, you can double click a

slider, then double click the color fill box in your main toolbar. Select the color of your choice when the box opens. Double click the other slider and repeat the above steps to change the color of that slider.
You can also use your swatches panel. Click a swatch color and drag it to the slider. Once you have the mouse over the slider, let go of the mouse. The slider will change to the color that you placed on the slider. You can open your other swatches to find more colors. So, just drag a color and drop it on the gradient slider.
Image Credits
All screenshots were taken by the author for educational purposes only.


