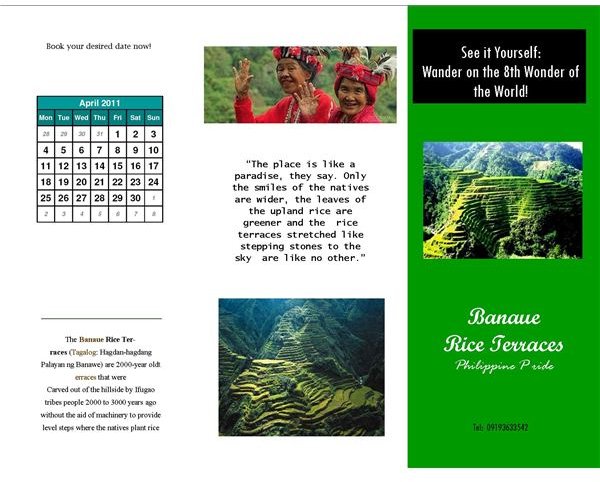
Wanting to include a calendar in your brochure to highlight important events? Learn how you can make one in a matter of minutes. Create your own brochure to impress more customers.
Planning to Create a Brochure? It’s Easy!
No matter how hard we try, we cannot be in two places at the same time. Therefore, if we need to circulate information quickly, brochures can help .
Brochures must clearly outline what the company has to offer, so inserting calendars in brochures to highlight important dates and activities can be beneficial. This article will teach you how to insert a calendar in a Microsoft Publisher 2007 Brochure or how to customize calendar using the Design Gallery of Microsoft Publisher 2003. Learn how to make a personalized brochure in a matter of minutes for your business, your group or yourself!
How to Create a Brochure and Insert a Calendar in Less than Ten Minutes!
“Measure twice, cut once.” This carpenter’s saying makes sense when creating a brochure, as well. After carefully deciding what design, text and photographs to include, get your tools and start working. Here is how to create one using the Microsoft Publisher 2001 program in your computer:
Step 1: Open Microsoft Publisher and click on Brochures. This will take you to the brochures options page.
Step 2: Choose your desired format by clicking it. Note that you may change the location of the text boxes and pictures by simply dragging them.
Step 3: Design your brochure. Add text in the text boxes. If you wish to add more text boxes, simply click Insert in the menu bar and then hit the Text Box button. Decide on your preferred font style, size and appearance.
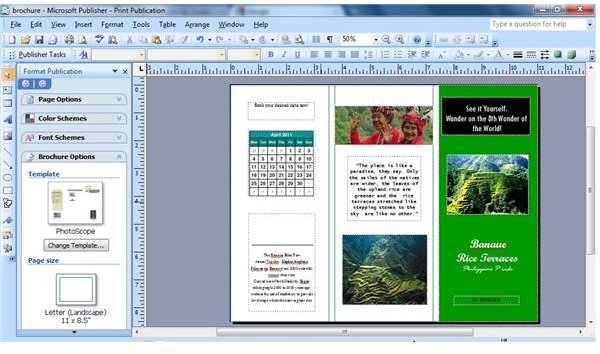
Step 4: Upload your previously made calendar by clicking the Insert button and then hit Pictures. On the other hand, if you have no calendar ready simply click the Add Text button. Insert tables into which you can write the dates for your calendar.
Step 5: Asses your brochure. Check out your design, colors and text. All set? Then you are ready to print your brochure!
Use the Design Gallery to Add Calendar to Your Publication!
When using a Microsoft Publisher 2003 edition, use the Design Gallery to customize you calendar easily. Check out these three easy steps to get started!
Step 1: To add a calendar to a publication, click Design Gallery Object on the Insert menu.
Step 2: Click Calendar on the Design Gallery options.
Step 3: Choose your desired calendar design and then hit Insert Object then viola! A personalized calendar!
Quick Tips on How to Make Your Brochure Attractive
To catch the attention of viewers, make sure that your format, text, and pictures are impressive. Avoid empty spaces in your brochure , as they may give a negative impression, but never make it overcrowded either.
Since colors play a significant role in making your brochure, select hues that will highlight important details and that will blend well with your pictures. When inserting a calendar, make sure that the font is big enough for the readers to see the dates and the notes you have included.
Lastly, the quality of paper is very important, never compromise it.
See how fast you have learned how to insert a calendar in Microsoft Publisher brochure in a few simple steps? Now all you have to do is to start making your own!
Credits: The images used in this article are created by the author.


