Maybe you have heard the term slow shutter speed before, but you aren’t quite sure what it means or why you would want to use it. Learn some situations where you may want to use slow shutter speeds and a few tips & tricks on how to get the pictures you want.
In order for a photo to be technically perfect it must be razor sharp, 100% in focus , and not blurred, right? Albeit false, this mindset usually leads us to make images using as fast a shutter speed as possible in order to minimize the chance of incurring any kind of blur in our pictures. Believe it or not, sometimes it may be advantageous (or even critical) to use a slow shutter speed when taking a picture. For the purposes of this article we will define a slow shutter speed here to be anything from 1/60 second and slower (the shutter on your camera is open for 1/60th of a second or longer). This is essentially because human movement comes into a factor at about this speed (either hand shake or the a human subject moving). In this article I will be giving you several examples of when you may want to use a slow shutter speed. These examples can be split up into two different categories: movement and a need for light. Finally I will show you how to accomplish these kinds of images with your digital camera, what settings to use, and some complications (and solutions to these problems) that may arise.
Motion
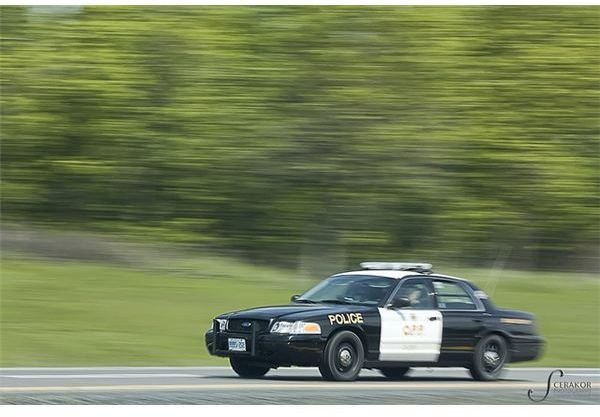
The first category of photography deals with those images that are using the motion of objects to their advantage. This means that we are making a conscious decision to use a slow shutter speed not because we have to (see the next section) but because it will artistically benefit our images. For example, we can choose to use a slow shutter speed to demonstrate speed by either blurring the object that is moving quickly or panning with that object to use motion blur in the background.
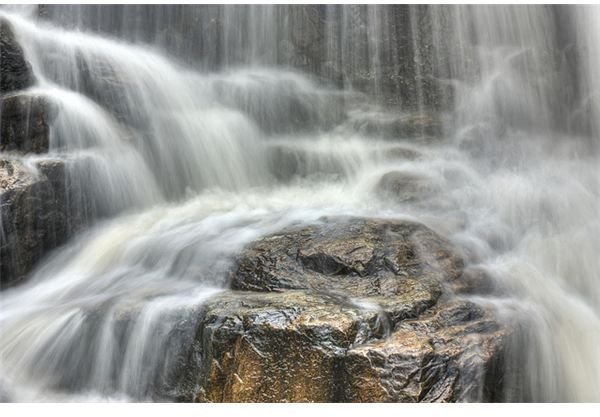
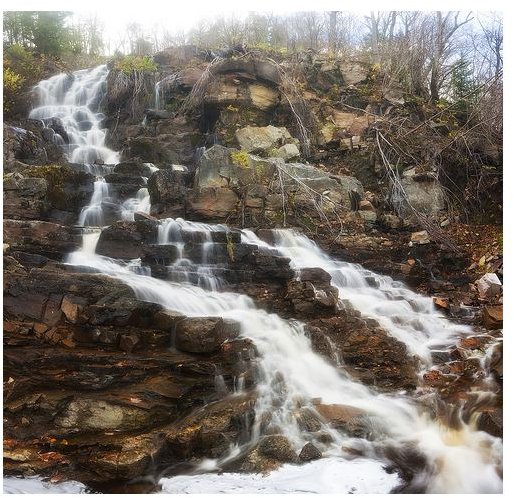
Another common use of motion blur is to make moving water look smooth and blurred. For example, by using a slow shutter speed when photographing a waterfall, the falling water blurs together in a smooth curtain. Using a fast shutter speed gives a generally less pleasing result. Similar to waterfalls you can apply the same concept to streams, waves on a beach, fountains, or nearly anything with moving water .
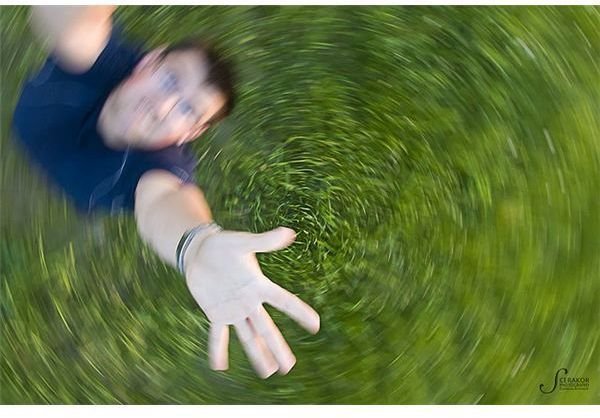
Finally, whereas the two previous examples dealt with the subject moving, you can also use a slow shutter speed and move the camera. The possibilities here are endless but an example could be spinning your camera while taking the shot to arrive at something similar to that below. The common theme here is that you have chosen to introduce blur yourself for aesthetic reasons.
Need For Light
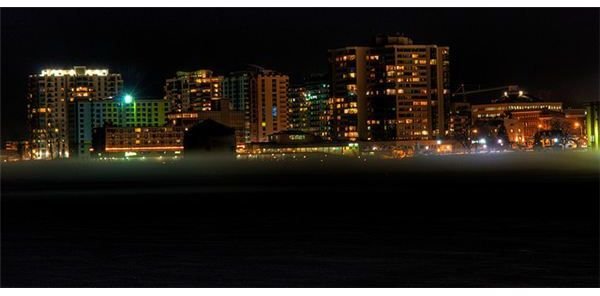
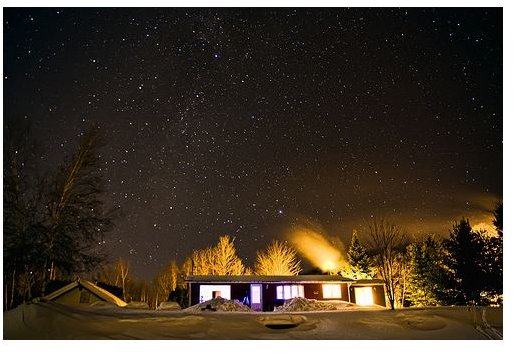
The second category of photography that may use a slow shutter speed would be those situations where you need more light and are forced to use a slow shutter speed to attain it. This often translates to taking pictures at night time . For example, taking photographs of cityscapes that are lit up during the evening would require a very slow shutter speed in order to capture the light necessary.
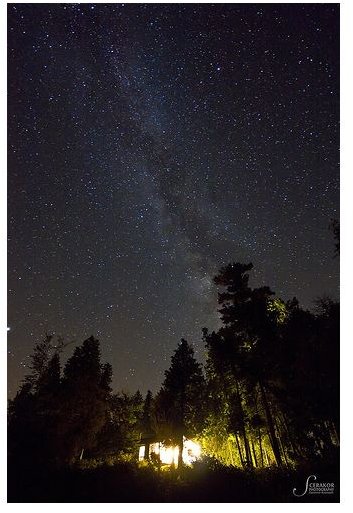
Astrophotography often involves taking pictures of extremely faint objects. If you are imaging constellations, star trails, nebulae, galaxies, or anything else deep in the night sky, a long exposure of 1 minute or MUCH longer is sometimes needed.
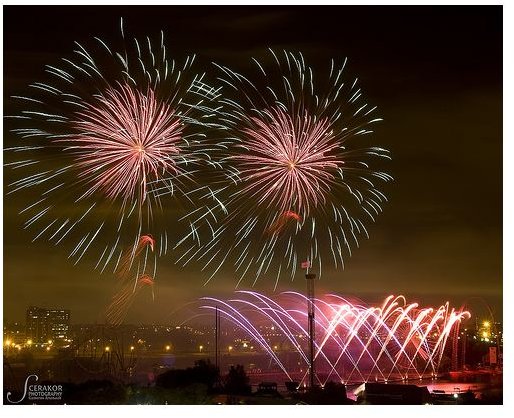
A third style of photography similar to this is to start a long exposure (on a tripod) and capture some something that occurs while the camera is exposing. An example of this would could be lightning photography, fireworks, light painting , a car driving on a night road, fireworks, lighting a lighter or a match, the list goes on. The common theme here is that you more than likely need to use a slow exposure since these events are taking place in a dark environment and you need the light.
How to Take Long Exposures
Now that we know when it may be advantageous to use slow shutters speeds for photography, I will give you a basic run down on how to do this with your digital camera. Before even setting a single setting on your camera the first thing you need to do is determine approximately what length of exposure you are going to need as some require much longer exposures than others. For those images made to show speed you will want a speed slower than 1/60th of a second but fast enough to leave enough of the image in clarity. 1/30th of a second is a good place to start and you can adjust from there. Moving water images work very well with approximately 1 second or longer if possible. For those in the second category you will have to play around with exposures everywhere from 5 seconds to 15 or more minutes.
In order to take a photograph with one of these slow shutter speeds you want to use the shutter priority or manual mode on your camera. Shutter priority mode allows you to dial in the shutter speed that you want to use and it will choose the necessary aperture to make a proper exposure. This method works well for those images depicting motion. For images involving the motion of water, aperture priority mode may be a better choice. Since water motion requires exposures of around 1 second, try stopping down the aperture all the way (highest F number possible) thereby giving the longest exposure possible with a proper exposure.
With night photography and those in the second category, manual mode is the way to go. Set up up the camera on a tripod, choose an aperture (to maximize sharpness or to maximize light), and, depending on the subject, choose an exposure time or BULB mode. In order to minimize camera shake for all of these in the second category, I recommend that you either use a shutter release or the two second timer.
For those point and shoot cameras without a manual option you can still get slow shutter speeds by knowing what the computer in the camera is doing during its scene modes . For slow shutter speeds try night mode or fireworks mode.
Complications
Although we want to use a shutter speed of close to one second you may actually run into the problem of having too much light. Even if the aperture is stopped all the way down the desired shutter speed may not be attainable with the current setup. There are a couple of things that you can do in order to extend the maximum exposure length possible. First, if at all possible, shoot when (or where) there is less light. If changing the time or the place of the photograph is not possible there are a couple of pieces of equipment that you can use. The official filter that we can put onto a lens is a neutral density (ND) filter who’s sole purpose is to lessen the amount of light that gets into the camera. These “sunglasses for your camera” come in all sorts of strengths (less and less light being let in) to extend the possible exposure time. In a pinch, a polarizer can be used to limit the light that enters the camera as well (although not as effective as a ND filter).
Conclusion
In this article we have investigated the photo techniques involved in using a slow shutter speed. We saw how it can be used to aesthetically blur images to show motion or creativity or to make up for the lack of light in a scene. We also found out that using shutter priority or manual (or even aperture priority) modes on your camera will often help you attain these images. Although these modes are preferred you can still possible trick your automatic camera into giving you the shutter speed you desire. Finally, you saw that too much light may actually be a problem when getting slow shutter speeds, but this does not mean it is impossible. If you haven’t already, grab your camera, get out the door and try out some of these slow shutter speed photography tricks.
All images were taken and processed by the author.
This post is part of the series: Photography and Shutter Speed
The articles in this series deal with one of the critical subjects in photography: shutter speed. These articles deal with slow and fast shutter speeds and when would be the best time to use each. Understanding shutter speed gets you that much closer to understanding photography.


