Learn how to crop your pictures in GIF Animator and create oval images. Add magic to your digital photos by using the 3-D slideshow special effects.
People have been fascinated by oval-cropped photos ever since the beginnings of photography. Some of you might still remember the old sepia portraits of your grandparents or great-grandparents so nicely displayed in a wooden or silver oval frame. Today we will focus on cropping pictures in GIF Animator and creating oval images. You will also learn how to add another special 3-D effect to your slideshows.
What you need
- Ulead GIF Animator (if you haven’t got it yet, you can download a 15-day free trial version at Ulead - Free Trials )
- A set of digital photographs in portrait orientation (with the height of the page greater than the width)
What to do (Steps)
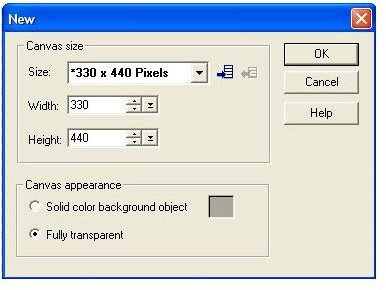
1. Create a new project in GIF Animator (File – New / Icon in Standard Toolbar / Ctrl + N) with the properties as shown in Fig. 1.
2. Add the photographs one by one (File – Open Image / Icon in Standard Toolbar / Insert key).
3. Change the size and / or position of the photographs if you need to. Right-click each photograph in the Object Manager bar, click Object Properties, go to Position and Size tab and adjust the width and position to fit the frame. Make sure the Keep aspect ratio box is ticked.
4. Select all the photos in the Object Manager bar (select the first, hold down Shift key and select the last). Right-click the selection and click Distribute to Frames as in Fig. 2.
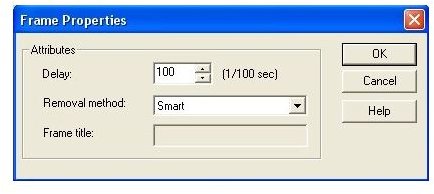
5. Change the delay time between the frames. To do that, select all the frames in the Frame Panel (select the first, hold the Shift key and select the last). Right-click the selection and go to Frame Properties. In the Frame Properties window, change the delay time to 100 (1 second). (Fig. 3)
Click image for full-size

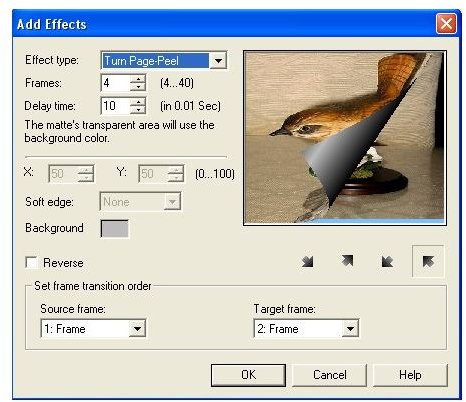
6. To create the slideshow transition, select the first frame, go to menu Video F/X – Peel – Turn Page-Peel and fill in the Add Effect window according to Fig. 4. Click OK. Repeat the step with the remaining main frames. (Note: The Source and Target Frame will change according to the frame you selected.)
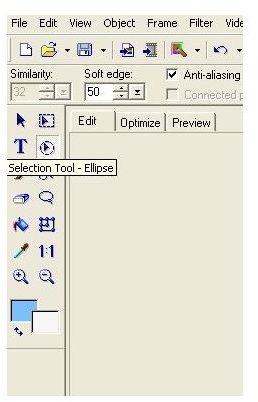
7. To create the oval border, first select all the photographs in the Object Manager bar as you did in step 4. Click the Selection Tool – Ellipse in the Tool bar (Fig 5). Using Drag and Drop draw an oval over the image starting from the up-left corner and ending in the down-right corner.
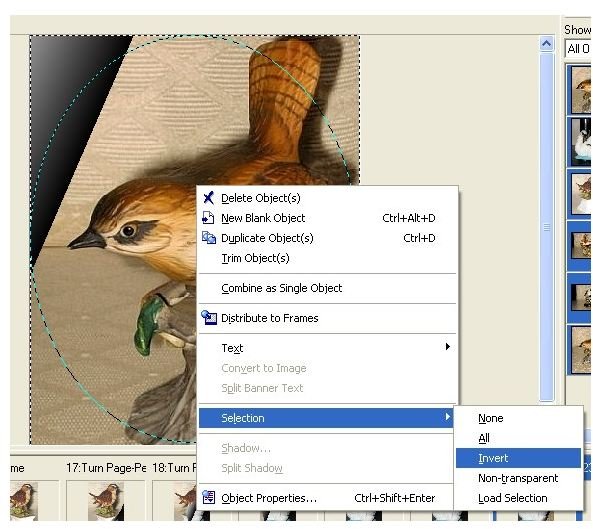
8. Invert the selection by right-clicking it and going to Selection – Invert (Fig. 6) Press the Delete key.
Click image for full size
9. To Preview the image, go to Preview Tab in the Main Window. To optimize, go to the Optimize Tab and click Optimize Now.
10. To save it as a GIF file, go to Menu – File – Save As – GIF File or press Ctrl + Shift + S.
To make an idea of how the final result will look like this, go to:


