This photo editing software tutorial will teach you how to batch process photographs using Photoshop Elements. Batch processing can be used to perform file conversions, renaming, resizing, etc. on many images at the same time.
Introduction to Batch Processing
What is Batch Processing?
Batch Processing is a term used in digital image processing while editing a bunch of images in one go … i.e. an entire “batch” of images is “processed”. It is a very useful technique for applying commonly used edits to all the images in a folder. This saves significant time and effort for other more productive tasks rather than perform the same actions for each image repeatedly over and over again.
Batch processing is commonly used for activities such as renaming files, resizing images , converting images from one format to another, etc.
What options are available for Batch Processing Photos in Photoshop Elements?
All the options mentioned above are available for batch processing photos in Photoshop Elements. Besides these activities, Adobe Photoshop Elements can also be used for complicated activities such as adjusting contrast, levels, colors, sharpening and adding watermarks to images .
How to Batch Process Photos in Adobe Photoshop Elements?
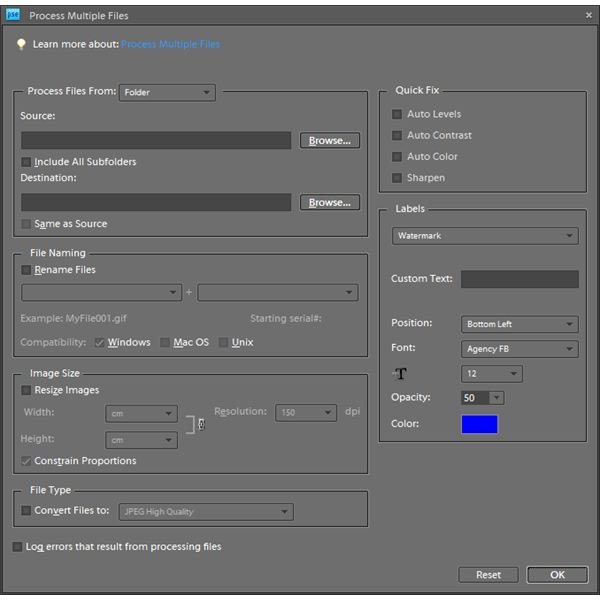
The batch processing option is available under the File menu as Process Multiple Files.
A screenshot of the Process Multiple Files options window is shown on the right.
Batch Processing Workflow
The batch processing workflow in Adobe Photoshop Elements can be explained simply as follows:
- Open the Process Multiple Files window in Photoshop Elements
- Select the Source and Destination Folders
- Choose the File Resize, File Rename and FileType Conversion options as required
- Select the Quick Fix options which are to be applied, and add a watermark if desired
- Click on Ok to begin the batch processing
- Review the log file if unsuccessful, identify and correct the error and repeat the process described here
The various options available are explained below.
Process Files From:
This section shows where to process the input files from (known as source location), and where to save the output files (known as destination location).
File Naming:
This section is used to rename digital photos . A variety of renaming options can be chosen such as the original filename in lowercase or uppercase, a 1,2,3 or 4 digit serial number, an alphabetic serial letter or the file extension itself. This provides us with a variety of file rename options.
Further, while renaming files, it can ensure compatibility with Windows, Mac OS and Unix as evident from the screenshot.
Image Size:
The image size section is used to resize files. The output dimensions (width and height) can be specified in terms of inches, pixels, cm, mm or percentages. The resolution can be mentioned in dpi and the constrain proportions checkbox is used to ensure that the image does not get distorted during resizing by maintaining the aspect ratio.
FileType:
The filetype section is simple and can be used to convert the files to any of the different image formats indicated in the drop down list.
Quick Fix:
This section can be used to perform edits such as Auto Levels, Auto Contrast, Auto Colors and Sharpen . This is especially useful while editing a batch of photos from a single photo shoot where most of the photos were shot under similar conditions and therefore require similar processing.
Labels**:**
The labels section can be used to add either a watermark in the form of text or a caption to the image . Additional options such as the location of the watermark/caption, the font size and type as well as the font colour are available.
Note: Adobe Photoshop Elements has the ability to make a log of the errors generated while batch processing. This may be useful for troubleshooting if the batch processing is unsuccessful.


