Learn to capture the magic of night time lights in black and white. We cover techniques, what to look for, and how to make the best black and white images at night.
Introduction to Black and White Night Photography
Photographing a scene at night in black and white is a great way to capture the contrast between the lights and darks. This technique can be especially effective when there is little color in your scene and you want to emphasize the dynamic range of light. Black and white images generally have a high-contrast look and can give your subject that extra pop and magical look. By using shadows and selective lighting, it can add mystery and drama to your image. It can also be a way to mask chroma (digital color) noise from using a high-ISO when shooting at night. The black and white grain can also be advantageous by adding detail and providing a film-inspired look.
Photo by Athena’s Pix
Think Like Your Camera
Imagine your environment in black and white. What would jump out at you if the colors were removed? Using your hands to make a rectangular viewfinder, look for interesting compositions containing silhouettes, shapes, lines, and textures. Textures especially are defined by depth which is created by the way light falls on your subject. Black and white adds extra contrast and depth making for more pronounced textures.
Exposure
Check your camera’s LCD and histogram after taking a picture. Do the shadows have detail, are any of the highlights blown out? The histogram is the best indicator you have out in the field to determine proper exposure. Remember that the left hand side of the histogram indicates the shadows, the middle indicates the midtones, and the right side shows the highlights. If the graph is bunched up on the left or right side, your image is under or overexposed, respectively. Use a good balance of shadows and highlights to add extra contrast to your night time images.
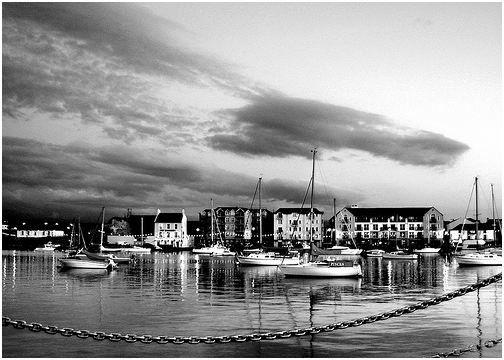
In the above photo, you can see a perfectly blended exposure of the sky, houses, boats, and water to give good contrast yet retain plenty of detail in the fore, middle, and background.
White Balance and Color Filters
Play around with your white balance and color filters (in post-production) to see how they affect your final image. Filters will emphasize or deemphasize different parts of your image depending on what colors are present and the filter you choose. Back during the film days, people used to have a full set of colored lens filters specifically for this purpose of manipulating an image’s contrast.
Quick Tips
- Shoot in RAW and color so that you can tweak your finalized black and white images in post-production and you have a color copy in case it looks better!
- Don’t be afraid to bump up the ISO when the sun goes down. A noisier image is always better than a shaken blurry image. Grain on black and white photos gives it that classic look anyway!
- Use a tripod for extra crisp, sharp night time images.


