
The new Object Extractor in Corel PaintShop Photo Pro X3 provides one more way of cutting out objects in digital photos. How does it work? Read this tutorial for step-by-step details.
Object Extractor’s Purpose
The Object Extractor is one of the new tools introduced in PaintShop Photo Pro X3 . The purpose of this new tool is to make it easier to cut items out of a digital photograph – in essence, separating particular objects from the photo’s background. After using the Object Extractor, you can perform a number of other editing tasks, such as changing the background of the original photograph or copying the extracted image and placing it in a different photo.
The Object Extractor isn’t the only tool in Paint Shop Pro that lets you carry out these tasks. In fact, Paint Shop Pro X2 Ultimate came bundled with a background remover plug-in that basically performed the same function. There are also other plug-ins, such as Topaz ReMask , developed especially for the goal of extracting objects from images. It’s even possible, though much more time-consuming, to use the Eraser tool to get the job done.
Using the Object Extractor
To use the Object Extractor, first open the image that contains the object you want to extract in Paint Shop Pro. As an example, I’ll show how to use the tool to extract the yellow rose in the image shown below. (Click any image in this article for a larger view.)
Image Credits: morgueFile/wallyir
Step 1: From the Image menu on Paint Shop Pro’s main toolbar, select Object Extractor.

This will open a new window in the program, like the one shown in the screenshot below.
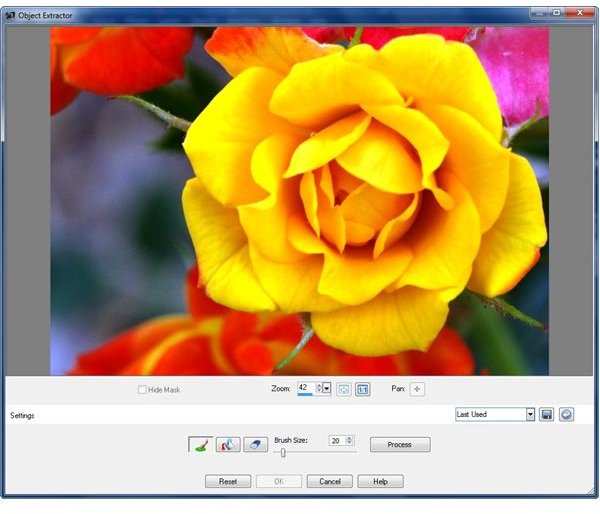
When the window first opens, it will default to fill your computer’s screen, but you can resize it in the same manner that you would use to change the size of any other window.
Step 2: Make sure that the Brush tool is selected (the one denoted by an icon that looks like a paintbrush dipping into green paint), and use that tool to draw an outline around the object that you want to extract. Before you being to draw, you may want to use the slider to adjust the Brush Size, so that when you are drawing your outline, it overlaps the edges of the object as shown in the image below.
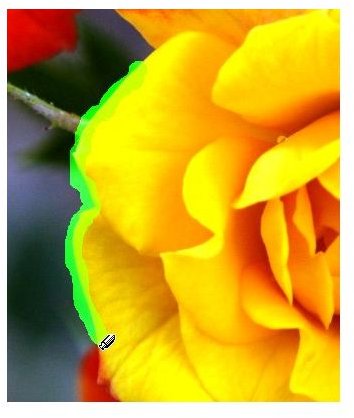
Note: If you make any mistakes while you are outlining the object, you can either click the Reset button to start tracing again from the beginning, or you can select the Eraser tool and just erase the brush strokes that you want to get rid of.
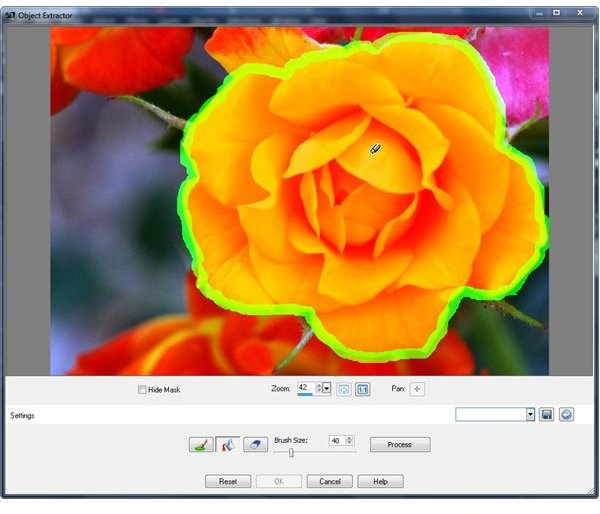
Step 3: When you’ve finished outlining the object, select the Fill tool (the icon shaped like a bucket pouring red paint) and click on the area of the photograph that you want to keep. In most cases, this will be the object that you’ve just outlined. But sometimes, depending on your project, you may want to choose the area on the outside of the object instead.
Step 4: Now, click on the Process button. If you’re working with a large image, it may take a few seconds for this process to complete. When done, you should see a preview of your extracted image with the traditional gray and white checked background that denotes transparency in Paint Shop Pro.
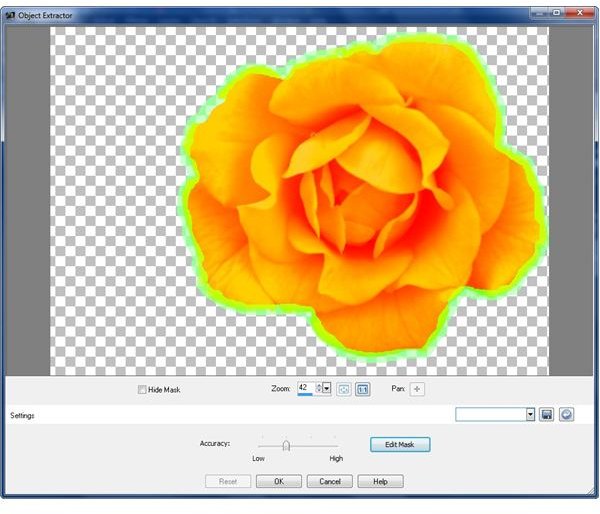
This preview will still have the green outline and red fill marks that you used to mark the object. Since these markings can make it hard to see exactly what your extracted object is going to look like, it’s a good idea to remove them for a moment by checking the box next to Hide Mask.
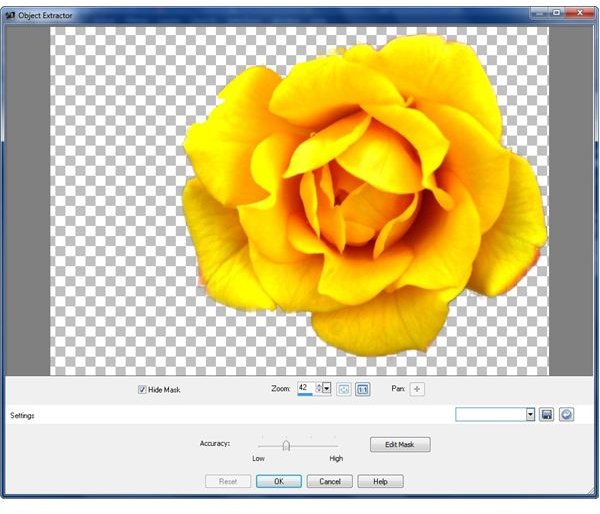
Step 5: If there is anything you don’t like about the preview, you can make changes by clicking on the Edit Mask button. (Make sure you uncheck the Hide Mask button before doing so.) This will allow you to go back to the original image before the background was

removed, so you can modify the selection. That is, you can use the Eraser and Brush tools to redraw the outline of the object in the areas where you would like more definition. You can also change the Brush Size to make the edges of the outline finer.
Repeat steps 4 and 5 until you are happy with the result shown in the preview area. When you are, click the OK button to return to Paint Shop Pro and have your changes applied to your photograph. Once you’re back in the main editing window of Paint Shop Pro, you can use the standard Eraser tool to clean up any stray marks or pixels left over from the object extraction process if needed.
When it’s time to save the image, remember that JPEG files don’t support transparency so you’ll have to use another format. For more details, see Saving Images with Transparency in Paint Shop Pro . Also, be sure to check out the other Paint Shop Pro tutorials and user guides available at Bright Hub.


