There are a number of ways to add snow to a digital photo using Paint Shop Pro, but one of the easiest is to enlist the help of a free plugin for the photo editor. This tutorial will tell you how to get the free plugin and how to use it to winterize your photos.
Winterizing Digital Photos
If you’re putting together a photo book , trying to create a personalized holiday greeting card, or just wanting to give a particular digital photo a more winter-like appearance, there are a number of ways that a photo editing application like Paint Shop Pro can help.
One thing in particular that you can do with Paint Shop Pro is use the free Snowflakes plugin to make it look like it is snowing in a digital photo. First, we’ll talk about how and where to obtain the plugin, and then we’ll describe how to use it.
The Snowflakes Plugin
You can download the Snowflakes plugin from the VanDerLee web site . If this is your first time using an add-on, you may first want to take a look at the article Installing Paint Shop Pro Third-Party Plugins . This article gives tips on how to download and install plugins for Paint Shop Pro and how to make sure they are accessible in the photo editor’s interface.
In addition to the snow effect, the Snowflakes plugin has other features that could make it useful for all sorts of photo editing projects. It’s also fairly easy to use and highly customizable, which we’ll demonstrate in the next section.
How to Add Snow to a Photo
Once the Snowflakes plugin is installed, you can start using it right away in photo editing projects using these steps.
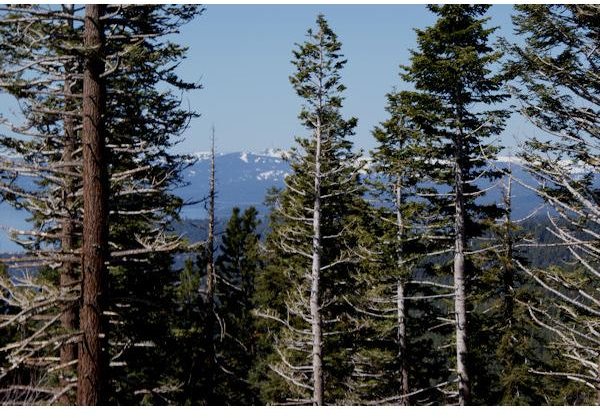
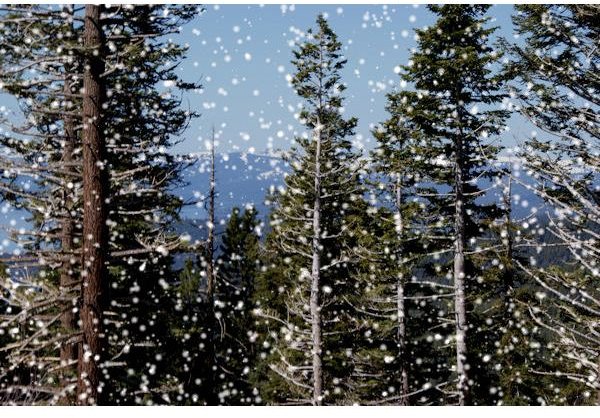
Step 1: Open the digital photo that you want to add snow to in Paint Shop Pro. As an example, we’ll look at adding snow to this photo taken near Lake Tahoe. (Click any image in this article for a larger view.)
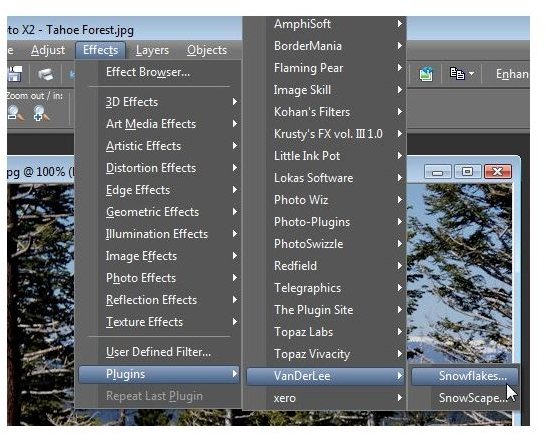
Step 2: Once the photo is open, access the Snowflakes plugin from the Effects menu on the Paint Shop Pro main toolbar. Navigate to Plugins and then select Snowflakes from the correct submenu.
Step 3: The dialog box for the Snowflakes plugin will now appear on your screen. Here, you can change several different settings in order to get the exact appearance you want for the snow in your digital photo.
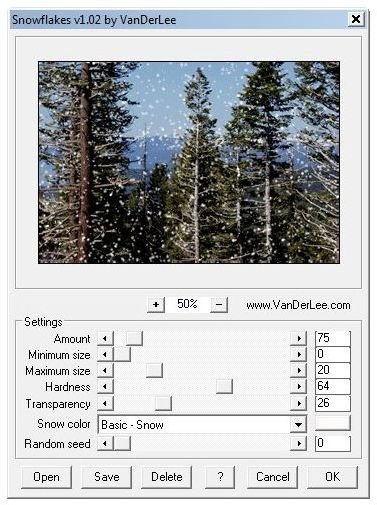
The preview window in the plugin lets you see the result of the proposed settings before you apply them to the actual photograph. This is nice because it lets you experiment and see several different possibilities before deciding on any particular one.
However, it is important to note that sometimes the results will look a little different on your photo than in the preview area because of the size of the photo. Although the settings might look like a very light snow effect in the preview window, they could appear more pronounced after being applied to the photo. So, you may have to practice and use the “undo” feature a few times to find the exact look you want.
Step 4: When you do decide on the settings you want to use, simply click the OK button and the changes will be applied to your digital photo. As mentioned above, if you don’t like the results, you can simply “undo” them and start fresh. Here is one possible result of applying the Snowflakes plugin.
For more tips and tricks, be sure to check out the other Paint Shop Pro tutorials found here on Bright Hub’s Digital Photography Channel. Also, if you enjoyed working with the Snowflakes plugin and want to try out some other add-ons, take a look at this collection of the best free Paint Shop Pro plugins that you can download and install without spending a dime.


