Do you want flexibility with selections? Photoshop’s lasso tools can help you make more accurate selections for better photo editing!
The Three Lasso Tools and How to Use Them
The lasso tool built in with Adobe Photoshop was designed as a freehand selection tool. You can draw your selections by hand and is a great feature, especially when you are trying to select elements in the photograph which are not regularly shaped.
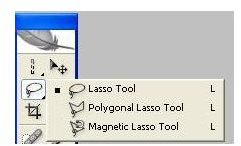
New versions of Adobe Photoshop features three lasso tools which can be used to create complex selections:
1. Standard lasso tool
With the standard lasso tool, you can now draw the selection borders using a pen but it is a bit difficult to be precise since you need to draw the selection in a single motion. This tool is best used in making complicated selections and when photos are not of high contrast .
2. Polygonal lasso tool
The polygonal lasso tool is a secondary tool and is used to draw straight edged segments and is not ideal for selecting complicated edges. To create selections, you need to click on the photo to create your anchor point and double click to close your selection.
3. Magnetic lasso tool
The magnetic lasso is the perfect tool for creating detailed selections. Through this tool, you can draw close to the edge of the object you want to select and the tool will automatically figure out where the boundary should be. Aside from this, you can also adjust the selection to fit the object. The down side of the magnetic lasso tool is that the photo should have high contrast in order for the tool to work properly.
The tool automatically places an anchor point and you don’t have to keep the mouse button held down while drawing. To create selections, click on the image to create your anchor point, continue around the object you want to select and click the first anchor point to close your selection.
To activate these functions, click on the lasso tool icon and choose the tool you want to use. Or you can press SHIFT+L to toggle between the functions.
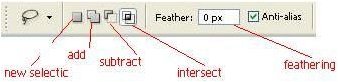
Just like the marquee tool , the lasso tools have several options such as new selection, add to selection, subtract from selection and intersect. You can turn on/off anti aliasing and you can also use feathering for your selections. Figure 2 shows the different options available for the standard lasso and the polygonal lasso tools. If you are using the magnetic lasso, you will see additional options (see figure 3 ).

Additional Tips
1. Hold down SHIFT when using the polygonal lasso tool to create straight lines at 45 degree angles (perfect for making rectangle, triangle and diamond-shaped selections).
2. When using the polygonal lasso tool, pressing down the ALT key switches to the standard lasso tool. Releasing the ALT key will revert tool to the polygonal lasso.
3. When using the magnetic lasso tool, pressing down the ALT key switches tool preset to the polygonal lasso.
4. Set high frequency to place lots of points while dragging. This is handy for jagged edges.
5. If your photo has low contrast and you want to use magnetic lasso, reduce your edge contrast setting. You will need to manually add anchor points.
6. If you want to undo an anchor point, use DEL key. This works for all three lasso tools.
7. If you want to add to the selection, press down the SHIFT key while dragging your mouse cursor. On the other hand, if you want to subtract from the selection, press down the ALT key.
This post is part of the series: Using the Basic Selection Tools in Adobe Photoshop
The power of Adobe Photoshop lies in the user’s ability to create more accurate selections. In this series, you will learn how basic selection tools work. You will also learn about keyboard shortcuts which can make your job a lot easier.


