
The marquee tools are probably the handiest tools in Photoshop and hold a lot of unexpected capabilities. This tutorial will teach you how to use them and provide you with tips that will make your photo editing experience a lot easier.
Why Write About Photoshop?
I damaged my camera after a visit to Thailand. For months, I wallowed in depression. You see, I bought my Nikon Coolpix (a point and shoot with 5mp resolution ) from my very first salary and I promised to take care of it always. Unfortunately, at that time, I underestimated the power of humidity and forgot to protect my camera . With my camera gone, I was lost. What’s a photographer without a camera? My friends keep telling me that everything will be fine, but then again, they’re not as passionate about photography as I am.
And yet, what was seemingly my lowest point in life, turned for the better when I discovered Adobe Photoshop . Apparently, there’s a reason for everything! Adobe Photoshop showed me how to make better pictures of the ones I have already taken. I became addicted in learning the different effects, adding elements, and so much more! I learned about editing an almost hopeless picture and turning it into a work of art I never thought possible with the camera as my only tool. I know a lot of you have already heard about this software, after all, it is THE most popular photo editing software today.
In order to create superb photographs through Photoshop, you will need to learn the basics tools first. Through these series of articles, it is my hope that you can also appreciate the unique capabilities of this software.
An Introduction to the Basic Selection Tools in Photoshop
There are many kinds of selection tools in Photoshop and all of these, in their varied forms are the main tools used in as much as 90% of your tasks. These tools are integral in the basic workflow – the better you become at selections, the better you are at Photoshop, and vice versa.
Though selections are important, you need to understand that it doesn’t have to be strict– the area to be selected doesn’t have to be rigid, it can be partial too. It is possible to make selections wherein some pixels are 100% selected and others are 100% unselected, however if you are looking for smooth blending when it comes to effects, then you will need selection gradients which allows you to select or unselect partially. “Anti-aliasing” is a term used for smoothing out the rough edges in photo editing.
With newer versions of Photoshop, you can now use feathering wherein the software immediately creates a border around your selection wherein some of the pixels are partially selected. The higher your feather edge, the softer your selections will be. If you are making photo montages, or when you are retouching images, this technique is very important.
In this series of articles, aside from the basic selection tools in Photoshop, we will also look into the anti-aliasing and feathering features and how you can use them to create professional results!
The Marquee Tools
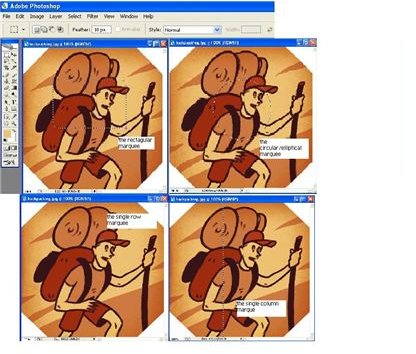
Unknown to many, there are actually four kinds of marquee tools: rectangular, elliptical, single row and single column. As the image below shows, each kind of marquee tool selects a portion of an image with a different shape.
(Click on images to enlarge)
How to Use the Marquee Tools
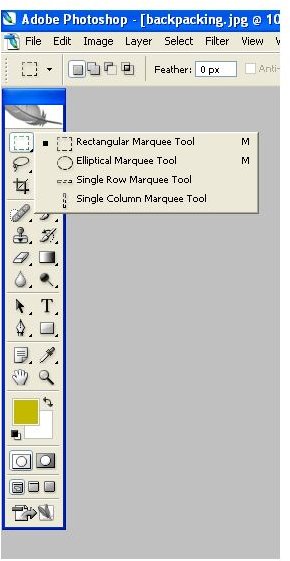
On the left side of your window, you will see all the tools available. On the top left part, the preset tool is the rectangular marquee. To change the preset, you can right click and choose the tool you want. Or press down the M key to toggle between the functions.
The rectangular marquee is used to choose rectangular areas of an image. The circular marquee works almost the same way except that selections are elliptical in shape. The single row/single column tools are not commonly used but if you’re looking to create a grid on the photo, these are your best options.
All the marquee tools are easy to use:
- Just drag your mouse over the part of the image you want to use.
- Press CTRL+C (Windows) or Apple+C (Mac). If the photo has several layers, use CTRL+Shift+C (Windows) or Apple+Shift+C (Mac) instead.
- Then hit CTRL+N (Windows) or Apple+N) to create a new document.
- Use CTRL+V (Windows) or Apple+V (Mac) to bring up a new document.
Once you have already selected sections on the photograph, you can now apply effects, or enhance that part of the image. The difference between the marquee tools and cropping is that, you only copy some of the pixels on the original for further processing. You do not remove the excess, such as what cropping does. Note that Photoshop automatically selects the size of the image you have pasted on the new canvass.
How to Make Accurate Selections
Each of these marquee tools have different options you can use – the normal mode (new selection), add, subtract, and intersect.
Each time you click and drag, a new selection is created and the previous one is lost. If you do not wish for this to happen, you can use the subtract mode (deselect certain areas) and the intersection (selects the overlapping parts of a currently active one and a new selection you drag out). On the other hand, the add mode expands the current selection, depending on the marquee shape you have selected.
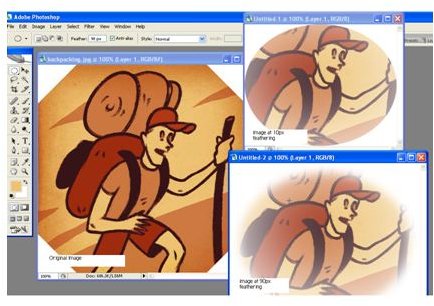
Feathering is also a great way to create more accurate selections by smoothing out the edges. In the images you see on the left are from the same photo, but were selected at different feathering. The higher your pixels are, the smoother the edges will be.
Helpful Tips
1. Holding down the ALT key will allow you to change your marquee mode so that you can expand your selection from the center instead of the usual dragging from the corners.
- If you want to create a perfect square/circle, you will need to constrain the selection. To do this, hold down the SHIFT key while you drag. Let go of the SHIFT key to switch back to unconstrained mode.
3. Hold down the SHIFT key before you click and drag so you can add to the selection. Use the ALT key to subtract from the selection. The marquee cursor changes to (-) or (+) to show you which mode you are in.
4. Hold down the ALT and SHIFT keys before you click and drag to activate the intersect mode.
This post is part of the series: Using the Basic Selection Tools in Adobe Photoshop
The power of Adobe Photoshop lies in the user’s ability to create more accurate selections. In this series, you will learn how basic selection tools work. You will also learn about keyboard shortcuts which can make your job a lot easier.


