If you haven’t yet mastered your digital camera’s aperture settings and struggle to create images with outstanding depth of field, Corel Paint Shop Pro Photo X2 is here to help. This tutorial will teach you the 5 easy steps it takes to enhance your photos by using the Depth of Field effect.
Understanding Depth of Field
If you’d like further insight to what exactly depth of field is, please read this Depth of Field article .
If you already know what depth of field is and you’re looking for help with how to control the depth of field from your camera, please check out this article on understanding f-stop and aperture .
If, however, you either 1. Don’t care what depth of field is and simply want to make your photos look better; or 2. Understand depth of field but have some photos you’d like to fix up, then read on to learn how to add depth of field to your digital photos using Corel Paint Shop Pro Photo X2 .
How to Apply Depth of Field to Your Photos
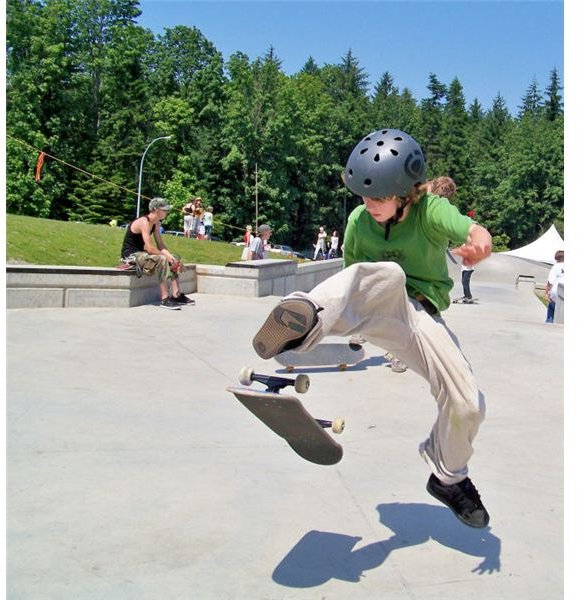
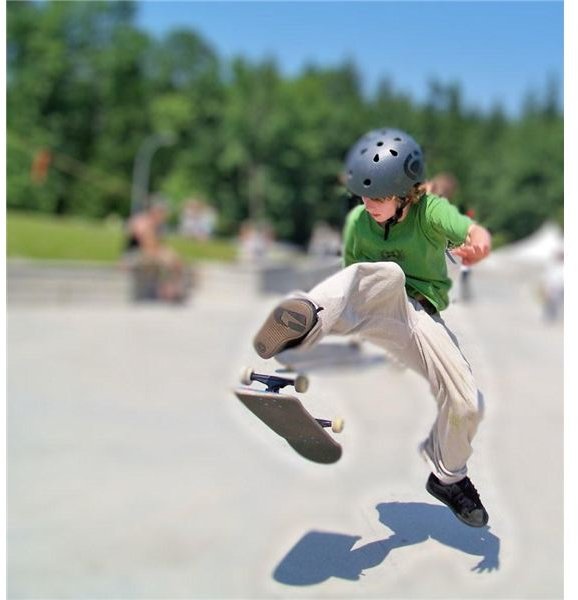
Step 1: Open the image you wish to edit. Photos that have distracting backgrounds work well for this tutorial.
(Click on any image to enlarge)
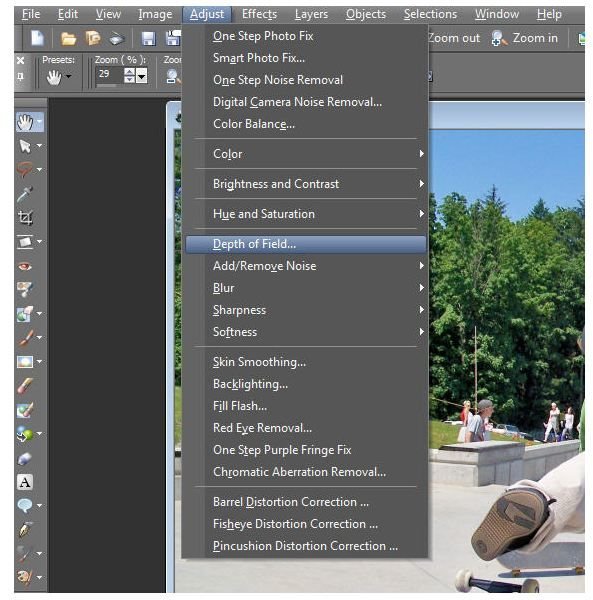
Step 2: From the main Paint Shop Pro toolbar, open the Depth of Field dialog box by selecting Adjust>Depth of Field…
Step 3: Select the area of focus. You can make a speedy selection by using the circular or rectangular selection tool, or you can choose the freehand selection tool for trickier shapes. For my picture, I’ll be using the freehand selection tool so I can draw around my subject. If I were to use the circular or rectangular selection tool, the areas between the subject’s legs and arms would also be in focus, making the edits not as effective.
You’ll also notice a little box called invert; when checked, your selection will become out of focus, while everything outside of your selection will remain clear.

When you’ve made your selection, you’ll be able to view your changes in the Preview area.
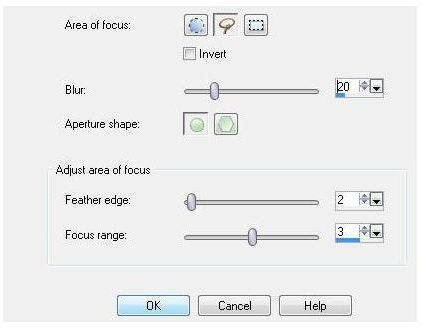
Step 4: If you aren’t happy with the changes you see in the Preview, you have the option of adjusting:
-
Blur – Adjusts the amount of blur applied outside your selection (or inside, if you have the invert box checked).
Advertisement -
Aperture Shape – Depending on your photo, it may not make much difference whether you have the circular or hexagonal shape selected. This option can change the patterns of light in the blurred areas of your image. Changing the aperture shape is most effective on images with a dark background or photos with small isolated areas of light.
-
Feather Edge – Controls how smooth the transition is between the focused and blurred part of your image.
Advertisement -
Focus Range – Changes the size of your selection.
How you decide to set the above options is entirely up to you and depends on your personal preference and what you’d like the overall results of your photo to be.
The screenshot below shows the settings I used. When you’ve made the changes to your liking, click OK to apply the edits.
Step 5: Go to File>Save As…, rename your photo and save to a location on your computer and you’re done!
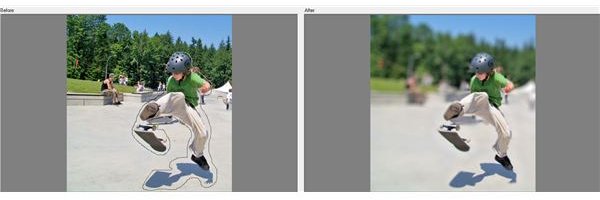
Before & After

Additional Tutorials
Did you find this tutorial helpful? Bright Hub’s Digital Photography channel has several Paint Shop Pro tutorials ideal for beginners and advanced users! You’ll find resources on everything from using layers to reviews of the best free plugins compatible with Paint Shop Pro by visiting our master list: Bright Hub’s Paint Shop Pro Tutorials and Resources .


