Using the PhotoVision Digital Calibration Target to set your exposure and white balance will ensure that you get the right exposure every time you shoot.
PhotoVision Digital Calibration Target
The PhotoVision Digital Calibration Target is a great tool that can do three different, very useful things. First, the striped side can help you set your exposure. If you turn it around to the shiny white side, it can also help you set your custom white balance. The third thing it can do, again on the all-white side, is act as a reflector to bounce more light on the subject. Something I love about this product is that it is spring-loaded and collapses neatly into a small circle and so you can easily stow it in your kit of photography tools and gadgets.
Setting Your Exposure
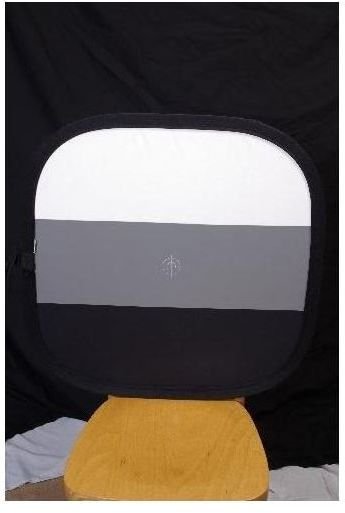
Having a proper exposure is crucial to getting a great photo. Get your assistant or subject to hold the target with the white part on the right side and photograph it with the camera in landscape format. You can also do what I do – in lieu of an assistant, I prop the target on something with the white part up and hold the camera sideways with the trigger on top. I got used to doing it this way when I took lots of portraits one after another and kept the camera turned that way. Often I worked without an assistant and had to learn little shortcuts like this.

Zoom in tightly to the target so you have three relatively equal bands of color. Then take your picture. It should look something like the second image shown at left.

Look at the histogram for this exposure. An ideal histogram will be trimodal, with the three curves peaking in three different zones. The middle one should be right around the center of the histogram and the two outer ones should not bleed off the histogram, completely contained within it. What this shows you is that the absolute white and absolute black on the target are recorded within your camera’s light spectrum. This means you aren’t losing any information by the exposure being too bright or too dark.
Setting Custom White Balance
The same shot you just did can also be used for your custom white balance setting. Your camera is smart enough to pick out the white part from the gray and black parts. What I prefer to do is to turn the target backward and shoot that for the white balance. It is a more pure white. I have not noticed any difference between the two in terms of setting the right white balance, but because the back gives a little brighter white, I prefer it.
The back of the target is pure white and a great reflector when you need one. Again, your assistant can hold it for you or you can buy a special arm that attaches to a light tripod that will hold it for you.
The one downside to the target is that it is a bit pricey. The 24” target retails for around $70 , which is a tough pill to swallow. However, it is one of the most useful pieces of equipment in my kit. For anyone who needs to rely on quality, balanced lighting, I highly recommend this product.
References
Written from author’s experience with the product.


