Layers are a powerful tool used in the digital photo editing processes of Paint Shop Pro. In this introductory article, we’ll explain exactly what layers are and give examples to illustrate this concept. Also, we’ll show how to make the Layers palette viewable on the Paint Shop Pro workspace.
What is a Layer?
People new to photo editing software like Corel Paint Shop Pro Photo X2 Ultimate may find all the tools and terminology related to layers a bit confusing at first. In actuality, if you’ve worked with any software application that has image capabilities, even office programs like Microsoft Word or PowerPoint, you’ve probably used layers without even knowing about it. The difference between these types of programs and Paint Shop Pro is that the latter gives you full control over how you use layers whereas others limit you to predefined functions.
The simplest analogy that I can think of to use to explain layers is to imagine a stack of transparent pages such as the transparencies used for overhead projectors. Each one of these pages may contain a photograph, text, lines and shapes, or even be tinted with a faint “see-through” color. The pages can be shuffled around in different orders with each combination providing a different final image when viewed as a whole. You can even remove one or more of the pages entirely to get a completely different look. In this analogy, each page would represent a layer of the final image.
Example of Layer Use
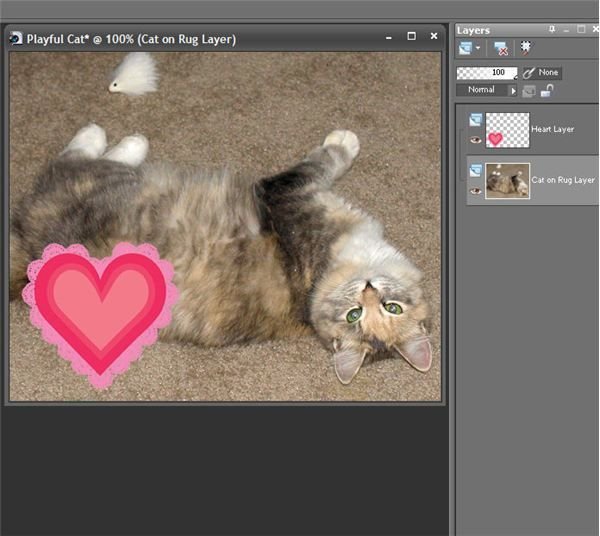
A more specific example of layer use in Paint Shop Pro can be given using picture tubes . In the screenshot to the left, I took a digital photograph of one of my mother’s cats (her name is Happy, by the way), and used an image from the Hearts picture tube to add another layer to the photograph. On the right-hand side of the photo, both parts of the image are shown in the Layers palette. If I wanted, I could add additional layers, delete one of the existing ones, or change the order in which the layers are stacked. In later articles of this series, I’ll go more into the details of how to perform each of these tasks.
Note: The process of adding a picture tube image to a photograph does not create an additional layer by default. If you want to know how to do this, keep following this series.
Viewing the Layers Palette
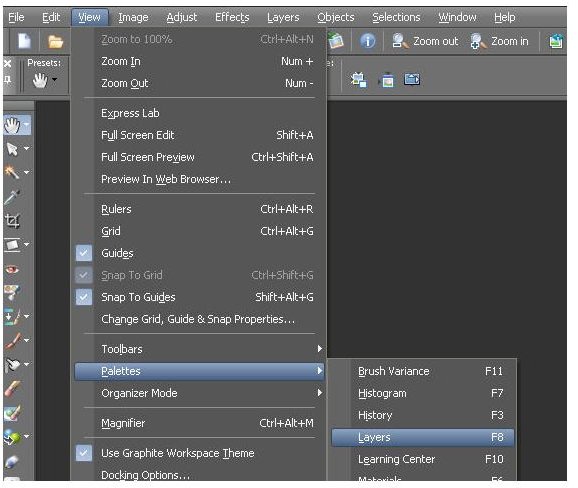
When working with layers, it’s a good idea to make sure that the Layers palette is visible in your Paint Shop Pro workspace. If you don’t see this element on your screen, you can add it by selecting Palettes from the View menu and then picking Layers.
This palette will appear on the screen in the same place it was last time it was used. If you’ve never moved it to a new location before, then it will be on the right-hand side of the screen. However, if you’re not comfortable with it there, you can drag it to any other position in the Paint Shop Pro workspace.
Now, with the Layers palette visible, we can get to work! In the next segment of this series, we’ll describe the nine different types of layers available in Paint Shop Pro, and then we’ll move on to explaining how to work with these layers.
For information on the other features found in Paint Shop Pro, check out the collection of tutorials and user guides found here at Bright Hub.
This post is part of the series: Working with Layers in Corel Paint Shop Pro Photo X2 Ultimate
What are layers and how can they be used to enhance your Paint Shop Pro digital photo editing projects? We’ll investigate these questions and more.


