If you wish to play MIDI clips in real-time, for instance whilst playing an audio clip in your set or similar, you can learn how to trigger multiple midi tracks in Ableton Live. Read on to learn how.
Ableton Live, as its name implies, gives you the possibility of choosing which audio or midi clips to play on the fly, which means greater control and variation during your live set. You can customize these aspects as you wish, so ultimately there is ample scope for creativity when making music.
Triggering essentially means you press a key in order to get a specific clip to play; you would have mapped your key before-hand which you can then use as your set is playing. You can assign both a the key of your computer keyboard, such as one of the F keys at the top for instance. Or, you can assign a MIDI key from your external device (such as a keyboard.)
Read onward if you wish to know how to trigger multiple midi tracks in Ableton live and the specifics of how to set your key-map.
Setting your Keys
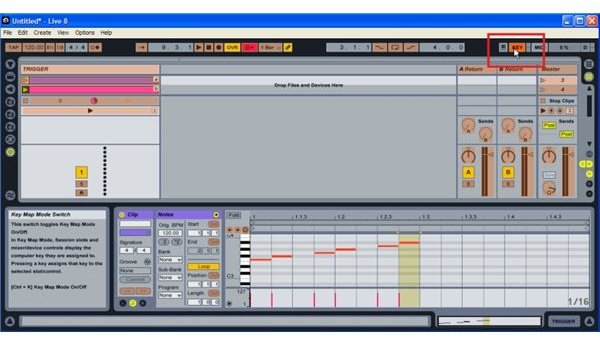
First, click on your session selector icon, on the right side of the screen, or go to ‘View’ at the top and then ‘Session’. Here you will see which clips you have available, on the left-hand side of the screen. For the purposes of this tutorial I have only loaded two clips, as an example.
To set your key is quite simple. Click on the ‘Key’ icon at the top of the screen, or go to ‘Options’ and then click on ‘Edit Key Map’. The clips, effects and similar which can be assigned will light up. Now click on one of your clips and then assign your key (press a key on your MIDI piano or computer keyboard.)
Remember you can create keyboard shortcuts for all these.
Triggering a Clip
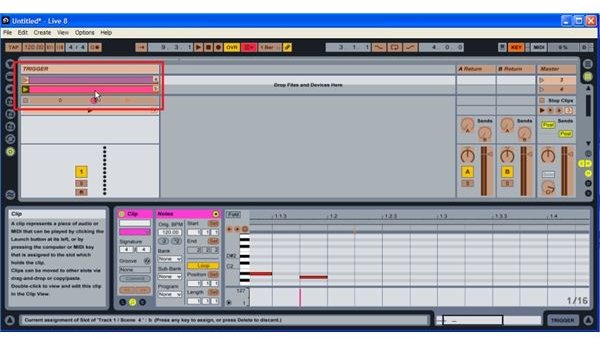
Now it is really simple to trigger your clip. In this tutorial, I’ve assigned keys A and B to both MIDI clips (from my computer keyboard) as a quick example. The default assigned key for global playback is your space bar, which you can of course re-assign should you wish to.
In order to trigger playback of clips, first hit the space bar so the playback begins. Then you can select clips from the keys you mapped (in the case of our example, clip A or B) or whichever you want to play at whatever time. This would also work with audio clips, and you can use the same method which is particularly useful for play sampled drum breaks whenever you wish.
Triggering either Midi or Audio clips (or both) could eventually result in a live set with your own unique flavor or style. For instance, by combining a Midi clip with a VST instrument (such as a Battery drum kit) and some sampled breaks (such as the amen break), you can drop them in the middle of your set for maximum effect.
Know you finally know how to trigger multiple midi tracks in Ableton live.
NOTE: This tutorial was created by using Ableton Live 8.2. All images and content are the author’s work and may not be reproduced without permission.
This post is part of the series: Ableton Live Tutorials
Learn some great ways to use the audio mixing software to your advantage.


