Panning is the name given to the technique of spreading your instruments and vocals across the left-right spectrum between your speakers. Of course you already know that. But do you know how to use panning to its best effect?
Critical Panning Issues
In our last article we looked at how the frequency spectrum can be seen as determining how the dimension of height is allocated between different tracks in our mix. This article will explore the dimension of width.
Width at first sight might appear to be an easy dimension to control. However, appearances can be deceptive.
Every track has a pan fader which can be used to move each track further to the left or right to allocate it a position in the left-right spectrum between the speakers. This has the effect of thinning out the mix and preventing the sound from becoming over busy and cluttered. As long as everything has its own space, everything should be fine, right?
If only it were that simple. For while it is true that you usually will want to position your instruments across a range from left to right, on its own that is seldom enough.
Other Factors
Some of the other factors you will also need to consider are:
- Acoustic balance. There will, invariably be numerous permutations of panning that will spread your instruments across the left-right divide, but you will also want to make sure that you achieve an acoustically pleasing left right balance. For example, you won’t want to place all of your bottom end heavy instruments (such as bass guitar, baritone sax and tuba) to one side and all of your top end heavy instruments (such as violin, piccolo and mandolin) on the other. It just won’t sound right. Where you know that different instruments are competing for substantially the same area of the frequency spectrum, consider placing them towards different sides.
Priorities. Some parts will certainly need to be given more importance in your mix than others. For example, a lead vocal should normally be placed near the centre.
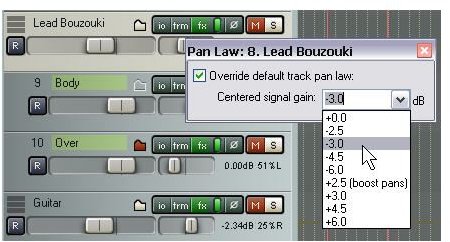
- Pan Laws. New generation software such as REAPER lets you assign different pan laws for different individual tracks. The pan law determines the rate at which a track’s volume appears to decay as it is pushed further out towards the edges of your mix. Where an instrument is especially present, for example, you might wish it to decay at a faster rate. The illustration shows how you can specify a pan law for an individual track in REAPER.
- Artistic Effect. This is amore difficult concept to explain. You need to try it out and work hard at it to get it.
Getting It Right
Suppose you have a vocal lead track, three vocal harmonies, an acoustic guitar, a bass guitar, a snare, a mandolin and a banjo.
You’d probably start by placing the lead vocal and the bass both near the centre, and you’d be off to a good start if you did. But then what?
Do you want your vocal harmonies to be panned as a group, close to each other, all off to the left or right, or do you want to spread them all the way across? What about your three stringed instruments? How do you want to balance that? Then that single percussive instrument, the snare. That’s just sitting there itching to cause you trouble.
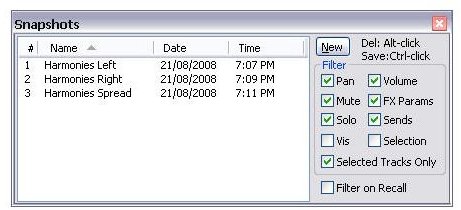
As a general rule in this sort of situation, try starting with the instrument that you are most worried about - in this case the snare. Experiment until you get it sounding about right. Then your stringed instruments and finally your harmonies. Keep in mind that there is seldom a single simple solution. Before you get carried away with reverb, compression or anything else, try saving two or three versions of your mix, each with its own panning arrangements. Shown on the left is REAPER’s Snapshots View, a simple but useful tool that lets you save many different mixes for the one project and to easily switch between them.
After that you can figure out which one works best, and concentrate on working with that.
One more point. If you think that that’s all there is to panning then you’re in for a shock. Our next two articles will explore further aspects of panning and how you can exploit these aspects to help you to produce great mixes.
This post is part of the series: Develop Your Mixing Sense
A series of articles intended to help you develop your mixing sense. Includes tips and tricks on finding the right balance in your mix, fleshing out thin sounds and more.


