
Most home recording enthusiasts are familiar with the concept of using width to spread out the different instruments in a mix. But did you also know that height is just as important in getting a good mix?
The Importance of EQ
In our previous article we looked at how can use spectral analysis tools to identify at least some of the areas where two or more tracks may come into conflict with each other. In this next article we will look at how we can use one tool, EQ, to correct this problem. In later articles we’ll be returning to this tool over and over again for any number of purposes. This article gives you an interesting introduction.
Let’s start by dispensing with one commonly held myth about plug-ins. In this context it applies to EQ, but we could equally be talking about delay, compression, gating or many other types of plug-in.
Log in to any audio user group and you will find posts asking questions like “Which is the best EQ?” or “Which is the best reverb?” I am so tempted at times to jump in with answer along these lines:
None of them if you don’t know how to use them properly. Almost any of them if you do.
That might not be 100% true but it does expose an important, obvious, but under-realised fact. Your understanding of what you are doing and how to use a plug-ins different controls and parameters will be more important in achieving a successful outcome than will be your choice of which brand of plug-in to use.
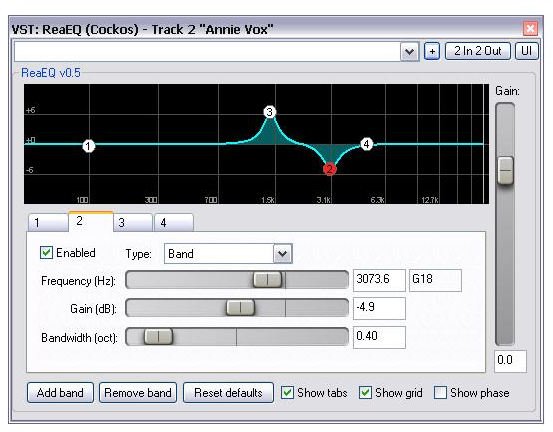
For what we are about to do now, you can use almost any EQ plug-in that you like. To begin with, try whichever one is supplied with your DAW. My example will show then use of ReaEQ, and EQ plug-in supplied with REAPER (my DAW of choice). But you can use any EQ plug-in with any DAW you wish to do this. Now let’s get back to the task at hand …
Conflict Resolution
In article 2, The Sound Spectrum, we identified potential conflict between our two vocal tracks in the range 1,200 Hz to 3,000 Hz. We can use our EQ plug-in to do two things:
- Identify the best frequency within this range for each individual track.
- Adjust the EQ for our tracks accordingly.
Insert an instance of your EQ plug-in into the first of your tracks. Select any band and change its type to Bandpass. Set a fairly narrow bandwidth and select a frequency about 1,200 Hz. Solo the track and play it. You will hear only that part of the frequency range that is allowed by the bandpass filter. Gradually adjust the frequency within the range that you are interested until you find that at which the voice sounds better than any other, This is known as one of its key frequencies. In the example illustrated, we have discovered a key frequency for this vocal at around 1397 Hz.
Now do the same for the other track. Find a key frequency within the conflict range as far from the key frequency for the first track as possible.
Now convert your bandpass filters to ordinary Band filters. For each track, add some gain at its own key frequency, and some reduction at the other track’s key frequency, An example of this for one of our tracks is shown in the second illustration.
You might wish to tweak your settings somewhat, but you will be amazed at the difference these few adjustments will make to the individual clarity of each of your voices.
This technique is not only suited to vocals. For example, it also can be highly effective in resolving conflict between different instruments, such as guitar, banjo and mandolin. Be prepared to be patient, to experiment and learn.
That’s it then? Well not quite. In fact we’ve a lot more to learn yet.
In this article we have looked at resolving one kind of conflict that can arise in one of the dimensions in which space and sound interact. In our next article you will see that there are many others.
This post is part of the series: Develop Your Mixing Sense
A series of articles intended to help you develop your mixing sense. Includes tips and tricks on finding the right balance in your mix, fleshing out thin sounds and more.


