Want to get your iPhone photos onto your computer? This walkthrough will show you exactly how to transfer photos from iPhone to Mac.
Transferring iPhone Photos
Not many people carry around a digital camera at all times, but most always have their cell phones with them. Luckily, iPhone’s camera app allows you to take great digital photos that are comparable to some digital cameras. But what’s the point of taking those photos if you can’t get them onto your computer for safekeeping. I’m going to show you how to transfer photos from iPhone to a Mac. If you have any questions after following the steps, feel free to leave a comment with your question.
Transfer Photos from iPhone to Mac
I prefer using a Mac to transfer photos from an iPhone. Apple usually designs its products to compliment each other, so it’s easier and has less steps than using another brand of PC. Connecting your iPhone to your Mac is the hardest part. Everything else is almost done for you. Without further ado, grab your iPhone, a USB cable, your Mac and let’s get started:
- Connect your iPhone to a USB port on your Mac computer.
- Wait for a few seconds. iPhoto should open automatically. If it doesn’t, double click the iPhoto icon from your Mac’s dock.
- iPhoto will usually automatically take you to your device’s photos once you connect your phone. If it doesn’t, select your device along the left side of the screen.
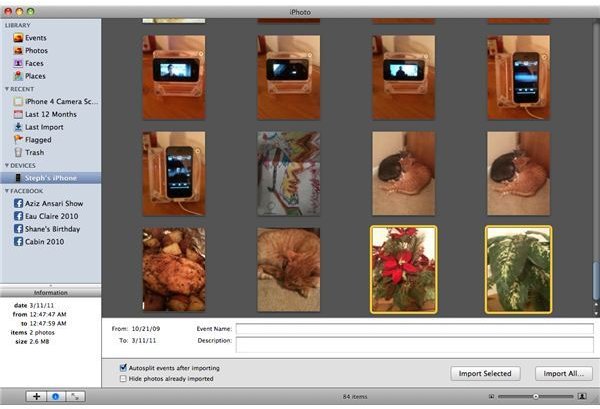
- Your photos will be displayed. Type in an Event Name and Description if you’d like.
- Press “Import All” or select the photos you would like to be transferred to your Mac and press “Import Selected”.
Transfer iPhone Photos to a Flash Drive
Interested in transferring your iPhone photos onto a flash drive? With a Mac, you’ll need to upload them to the computer first, then transfer them over to your flash drive. Follow the steps above to upload your photos to your Mac, then insert your flash drive into a USB port. Open iPhoto and drag and drop all the photos that you’d like onto your flash drive. New to this and need more detailed instructions? Read Transferring iPhone Photos to a Thumb Drive for a step-by-step guide.
Taking Photos with iPhone
Now that you know how to transfer photos from iPhone to Mac, take full advantage of your phone and start snapping shots of the precious moments that you’ll want to remember forever. Before you do, make the most of your iPhone camera by learning the ins and outs of its camera app. Whether it’s tips on taking better photos or photo editing hints and tricks you want, Bright Hub has several guides that you may like to check out.
- Taking Great Photos with iPhone
- Top 10 iPhone Camera Apps
- Top 10 Apps for Editing & Enhancing iPhone Photos
References
“iPhone User Guide.” Apple, www.apple.com
iPhone image courtesy of Apple, www.apple.com
Screenshot provided by author.


