Use these simple steps to set up an iPhone Exchange e-mail account. The Microsoft Exchange e-mail service is widely used in large organizations, but help is not always provided to iPhone users who want to check their Exchange e-mails accounts on the iPhone.
Step 1: Get Your Exchange E-mail Settings
In order to set up your iPhone Exchange e-mail account, you need to have a few settings and configuration details on hand. If you do not have this information, contact your IT Help Desk for assistance.
- Email address: this needs to be your full email address (e.g. Jane@company.com ).
- User name: in some cases, this is the same as your email address.
- Password.
- Description: the description can be anything you want (e.g. “Work Email”).
Note: Before you set up your Exchange account, you should back up your iPhone with your computer using iTunes.
Step 2: Add Account Using Settings
Once you have all the configuration information described in Step 1, you can begin the set up process.
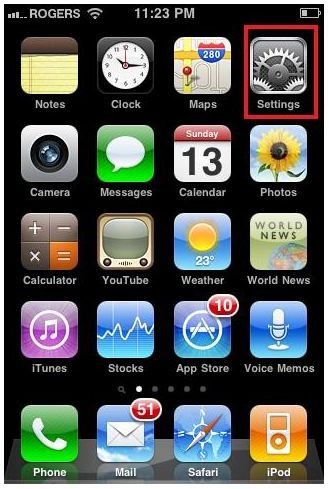
Go to the Home Screen and look for the “Settings” app, which looks like a series of gears. The settings app is circled in red. It looks like three interlocking mechanical gears.
Step 3: Open “Mail, Contacts, Calendars”
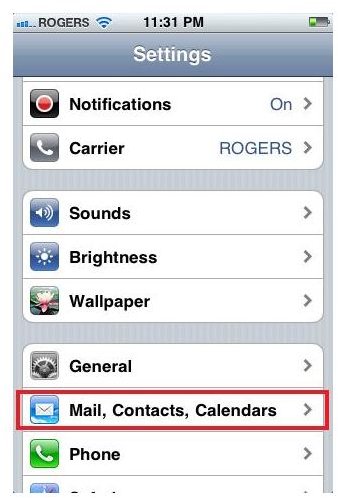
Open “Mail, Contacts, Calendars.” This part of Settings can be used to set up any e-mail account, not just Exchange e-mail accounts. Check out how to set up e-mail on iPhone for instructions related to other types of accounts. The option you need to select has been outlined in a red box in the screenshot shown below:
Step 4: Open the “Add Accounts” option
Open the “Add Accounts…” option to choose the type of e-mail account you wish to open.

Afer you open the “Add Accounts…” option, you will be prompted to select from several e-mail account options: choose “Microsoft Exchange.”
Step 5: Input your Microsoft Exchange E-mail Settings
This is the step where you can enter the information you gathered in step 1 (e-mail address, user name, and password) and type it into your iPhone. Enter the information slowly to ensure you do not make any mistakes.
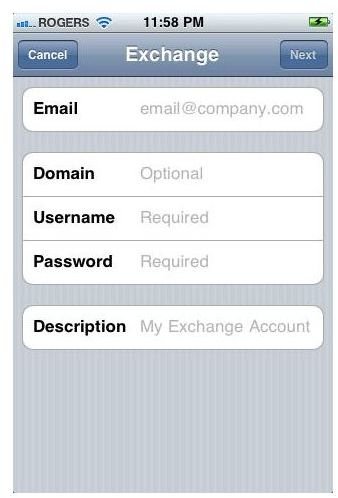
Unless you have been told otherwise, you can leave the “Domain” field blank. You may enter whatever description you wish in the Description field. If you use multiple e-mail accounts on your iPhone, make sure your Description is distinctive. Here are some suggested descriptions you can use: Work E-mail, Home E-mail, or Corporate E-mail. Once you have entered all the information, tap the “Next” button in the top right hand corner.
Step 6: Acknowledge the “Cannot Verify Server Identity” Prompt (optional)
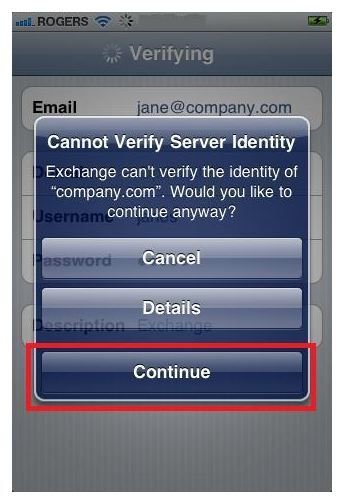
In some cases, you may be encounter a “Cannot Verify Server Identity” message. Choose the “Continue” option (outlined in a red box in the screenshot below). If you encounter this error message, you will need to know the server address for your Exchange e-mail server. If you do not know this, contact your IT Help Desk.
Step 7: Choose Your Exchange Sync Settings
If you have successfully completed the steps outlined above, you will now be at the final step. At this stage, you can choose which Exchange content you wish to sync to your iPhone. You must set at least one of the options to “ON” in order for your account to work properly. Once you have made your choice, tap the “Save” button in the top right hand corner.
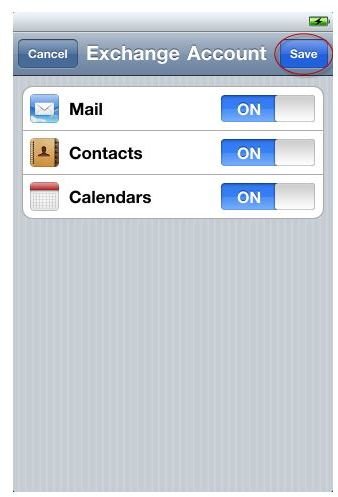
Warning: When you set “Contacts” and “Calendar” to “ON,” your iPhone will download your contacts from the Exchange server and overwrite the Contacts on your iPhone. If you choose to sync all the content, back up your iPhone contacts first.
References
The steps in this article explain the iPhone Exchange e-mail set up process. If you encounter problems, you may wish to consult your help desk, Apple or Microsoft for further information on error messages and other problems.
- iOS: Exchange ActiveSync Account Quick Setup Guide (Apple), https://support.apple.com/kb/ht2480
- Set Up Exchange ActiveSync Access to Your Mailbox (Microsoft), https://help.outlook.com/en-us/140/bb896613.aspx
- Screenshots provided by the author


