This article will show how to create JUnits in a Android project using practical examples. It builds on the work taught in the previous two articles in the series.
Introduction
Now we know about JUnits philosophy , and we know how to set up JUnits in Android´s development environment, let’s start creating some basic examples, gathering all the information we had from my last articles.
The starting point is the BrightHubExample and the BrighHubExampleTest projects from the last article I wrote. At the end of this article I will publish the full code of the examples we are going to create.
Instead of explaining JUnits with the Calculator example (as I did in my first Junit article), I will use another exercise. We are going to test a piece of code inside our Android application with the following specification:
- We will have a StringCounter class
- This class will have the following functionality:
- Counting words for a given string.
This specification will be used for our example.
Testing words counter
Let’s test the first functionality of our class: the word counter.
In the BrightHubExampleTest project, we start writing our testing method inside the HubTesting file. You have to remember first of all that we need to create the testing classes, even after creating the functionality itself. So we need to test that the method countWords (this is a good moment to give name to the method) from the StringCounter class counts the words of a given string.
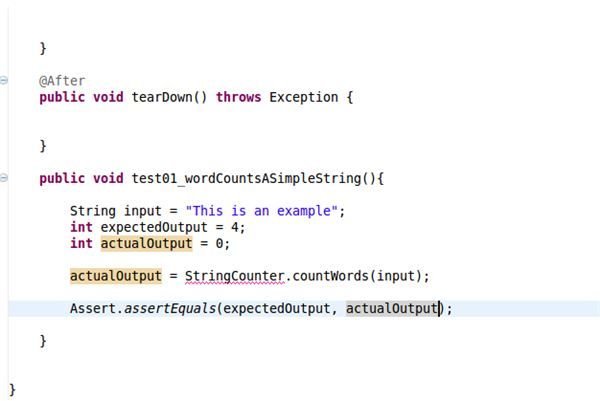
First test: a regular situation, we pass to the method a normal string and we receive the number of words from that string. Here it is:
We create an input sample string, and we create two variables, the expected output (we know that this number is going to be 4, because we have set the string with 4 words) and the real output (set to 0). Now we name our method
actualOutput = StringCounter.countWords(input);
As you can see at the image, Eclipse complains to us marking this line as “invalid”. Yes, it´s true, it’s invalid because we have not created the method, not even the class yet! Let´s create them: A class called StringCounter with a method called “countWords” that have an String as input parameter and a Integer as a return value inside the BrightHubExample project.
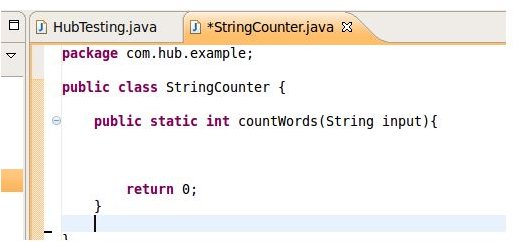
Remember to create this method as “static” (this is just because it’s easy to set for our learning purpose) and don’t forget to import the StringCounter class inside the Testing class.
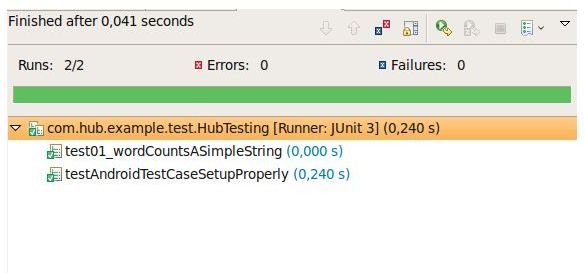
Now that we don’t have any compilation problems, let’s try our creation:
Right Click on BrighHubExampleTest project → Run As → Android Junit Test.
The JUnits window will appear with this information:
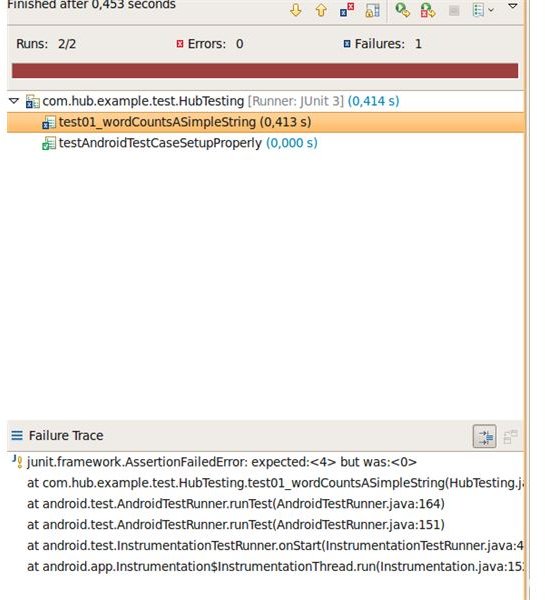
Interesting:
junit.framework.AssertionFailedError: expected:<4> but was:<0>
This error means that the test has failed —but why? “it expected 4 but the result was 0”. If we remember the test we created before, we set as “expected value” a 4 (the number of words in the string) but a 0 was returned. This is because when we create the countWords method we set by default “return 0”
Well, now that we know what happens when a test fails, let´s create the full functionality to make it pass
Hint (TDD says that first you have to implement the minimum functional code that makes the test pass, this will be as easy as put the “return 4;” instead the “return 0;” in the tested method. We are going to skip this step and create the functionality we think will make this test pass)
So with this piece of code:
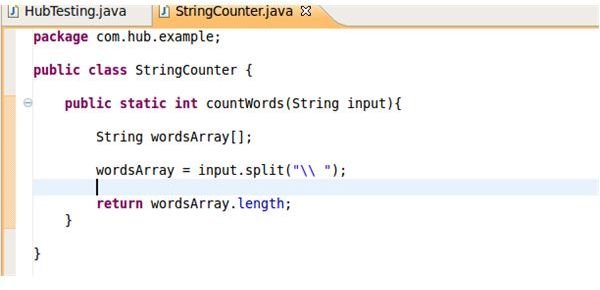
And running the tests again, we can see that the test passes
Now we have the basic functionality, our code must be refactored. Well, in this case this is not significant because we have just 3 lines of code, but imagine a more than 20 lines method. Maybe we could do some refactoring and improve the effectiveness of the method.
(Refactoring is a very good practice; it should be done from time to time. This helps keep your code clean and legible).
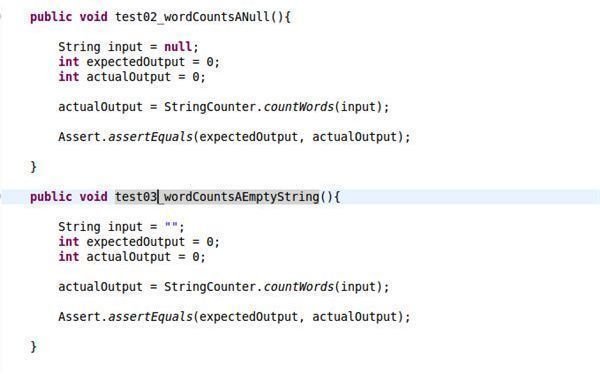
Once our code is refactored, let’s think about more possible cases of testing. Think about extreme cases. What happens if the input value is null? Or what if it is an empty string? We have to test it, so let’s create a pair of test methods for this purpose.
And now, let’s run the tests.
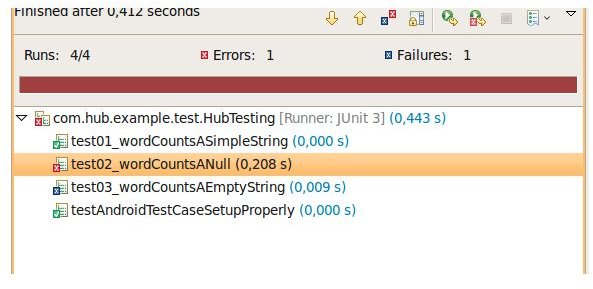
Oh! that’s new!
java.lang.NullPointerException
That’s because we are trying to use a null value inside the “split” method.
About the 3º test. It’s not passing. We have to fix them. The following code will work:
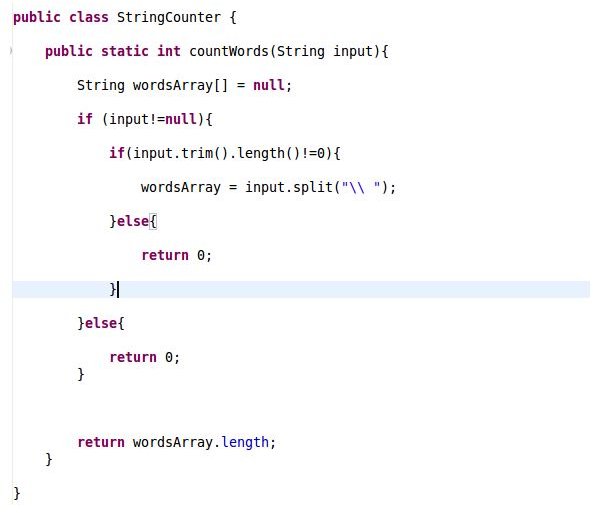
And when running the test:
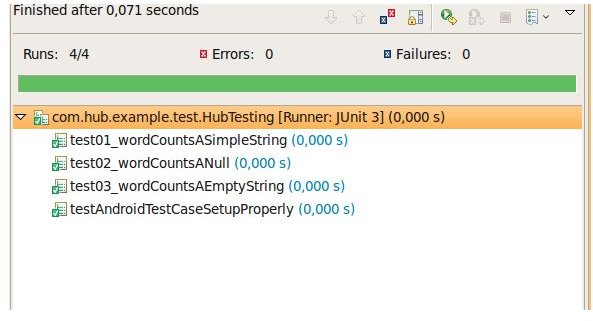
Great! we have them passing all tests.
Now you have the basic knowledge and tools to create good quality code. And remember, create as many test methods as you can think of. The more you create, the safer your code will be.
Here are the complete examples:
Ask, comment, interact!
Ask any question you have about the article; I will try to answer as fast as I can. Comment on my code, my writing, maybe there is something that its missing or is not complete; just let me know - In other words, interact!!
Follow up
If you want to know when new articles are released, subscribe yourself to the Google Android RSS. Otherwise, you can follow my research, articles and work in my professional twitter: jbeerdev
Testing in Android Development Environment
In this series of articles I will write about testing philosophy, JUnits in Android and how to create useful testing classes.
- An Introduction to JUnits in the Android Development Environment by Jbeer
- Junits in the Android Programming Environment by Jbeer
- Creating JUnits in Android by Jbeer


