Get acquainted with the tools you’ll need to create a project in SketchUp. Following our series on designing your house with SketchUp, this article explains what tools you’ll need and why.
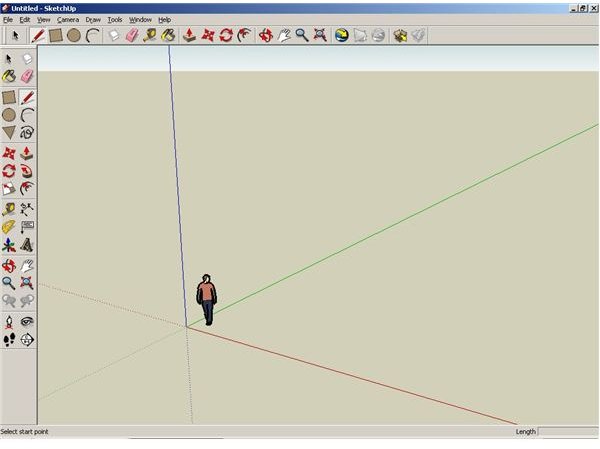
The opening screen of Google SketchUp, is in the perspective view. You will see a model named Bryce. Bryce is there to help you with scale and proportion, but most people find him a distraction. You can easily delete him and re-add him or other people at later times in your modeling. You will also notice red, green, and blue lines. This is where the geometry comes in. The red line represents X axis, the green line represents Y axis, and the blue line represents Z axis. The dotted lines represent the negative X, Y, and Z axises respectively.
Don’t worry about brushing up on your high school geometry skills. You won’t need much more than a rudimentary understanding of dimensions and space, unless you’re planning on doing projects that require precise measurements. SketchUp is extremely intuitive and will help you by predicting your next logical move. You will see as you go along, that SketchUp gives you suggested moves (by way of dotted lines). This is one of the ways this software is so user-friendly.
In order to model with ease, you’ll need to get very familiar with your tool bar, and the keyboard shortcuts. Here are the tools you’ll need for designing a basic house.
Select, Line, Rectangle, Circle, Arc
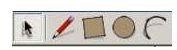
Select - Space Bar
This tool isolates all the object you click on. Select an object directly clicking on it, or by clicking on nearby area and dragging to include object.
Line - “L” key
To create walls, floors, ceilings, and more, you’ll need the line tool. To use the line tool, select point a, release the mouse, and then click on point b. A straight line is created between both points. It’s not necessary to drag the mouse to create a line.
Rectangle - “R” key
Circle - “C” Key
Arc - “A” Key
In the example shown in this series, we’ll use the arc tool. To create an arc, select the beginning and end points, and then go back to the middle to start raising the arc. Make a final third click to complete arc.
Make Component, Eraser, Tape Measure, Paint Bucket
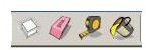
Make Component - No short cut key
Combines items to make an element of your design. Useful for creating windows, doors, pieces of furniture.
Eraser - “E” Key
This tool deletes undesirable items. To use the eraser tool, simply hold down the mouse button and move the eraser over part of the item. If it is a line or a component, the whole item should be deleted.
Tape Measure - “T” Key
This is an invaluable tool that allows you to measure lines and faces. You’re also able to create construction lines with the tape measure tool, allow your lines to be uniform. Use the tape measure tool in conjunction with the Value Control Box (VCB).
Paint Bucket - “P” Key
Select a fill color for your walls from a materials pop up box.
This post is part of the series: Creating a House with SketchUp: Start to Finish
A basic tutorial series for you to create a dream house with free 3D modeling Google SketchUp. Learn what you need to know, to get you started quickly!
- Preparation: The Basics of Designing Your House with SketchUp
- Getting to Know the Tool Bar in SketchUp Part 1
- Getting to Know the Tool Bar in SketchUp Part 2
- Creating Your Floor Plan in SketchUp
- Google SketchUp: Raising the Roof and Erecting Walls to your 3D Dream House
- Beautifying and Presenting Your House Using SketchUp


