
Have an event that you need to get the word out about? Google Calendar will help you keep things simple because all you’ll need to do is get email addresses from your attendees, and you will be notified of their attendance via email. Save yourself some time and use Google Calendar.
Getting Started
Google Calendars is a wonderful application, offered for free. All you have to do is sign up, and if you have a Google account you use with other services like Gmail, AdSense, and AdWords, you can use it here too. If not, you should read Google Calendar: Creating an Account for help getting set-up. It’s a simple process and isn’t any more difficult than setting up an email address.
To get started, you’ll need to visit Google Calendars . Login, or follow the on screen instructions while referring to the article above for help.
Use this program to save time, paper, and postage. Electronic event invitations help you in all three of these areas, and through Google Calendar’s Event Invitation feature, you’ll be able send your invitations for free.
Creating an Event Invitation
Once you have logged into your account, you’ll see a screen like the one on the right. From here, you can see all the events in your calendar, and create new ones.
Click Create Event on the top left, as demonstrated by the red arrow in the screen shot.
This will bring you to the Create Event Screen, shown below on the left. To create an event, fill in the required fields. Tell Google what the event is, when it will occur, if it happens more than once–and if you want it to repeat–along start and end times of your event. Google will offer to remind you, via email, SMS message, or pop-up, at a pre-determined interval of time that you set.
If you have multiple Google Calendars, you’ll also need to choose the calendar in which you want to place the event.
Choose whether you’d like to be shown as busy or available on Google Talk–the integrated instant messaging program within the Gmail dashboard–and whether the event should be public or private.
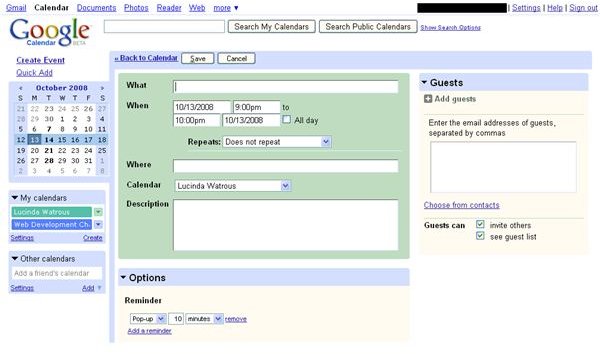
On the right side of the screen, you’ll see a box labeled Guests. To send an event invitation, enter the email addresses of the people you would like to invite to your event. If these email addresses are in your Gmail account contact list, you can grab them from there by clicking Choose from Contacts. This will open in a pop-up window from which you can select addresses in your Gmail address book.
The last thing you do before you save the event and send the invitation, is choose the guest options. This will allow your guests to potentially invite other members and see the guest list if you leave both boxes checked.
Once you have completed all of these steps, scroll down and select Save. Your event is saved, your invitation is sent, and you are all set. This is a very handy tool for meetings and keeps things simple.


