You can make backup copies of your Blu Ray discs for your own use, but first ensure that this is legal in your country. The process is somewhat similar to making backup copies of DVDs and inside we explain how.
Introduction
Before we begin by converting Blu-ray media to WMV files, we have to know where we are heading. First, there are some legal considerations. My personal opinion is that making backups of any digital media is perfectly fine, given that you hold the original, but governments may not have the same opinion. Therefore it is the best to check this point in advance and make sure that you are not navigating in dangerous waters. Secondly, converting one media format to another, DVD to AVI or WAV to MP3 is called “ripping” in computer terms and ripping Blu-ray discs involves very high computer resources. Note that you will be dedicating all of your computing resources to the ripping task and, with current computers, this will take a long time. You should consider performing this task when you will not be using your computer for a couple of hours. Plus, the resource usage is not constrained to the processor (CPU) and main memory (RAM), it is also affects the storage. I suggest that you have a minimum of 80 Gigabytes of space free on your hard disk. Of course, there should also be a Blu-ray player installed and working on your computer.
Ripping Blu-ray DVDs is for Windows computers only. Mac and Linux are not supported (for now).
Software
Before we get going, we need to have some software for our task. Here is what we need and why:
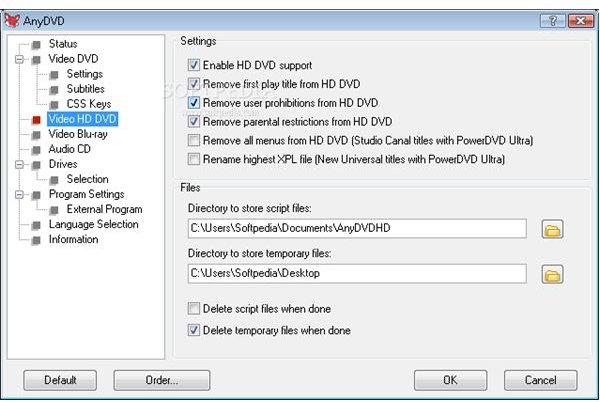
- AnyDVD HD : Removes the BD lock, region code, and other security blocks and makes the Blu-ray disc “rippable.” The download is 21-day fully-functional evaluation copy. The full version costs USD 80.
- .NET Framework : Download and install the latest .Net framework release. The other programs that we will use require .NET Framework 2.0 but it is better to have the latest release (3.5 for now).
- Avisynth and FFDShow Codecs: Required by RibBot 264 (see below).
- Haali media stripper : Required by RipBot 264 (see below). If you have K-Lite Codec Pack installed, you probably have this one already. You can check for AVI Splitter on your codec pack, which is the other name for Haali.
- RipBot264 : Transcodes the copied file to the format of your choice, in our case Windows Media (WMV).
- TSMuxer : Used to rip the audio/video streams from the Blu-ray disc. If everything goes fine, this will not be necessary.
Please install these programs in the order shown above.
Process
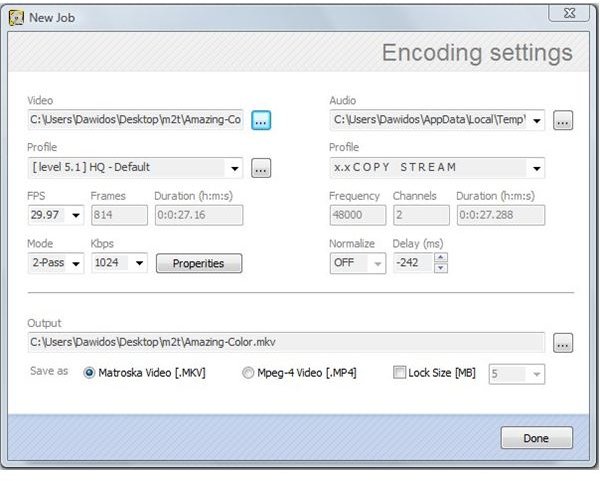
Now let’s roll up our sleeves and get going. First, start AnyDVD HD and go to your system tray and click on the fox icon. Select “Rip Video DVD to Hard Disk.” You can expect this process to take three hours or so. When AnyDVD HD has finished, go to the C:\Movie_Name\BDMV\STREAMS directory and find the largest file with .m2ts extension. Double-click on it. If it works perfectly, then open up RipBot264 (if not, skip to the next paragraph and then come back). When you open up RipBot 264 for the first time it will complain that you don’t have FFDShow installed. If you followed my advice and installed the codecs, search for the RipBot264 file, open it with notepad, and find the entry “CheckRequiredSoftware.” Change the value from 1 to 0. Save the file and open RipBot 264. In the program, click “Add” and select the largest file with the .m2ts extension under “Video” in the top left. Then make the necessary selections that suits your taste (such as saving the movie for iPhone or iPod or MP4 or MKV) and select where the output file will be saved. Then click on the options and select the output size of your video. Be sure to make a preview here, otherwise you will have to go through the long process of transcoding again because the output file will not match your device. When you are done, click “OK” and then “Start” to begin the process. It will be a wise option to start the process before you sleep and leave your computer running because the transcoding process will really take long (again, depending on your hardware configuration this will take at least another three hours). When the program has finished without errors, it means you have completed the ripping process. And, no, you cannot watch your movie when you are ripping or transcoding it; you will at least double the ripping or transcoding time, your video will seem choppy and sometimes stalled, yet demanding these tasks simultaneously will make your Windows system more prone to crashes. And if it crashes, you will have to go back to the process and start all over.
If RipBot264 complained as told in the previous paragraph, then there are two possible reasons:
- You do not have enough space on your hard disk, or
- RipBot264 has some problems with the Blu-ray disc that you have
Correcting the first one is easy; either free up some space or select a drive with a bigger capacity. To solve the second one, open the TSMuxer program and select the largest file with the .m2ts extension as you did previously. TSMuxer will display all the languages present in the file. Choose the language, select the output folder and click the “Start muxing” button. When TSMuxer finishes, you will have a file with a .ts extension. Open up the RipBot 264 and select this .ts file as the input file.
Conclusion
Ripping a Blu-ray DVD requires too much resources, takes up too much space on the hard disk, and takes a very long time. However this does not mean that it is impossible. If you follow our steps so far, you should already have a high definition movie file stored in your computer.
Screenshots courtesy of Softpedia .


