
The Kindle DX eBook reader has a secret “recovery mode” that allows you to manage and re-install files when the reader’s normal interface is defunct. We show you how to access and use this mode.
Recovery Mode: Kindle DX’s Secret Tool
Think back to 2009, when Amazon unveiled the Kindle DX eBook reader . At that time, nobody knew much about the device beyond what was on the sales pitches: thinner than the original Kindle and Kindle 2, with a larger screen than either, incorporating PDF support and a neat accelerometer to automatically rotate pages as the device was turned. Besides this, of course, the Kindle DX includes the same service as earlier Kindle readers, interfacing with Amazon.com to allow eBooks to be downloaded and consumed on the go.
As time goes on, users have discovered more about the Amazon Kindle DX. Not mentioned in either Kindle DX reviews nor the official Kindle DX product page, for instance, is the recovery mode, Kindle DX’s equivalent of a computer’s “safe mode.” This useful function allows you to rescue a “bricked” or non-functioning Kindle by accessing the reader’s “emergency controls,” as it were. The mode is not for users who don’t know what they’re doing; however, a quick browse of our tutorial for the Kindle DX recovery mode will give you the confidence to access this useful tool should you need to.
Accessing the Recovery Mode
If your Kindle DX is working correctly, it’s probably best to leave well enough alone. However, if you’re experiencing lost eBooks, the inability to boot past the intro screen, incorrectly functioning menus or a Kindle DX that won’t connect to your computer via USB, it’s worth booting up Kindle DX Recovery Mode to see what the problem might be.
Accessing the Recovery Mode is easy, but you need to be attentive. To access the mode, first plug your Kindle DX into a mains power outlet: you can do damage by launching Recovery Mode on a Kindle DX with a low battery. Then, reset or turn on the device. Wait for the screen to flash from black to white. As soon as this happens, press and hold the “Home” key. If you see the “Amazon Kindle” launch screen with a progress bar, you’ve missed your window - wait for the device to boot then reset and try again.
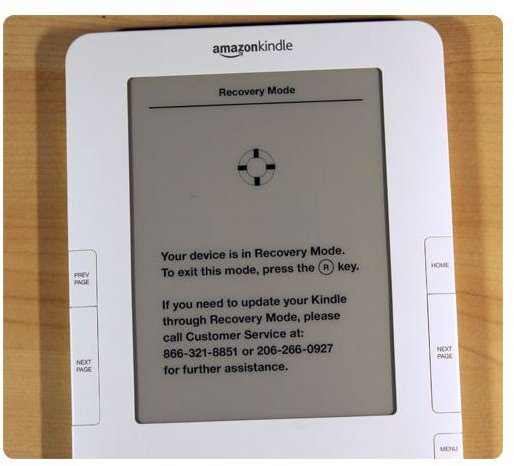
Assuming you’ve got the timing right, you’ll now see a screen reading “Recovery Mode” with a round life-ring in the top half of the screen.
Using Recovery Mode

Now that you’re into Recovery Mode, what can you do? Well, if the Kindle DX isn’t connecting to your computer or showing up when you plug it in, Recovery Mode will bypass the software checks that are most likely preventing the connection. When you connect a Kindle DX to your computer in Recovery Mode, it’ll show up as an external drive and allow you to browse and alter files. With this ability, you can scan the device for corrupt or incomplete files, as these are the most likely culprits for system errors. Go through the file structure looking for files you installed immediately before the device stopped working - if the file won’t open, copy it to your desktop, delete from your Kindle DX and reboot to see if this fixes the problem.
Recovery Mode can also be used to re-install a software update to your Kindle DX. If the reader’s operating software is faulty, it can sometimes refuse to boot - preventing you from installing fresh software. Go to Amazon’s software update page and download the latest version of the software for your Kindle DX. Transfer the file to the root directory of your Kindle DX and disconnect the reader, then press “1” on the Kindle’s keyboard. This will install the fresh software onto your reader, overwriting the corrupt software that may have been causing problems.


