People who purchase a Canon XL1 digital video camera have invested some good money into a solid piece of recording equipment. However, there are some important things to remember when working with this camera. Here are some tips for those working with this camera to ensure the best video possible.
Information About the Camcorder
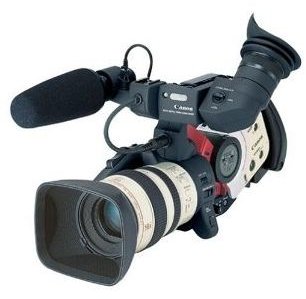
The Canon XL1 is a mid-range video camcorder, running $4,500 new as of June 2011. While it is not the latest in the Canon line of video cameras, it is still a worthy addition if you understand its limitations. The first thing anyone who wants this camera has to know is that it is a
standard definition (SD) video camera and, at over $4,000, a videographer is investing a lot for something that does not shoot in high definition (HD).
However, the camera does give a lot of leeway when shooting quality video. With all the adjustments the camera allows, if the scene is lit properly, video quality with this camera is better than some lower end HD camcorders. However, in order to achieve this quality, a user must understand all the intricacies of the camcorder.
The other thing that a person must understand is that if the camera is purchased in its basic package, the lens is a 16x optical zoom lens and shoots in full screen. What makes this Canon XL1 so intriguing is the camera uses interchangeable lenses, and widescreen lenses can be purchased. Unfortunately, these lenses cost over $2,000 and, by the time all the pieces are added, the camera becomes an expensive investment for an SD camera.
Before Getting Started
When looking at Canon XL1 tutorials, a lot of talk goes into what to do with the camera but it is just as important to make sure everything where you are shooting is optimal. Sure, if you are shooting a live event such as a football game or concert, there is not much you can do to optimize the look of the scene but, if you’re shooting a short film or something you have control over, you can do a lot before hitting the record button to ensure the Canon XL1 performs at its best.
The first thing to understand is that the camcorder can shoot almost better than lower level HD camera if, and only if, you light the scene properly. There are plenty of tutorials concerning lighting for video and they all provide great advice for videographers. Film directors like Steven Soderbergh have proven that a Canon XL1 can shoot motion picture-quality images but those directors also know how to light a scene. Learn how to light a scene properly and the money spent on this camera will pay off in spades. If the lighting is poor, you might as well be shooting with a $100 SD video camera.
Adjusting the Levels
The first thing I would suggest is to use a UV filter when shooting outdoors. The Canon XL1 is notorious for washing out images if there is too much light and the sun is a killer in outdoor situations. Also, if shooting outdoors, the camcorder comes with a built-in ND filter, which can be turned on to decrease the amount of light passing through the lens. This button is found right next to the lens itself. Make sure this is not on when shooting indoors, though. It might be a good idea to set up a checklist so you can double-check all settings before every shot.
The next step you need to do is adjust the f-stop and shutter speed for the shot. The camera offers an EASY shoot level but this will not provide you with a quality image. Using this level is something only amateurs should use and those are not the people who should dish out the money for this camera. The level you should almost always use if shooting for the optimum quality is MANUAL.
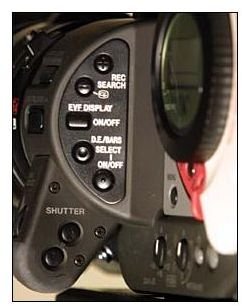
Once on the MANUAL level, you can adjust many things to make the images look as good as possible. On the left side of the camera there is a wheel for the Iris/Select and two buttons for the Shutter. There is also a Gain dBi sensitivity level you can adjust, also on the left side of the camera.
- IRIS: This controls the amount of light coming through the lens. The Canon XL1 also comes with a “ZEBRA STRIPES” feature so you can see what areas of the screen are washed out. Adjust the IRIS until all Zebra Stripes are gone.
- SHUTTER: The Shutter relates to the speed of the camcorder. The Shutter Speed needs to be adjusted based on the lighting of the scene. The Canon XL1 offers anywhere from 1/8th of a second all the way up to 1/15,000th of a second. This setting determines how long the light is allowed into the camera. A faster shutter speed allows less light to enter, and makes the image darker.
- GAIN dB: This level increases low light capabilities. The levels on the camcorder range from -3 to +30 dB.
What is best is to simply play with the levels until the image looks as good as you want it to. Do not use the viewfinder as an accurate depiction of what the image will look like, though, because that is not the look you will end up with. One cheap alternative is to buy a small color television and hook the camera up to the TV to use as a monitor. Other videographers believe that the better indication of the quality will come with a black and white set but I prefer to see how vivid the colors will look.
Finally, set the White Balance . It is also on the left-hand side, right next to the GAIN dB. To set the levels, make sure you have something completely white, such as poster board, and aim the camera at it. Press the White Balance level button to make it pop out and choose whether it is indoor, outdoor or one of the specialty levels. Press the White Balance adjust button and it will set the balance for you. Then push the pop-out button back in.
Finally, all the lighting levels are set, the colors are what you are hoping and the white balance is ready. This means, you are ready to shoot your movie.
Other Things to Take into Consideration
I mentioned earlier that you can fake widescreen but that is not really recommended. What the Canon XL1 does when you turn on the 16:9 widescreen mode is cropped and not letter boxed. This makes a huge difference when showing your movies to others and it is clear you did not use true 16:9 widescreen. You can try this for your own projects but don’t expect it to pass muster with professionals.
The next big problem is the audio modes. The camcorder comes with a microphone that attaches to the right side of the camera but the sound quality is poor and you can sometimes hear the whirring of the MiniDV tape as it records the audio. Don’t use the onboard mic, pay the money for a shotgun mic.
You can hook an external mic into the camera if you don’t have a separate audio recording device using the Audio jacks on the back of the camera. Just make sure the AUDIO IN is switched over to those jacks. You can then adjust the sound levels with controls on the left side of the camera body. Make sure you get the right adapters to hook in your mic and make sure they are capable of delivering stereo sound, which takes a splitter for the Canon XL1.
Finally, as a warning, be careful when handling the camcorder. The FireWire input jack makes it easy to transfer your video to your computer but it is delicate. If you are too rough when plugging your cables into the camera, this camcorder’s FireWire port has a habit of breaking and then you are stuck without the best way to transfer video. Also don’t shoot in areas where the weather is too humid because the camcorder will shut down as a self-protection if it gets too humid. If that happens, you are left without a camera to shoot with.
References
Information from author’s personal experience.
Buy a Canon XL1 from Amazon.com
Canon XL1 image used from Amazon page.
The other two images are from author’s personal collection.


