Trying to figure out how to clean install Windows 7? For the most part, clean installing Windows 7 is an easy, step by step process. This article covers some tips, tricks, and workarounds for performing a Windows 7 clean install on your computer.
Remove Windows 7 and Reinstall - Alternative Methods
Previously, we covered the basic way to remove Windows 7 , format the hard drive, and reinstall. If you have not yet done so, please check out the first two articles in the series for specific steps and guidelines.
If you have tried reinstalling Windows 7, but for some reason it didn’t work, there are a couple of alternative methods that you can use to remove old versions of Windows and do a Windows 7 clean install.
The most popular method involves the following steps:
- Insert your Windows 7 operating system install disc into your PC’s CD/DVD drive.
- Navigate the path Start > Control Panel.
- Scroll down the page and select the option titled Recovery.
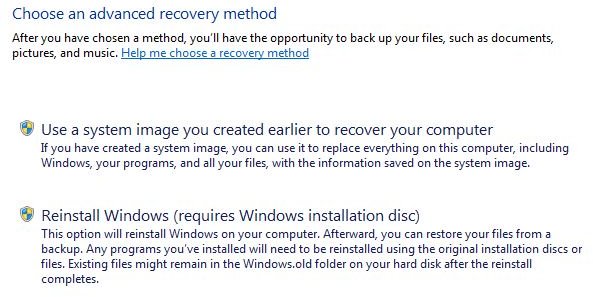
- Click the link ‘Advanced recovery methods’.
- Select the option Reinstall Windows (requires Windows installation disc).
- Follow the on screen wizard to complete Windows 7 reinstall and removal of old Windows 7.
Windows 7 Clean Install Using an Upgrade Disc
Using an upgrade disc requires an extra step, before you can get Windows 7 activated . After you have removed Windows 7 and reinstalled, you should have Windows ready to go. However, you will not be able to activate Windows 7 with an upgrade key, because using a Windows 7 upgrade key and disc requires you to upgrade from a previous version of Windows. Because you have clean installed using an upgrade disc, you need to trick Windows into believing that you have upgraded from a past version of Windows.The following steps will allow you to activate Windows 7.
- After removal of old Windows and clean install, make sure that your computer is powered on and you are logged into Windows.
- Insert your Windows 7 Upgrade DVD into your computer’s CD/DVD drive.
- Once the install disc loads, choose the option to Install now.
- The next screen will present you with two options. Choose the upgrade option.
- Follow the on-screen wizard to initiate the upgrade process.
Once Windows finished upgrading, your key will be functional and you can activate Windows 7. Because you have just upgraded Windows 7 on top of Windows 7, Windows detects this as an upgrade. The Windows 7 clean install using an upgrade disc should be complete.
Installing Windows 7 Drivers
After installation is complete, you may need to install drivers so that your display, sound, video, etc… works with Windows 7 . Finding drivers is not a general process, as each PC manufacturer is a bit different. If you bought your computer from a manufacturer such as Dell, Gateway, or HP, you should have gotten a drivers CD/DVD with your PC. Simply insert this disc into your computer’s CD/DVD drive and follow the on-screen instructions for installing drivers.
If for any reason you don’t have a drivers disc, you can always download the drivers from manufacturer websites.
That’s all there is to it. Now all you have to do is copy your files from backup back to your new clean Windows 7 install.
This post is part of the series: Windows 7 Reinstall Guide
This in-depth, three part series focuses on the concept of backing up your files, erasing Windows 7 from your PC, formatting the hard drive, and reinstalling Windows 7. There are a couple of ways that you can go about a clean install of Windows 7, but this method is the easiest and most effective.


