Windows 7 jump lists are right-click menus that make it easier to find what you are looking for. Learn about Office 2010 jump lists, including what they display and how to customize them.
What Are Jump Lists?
The Quick Launch toolbar found in previous versions of Windows are gone. They have been replaced with Jump Lists. Jump lists are contextual menus featured in Windows 7 and designed to make it easier for you to find the files and operations you need.
You will find Jump Lists in two locations: your Windows taskbar and your Start Menu. If you have a program open, a Jump List will appear in the taskbar. You can also pin programs to the taskbar so that their Jump Lists are always available there. To view a Jump List in the taskbar, right-click any icon you see there. If you have Windows Touch, you can also flick Jump Lists to view them. Read Using Windows 7 Touchscreen Features to learn more about this feature.
If you have recently used a program or have pinned an application to the Start Menu, Jump Lists for them will appear in the Start Menu as well. To view Start Menu Jump Lists, click on the arrow to the right of the application in the Start Menu.
A variety of files and operations appear in Jump Lists, varying by program. Read on to learn what you will find in Office 2010 Jump Lists and how you can customize them.
What Do Office 2010 Jump Lists Contain?
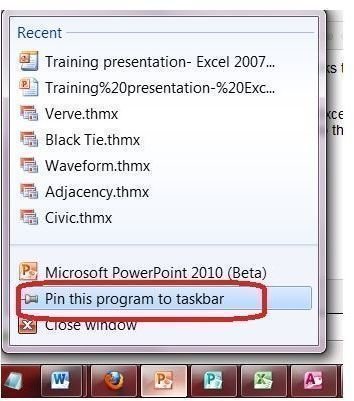
Almost all Office 2010 Jump Lists contain links to recent files. Exceptions to this include Outlook and OneNote, due to the nature of these programs.
If you want quick access to Word documents, Excel worksheets or other Office 2010 files, you can pin these programs to the taskbar. To do so, open the program that you want to pin to the taskbar so that a Jump List will appear. Right-click the taskbar icon and select Pin to Taskbar. Once you pin the Office 2010 program to the taskbar, an icon will remain there. Any time you want to open a recent file using that program, simply right-click the Jump List on the taskbar and select the file you want to open.
When an Office 2010 program is pinned to the taskbar, you can also use the Jump List to open the program itself. Right-click the taskbar icon and click on the program name. If at any time you wish to remove the program from the taskbar, open the Jump List and select Unpin This Program from Taskbar.
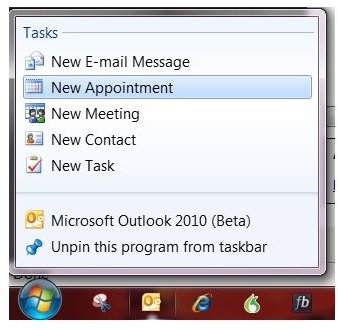
Pinning Outlook 2010 to the taskbar gives you easy access to Outlook tasks whether you have the application open or not. You can open a new message, appointment, meeting, contact or task directly from the Outlook 2010 Jump List.
Can I Change Office 2010 Jump Lists?

If there is an Office 2010 file that you want to keep on the Jump List, you can pin it there. To do so, you will need to have recently opened that file, so that it appears on the Jump List. To pin a file, open the Jump List for that program. Point to the file you wish to pin. Click the pushpin icon that appears to pin the file to the Jump List.
Likewise, Office 2010 Jump Lists often contain files that you have since deleted or no longer need to access quickly. You can remove files from Office 2010 Jump Lists. Open the Jump List, right-click the file you want to delete and select Remove from This List.
You can clear the history for Office 2010 Jump Lists as well. To do so, click Start and type taskbar into the Instant Search box at the bottom of the Start Menu. Select 
Related Articles
To learn more about new features in Office 2010 and Windows 7, read Best New Additions in Office 2010 , How to Customize Windows 7 Start Menu and Searching for Folders in Windows 7 .


