Quick Take
The BIOS is the doorway to the brain of your computer. Like in brain surgery, it can be quite dangerous if you do not know what you are doing. This article explains how to open Windows 7 BIOS. Some warnings are to be taken seriously, as hardware damage can occur.
On this page
Entering the BIOS
Some motherboards will be programmed to give access to the BIOS by pressing Delete, F1, or F2. A small variety of motherboards will use different keys, but at the very early stage of System Boot, a message will appear on screen that indicates that correct key for entering setup.
- Start or Restart your computer.
- Press Delete (or the appropriate key) as soon as the system recognizes the hard disks. A safe way of doing it without missing the window of opportunity of the correct time to hit the key (which will allow you to enter setup) is by hitting such key as soon as you see the message: “Press Del for Setup” (example) … or by pressing the appropriate key from start up until you actually enter Setup (BIOS).
Do not:
Advertisement
- Hold down the appropriate key in order to enter the BIOS at the right time. It will not work, and your keyboard may lock up.
- Enter BIOS without a purpose. The BIOS deals with hardware more than it deals with software. A wrong configuration there may cost you more than time … it may cost you money. The purpose for entering the BIOS should be more than just curiosity.
- Change settings you do not fully understand. Changing the frequency of your memory cards or the voltage of your CPU may result in catastrophic hardware failure. Overclocking is an art, as much as it is a sort of extreme sport for the hardware literate, but it can potentially produce very bad results.
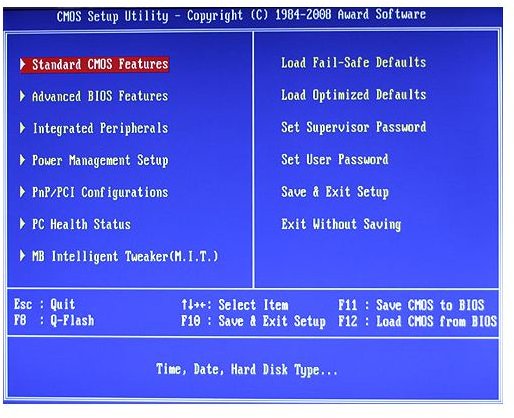
The BIOS Interface
Most motherboards provide the following menu options on the BIOS interface:
- Standard CMOS Features: Will allow you to set the date and time, as well as to configure the hard disks, optical drives and floppy disk.
- Advanced BIOS Features: This gets a little more complicated. A wrong configuration here, and your system will crash, not start, freeze, or be damaged. It is important that you stay away from changes on this section, unless you know what you are doing. Some of the options included in this section are: CPU Clocking, Boot Disk Order, and Security and Integrity settings.
- Advanced Chipset Features: This section will allow you to overclock or set up special configurations for the hardware your system possesses according to your motherboard. The danger here is that not always does the motherboard know what is best for your CPU or Memory Cards … and not always do the “special” features offered in this section of the BIOS work out well. So, before “Enabling” something that was “Disabled,” make sure you know that there could be consequences.
- Integrated Peripherals: Includes IDE Connections, RAID Configurations, USB Configurations, and boot-time settings for keyboard and mouse.
- Power Management Setup: A less appealing version of your Windows 7 Control Panel’s Power Management . This section will allow you to configure special power and reset buttons on the front of your Computer Case, if your motherboard offers such power features.
- PnP/PCI Configurations: This section is for the configuration of the Expansion Slots in your motherboard and their functions and settings. From PCI-E Graphic Cards to AGP and ISA (older) technologies, you will be able to turn each bay on or off, as well as setting primary to secondary.


