This article shows readers how to use Visual Basic for Applications to link database tables, create time-saving field codes, create a custom function in Excel, and much more.
Office VBA Examples
Microsoft Office has an unseen–and unfortunately largely used–workhorse running under it: Visual Basic for Applications (VBA). Using VBA, you can do anything you can do by hand in Microsoft Access, Excel and Word, but faster and cleaner.
VBA Example: Don’t spell check
Begin your VBA education by trying this macro, which makes the Word spell checker overlook text you select. The manual equivalent that this macro replaces requires several steps, while the macro only needs one.
Open up a Word document with many spelling errors. Enable macros by selecting “File>options>Trust Center>Trust Center settings>macro settings” and selecting the “Enable macros” option. (Caution: enabling macros can make your computer vulnerable to malware attacks.)
Return to the main Word window and right-click on the status bar at the bottom of the window. Select “macro recording.”
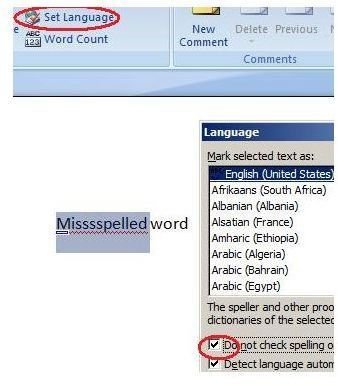
Select some misspelled text in the document, then press the status bar’s small, rectangular macro icon to begin recording a macro. Name the macro “nospellcheck.”
Select “Review>Set language” and uncheck the “do not check spelling or grammar” checkbox in the “Language” dialog box.
Click the status bar button that stops the macro recording. Select “File>options>customize,” then press the customize button. Select “macros” in the Category list, and “nospellcheck” in the Macros list. Enter a shortcut key (e.g. alt-N) and press “Close.”
Return to the Word document and select more text containing misspelled words. Press the shortcut key you just created, and notice that the red line that indicates a misspelling is gone.
Use this macro to mark any text for exemption from the spell checker.
Read more about Word’s spellchecker here .
A word-joiner in Excel: First initial, last name
VBA is essential for creating custom functions in Excel. Use VBA to create a function that reformats a name in the format “Joe Smith” to “J. Smith.”
In Excel, press alt-f11 to enter the Visual Basic IDE (integrated development environment). Select “Insert>module”, then paste the following code into that new module’s code window:
Public Function
makename(first, last) As String
Dim f
‘get first letter of first name
f = Left(first, 1) & “. " & last
makename = f
End Function
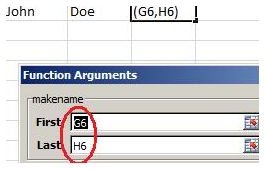
Return to the Excel workbook and enter “John” in one cell, and “Doe” in the cell to the right. Click the blank cell to the right of the last name.
Select “Formulas>insert function.” Select the “User defined” category, then find and double-click the “makename” function.
In the “Function arguments” dialog box, select the cells containing the first and last names, then press “OK.” Your custom formula will reformat the name in a single cell as “J. Doe.”
Learn more about writing custom Excel functions here .
A VBA love letter
Use VBA to create a form letter that involves no mail merging. Using the instructions from the previous example, paste the following code into a new Visual Basic for Applications code window:
Public Sub makeLink()
Dim p, q, s As String
p = ActiveDocument.FullName
q = Replace(p, “\”, “\\”) ‘Escape filename backslashes
s = “link word.document.12 " & q & " bmark \a \r”
Call Selection.Fields.Add(Selection.Range, , s)
End Sub
Return to Word and assign the shortcut key “alt-k” to the new macro. In a new or existing document, type the following letter, being careful to press your shortcut key where the text says “[PRESS ALT-K].”
If Word displays a warning saying that it can’t create a link, simply click the “OK” button to close the dialog box.
Dearest Monique:
How cruel of you to suggest that my love for you is not pure and singular.
[PRESS ALT-K], I love you and no other. The very name “[PRESS ALT-K]” is synonymous with joy.” No other name or woman holds meaning for me.
[PRESS ALT-K], darling, I am Faithfully Yours forever,
John
Read more about Word’s field codes here .
Reveal bookmarks
Since this form letter depends on a bookmark to work correctly, we need to highlight bookmarks in the document. We can do that with the following steps:
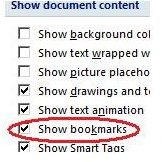
Select “alt-F>Word options>advanced” and check the “Show bookmarks” checkbox under the “Show document content” heading. Return to the letter in the document and select the text “Monique,” then select “Insert>bookmark.” Type “bmark” for the bookmark’s name and press “Add.”
Select the whole document and press F9, then shift F9. Notice that the link field codes are replaced with “Monique.”
Change the “Monique” text in the “Dear Monique” line to “Dear Jasmine”– being careful to type “Jasmine” inside the “[]” delimiters of the “bmark” bookmark. Press F9 and shift-F9 again to update the letter with Jasmine’s name.
Read more about Word’s bookmarks here .
Link to an Access table from Excel
Try this example in Access, which runs a query whose resulting table is viewable in Excel.
Start by opening Access and creating a table with this data:
book,datesold,netsale
tale of two cities,12/1/2009,$5.01
tale of two cities,12/3/2009,$4.98
the count of monte cristo,12/5/2009,$1.98
the count of monte cristo,12/6/2009,$0.98
Create the following queries, using the SQL View to create both:
SELECT books.* INTO selectoutput FROM books WHERE book like “*two*”;
Name the query just given as “storedquery.” Name the following query as “killtable.”
DROP TABLE selectoutput;
Enter the code
Open the Visual Basic IDE, select “Insert>Module” and paste this code in the new module’s code window:
Public Sub doquery()
On Error GoTo CONTINUE_QUERY
DoExcelQuery (“killtable”)
CONTINUE_QUERY: DoExcelQuery (“storedquery”)
End Sub
Public Sub DoExcelQuery(qry As String)
DoCmd.SetWarnings False: CurrentDb.Execute qry: DoCmd.SetWarnings True
End Sub
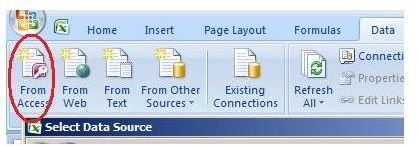
Open Excel and select “Data>From Access,” then navigate through the Excel “Select Data Source” wizard, providing it the name of the books database and table you just created. Save the Excel file with any name, and close it.
Return to Access and modify the “storedquery” query, replacing “*two*” with “*count*” in the “WHERE” clause.
Re-enter the Access’ Visual Basic IDE and place the cursor anywhere in the “doquery” function. Press F5 to run the query, then open the Excel file you’d previously saved. Select “Data>Refresh all,” and notice that the table now displays the “count of monte cristo” rows instead of the original “tale of two cities” rows.
Read more about linking from Access to Excel here .
References
For more tips and tricks, be sure to browse through the other items in Bright Hub’s library of Microsoft Office tutorials and user guides. New and updated articles are added on a regular basis so bookmark us and keep checking back.


