The Mail Merge function in Word 2007 lets you create letters, envelopes, and labels for multiple recipients of the same document. Learn how to use a Mail Merge for your next mailing with these simple Microsoft Word mail merge instructions.
Mail Merge Instructions
One of the most convenient features of Word 2007 (and previous versions of Word, too) is the Mail Merge function. With Mail Merge, you can write just one letter and print off personalized documents to an unlimited number of recipients. You can also print labels and envelopes with ease and give your mailing a professional look for both business and personal applications.
Using the Mail Merge feature in Word 2007 involves a few simple steps. First, you must start a Mail Merge by telling Word 2007 that you want multiple people to receive your document. Second, you select the recipients to receive your document. Third, decide how you want the merged information to look in your document. Finally, select the fields to merge into your document. Follow the detailed steps below to do your first Mail Merge.
- Tell Word 2007 That You Want to Do a Mail Merge
With a few clicks of the mouse, you can let Word 2007 know that you want to merge information into your document. For this example, let’s assume that you are writing a business letter and you want to include the recipients’ address information at the top of each letter.
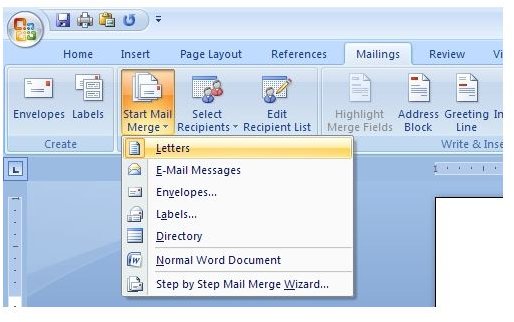
To tell Word 2007 that you will be using the Mail Merge feature, click on the MAILINGS tab and then click on the arrow next to the START MAIL MERGE button on the Word 2007 Ribbon (see Figure 1). Notice that there are several choices here. Choose the first option, LETTERS. Don’t be surprised if nothing happens. Word 2007 now knows this document will contain a Mail Merge.
- Select Recipients for Your Word 2007 Mail Merge
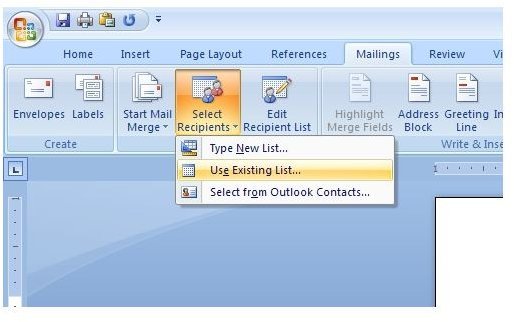
To tell Word 2007 the source of your recipient information, click on the arrow on the SELECT RECIPIENTS button on the Ribbon. Here you have several options. Most people store recipient information in an Excel file but you could actually start a new list by clicking on TYPE A NEW LIST. For our purposes here, click on USE EXISTING LIST (see Figure 2).
The SELECT DATA SOURCE window opens and you can use the window’s browser to indicate to Word 2007 the location of your Excel recipient list. Notice that Word 2007 supports a large number of recipient sources such as Access, Word, Office Address Book, and even HTML files. Keep this in mind if you ever want to use these types of files as the source of your addresses.
After you have selected your Excel source file, you will be asked which worksheet contains your address information. Select the correct worksheet from the list and click on OK. Again, nothing special happens after you select the worksheet. Word 2007 now simply knows the precise location of your Addresses.
- Decide How You Want Your Addresses to Look After the Mail Merge
Now you need to make some qualitative decisions on how you want your merged information to look. For example, where on the page do you want the information? If this is an address list, do you want the recipients’ names to be in bold text or regular? Do you want to include all address information such as zip codes and city? Will the merged addresses be in a different font from the rest of the document?
Thinking about this information now can save you time and effort later. It may help to temporarily type in a fake address so that you can see how it will look when the Mail Merge is complete. After you decide how you want the merged information to look, it is time to insert the actual fields of the Mail Merge.
- Insert the Mail Merge Fields
In your Mail Merge source file (normally an Excel file), it is important to make sure that all of your information is properly formatted . This means that only last names appear under the “last names” field and that there is no missing information in the source file. If you are missing someone’s zip code, for example, now is the time to fill in that missing information.
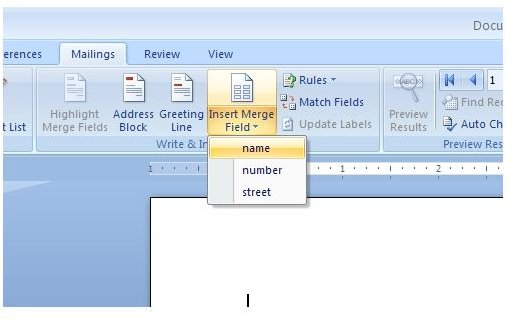
To add Mail Merge fields to your Word 2007 document, click on the arrow on the SELECT MERGE FIELDS button on the Ribbon. Here you will see a list of the fields from you address source file (see Figure 3). Place your fields in one at a time just where you want them to appear in your document.
When you are finished inserting your Mail Merge fields, you can edit them to look any way you want. For example, you can bold, italicize, left/right justify, place spaces, and do just about anything else you want just as if the fields were printable text in your Word 2007 document.
To complete the Mail Merge, click on the arrow on the FINISH AND MERGE button on the Ribbon and choose PRINT DOCUMENTS. A new document will then print for each of your addresses in your Mail Merge source (Excel file).
Conclusion
Inserting information such as addresses into Word 2007 using a Mail Merge is a simple process. The Microsoft Word mail merge instructions discussed in this document are straightforward descriptions of only a few of the Mail Merge options. By exploring the Mail Merge menus, you will discover that there are many opportunities to customize how to merge data into Word 2007 to create professional looking documents.


