
A lot of cool image viewing applications for your Windows XP based PC are available in the market. Still, when you try to view your favorite images, by default some other application opens them that annoys you a lot. In this article, we will try to figure out how you can get rid of this problem.
How can we change the default image viewing image application in Windows XP?
Microsoft Windows XP provides the users with a functionality to customize their computing experience on a number of levels and in a range of ways. Normally Windows XP associates every file format supported by it with a certain application within which the file is opened by default. For example, the default image viewing application under the Windows XP environment is Windows Picture and Fax Viewer. Hence, whenever you attempt to open an image file supported by Windows XP, the image file is opened within Windows Picture and Fax Viewer by default.
However, if you are not satisfied enough with Windows Picture and Fax Viewer or you prefer to view your image files in any other image viewing application of your choice due to any reasons, you might customize Windows XP for associating that particular image file with that image viewing application too. This can be done in a number of ways, which are as follows:
- Changing the default image viewing application directly
- Associating the image file format from within the application
- Associating the image file format through Folder Options
In this article series, we will discuss all these modes one by one.
Changing the default image viewing application directly
This is the most straight forward method to ensure every time you open your desired image files in Windows XP, your favorite image viewing application pops up with the images ready to be seen by you. For doing this, right click the icon of your image file, and select “Open with > Choose Program”. You will see a list of programs in front of you, which will be categorized into two groups. On the top in the list, you will see some applications grouped as “Recommended Programs”. You will also see some other applications grouped in a separate category named “Other Programs” on the bottom of the list.
Check thoroughly if any group of applications in the list contains your favorite image viewing application that you want to make default for the particular image file format, and select it. After selecting the application icon in the list, click the checkbox before the caption “Always use the selected program to open this kind of file” right below the window pane, and click at the “OK” button. You’ve done it! Now all the image files pertaining to that particular file format will be opened in the application that has been selected by you as the default image viewing application for the format.
If you are unable to find the application right here in the list, don’t panic. There’s a lot more that can still be done. Below the caption mentioned above, you will find a button labeled “Browse”. Click it, and you will reach the “Program Files” folder inside your Windows XP installation folder. By default, when you install any Windows XP application, this folder is auto-selected by the PC for you to install your application into.
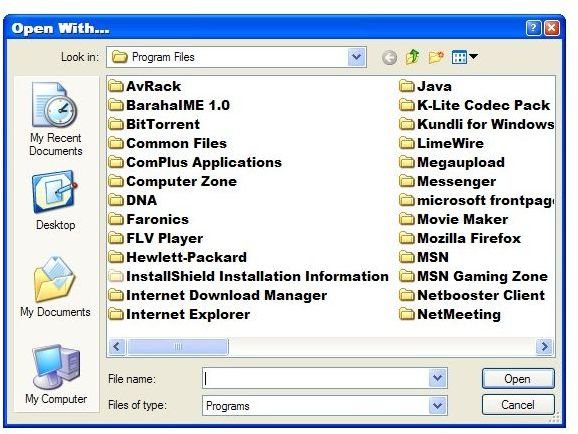
Had you not selected any other disk or folder for installing the application, the “Program Files” folder will contain a separate sub-folder wherein you image viewing application will be installed. Mind one thing here, sometimes at the time of installation, the application might create a sub-folder within the “Program Files” folder with a name different from the application name. For example, if the company “Dazzle Inc” develops and sells a Windows XP application named “Super Viewer”, it might be possible that the application is installed within a sub-folder named “Dazzle Inc” within the “Program Files” folder, that might lead you to further confusion. Hence, make sure apart from your image viewing application, you also know the name of the software company which has developed it.
Now, find and open the appropriate sub-folder within “Program Files”, and locate the main executable file of your image viewing application. Once you find the executable file, select it and click “Open”. You will find that the application has been added to the “Recommended Programs” or the “Other Programs” group within the “Open With” dialog box. Now simply select the application icon, check the box before the caption for making it the default application for opening your particular image files, and click “OK”. You’re done!
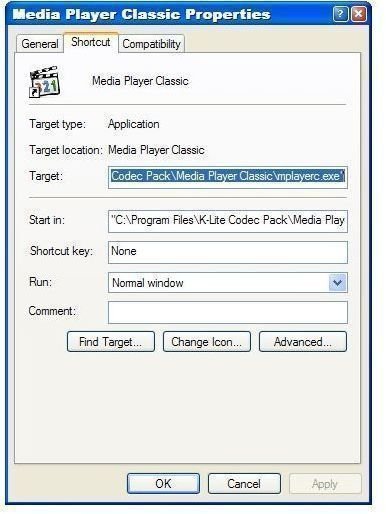
If you are facing any difficulty in finding the executable file for your image viewing application, there is one smart way of knowing its exact location and name. The shortcut to your application is provided within the application sub-menu within the Start > Programs menu. This is the same shortcut that you click upon to start the application. Depending upon your Windows XP installation, you may also find a shortcut to the application on your Desktop screen.
Just right click this shortcut icon, and click “Properties”. In the dialog box that opens, within the “Shortcut” tab will be a “Target” text field, where you will find the exact address of the executable file to which this shortcut leads. Select the address from the text field, and paste it directly in the “File” text field when you browse through the “Program Files” folder to find your program. Just click the “Open” button, and you will immediately find the application icon has been added to the list of programs available for opening the image file format chosen by you.
This post is part of the series: Changing default applications for viewing images in Windows XP
At times you want to view your pics and images within a particular image viewing application upon your Windows XP PC, but by default, the images are opened in some other application you don’t like. Want to change the default application for viewing your images? Read on.


