How to create a Help Desk URL using Canonical name records (CNAME) in Windows DNS and HTTP redirection. Step by step guide with examples.
Before We Begin
In this article we will learn how to create a Help Desk URL using Windows DNS and HTTP URL refresh technique.
Long URL : https://webserver1.mycompany.com/helpdeskcompany1/internalhelp.asp
Short URL’s that will be used by our users :
- https://helpnet
- https://helpdesk
- https://support
- https://supportnet
- https://help
Techniques used :
- Windows DNS Cname
- HTTP URL Redirect by HTTP Refresh
Understanding the Cname and HTTP Redirect Concepts
CNAME
Often computers on the Internet have many different roles as Web server, FTP Server , Mail Server or any other role. Often , in order to hide this, the administrators are using CNAME Records to give each computer different names (aliases). For instance, a server that stands behind the Brighthub.com can be be both a Web Server and a FTP Server and therefore we can define two CNAME records for these:
www.brighthub.com = server1.brighthub.com
and
ftp.brighthub.com = server1.brighthub.com
server1.Brighthub.com can point to a single IP address such as 192.168.1.1
CNAME stands for Canonical Name and it’s actually an ALIAS. A CNAME is not a canonical name, but rather an alias for a canonical name. Whenever you are in doubt about the use of CNAME’s, you should make A records instead.
HTTP Redirect
HTTP Redirect is a method of redirecting a URL by the means of the HTTP redirect. For example let’s say we have a URL that is old and obsolete and we want to automatically redirect the user from the old URL to the new URL in a way that is transparent for the user. In order to do this we can use different techniques and one of them it is the HTTP Redirect.
One of the often used techniques is the HTTP refresh where the HTML code of the web site will automatically refresh the page and send the user to a new URL.
For example, you want to redirect the users that access a page on your website to a new page. You will then modify your old HTML code so it contains the following code :
This code will automatically redirect all the visitors to the https://www.mydomain.com/newpage.html
Help Desk URL and DNS
Many companies have their internal Help Desk web site hosted on the internal servers and the users will access it via their Intranet site or some Help and Support button on their machines. Usually the Help Desk department will have some kind of ticketing system that will be integrated into a website where the users can create tickets, read FAQ articles, read the IT company policy and so on. Such Help Desk systems will have a simple URL so the users don’t have to remember long names and complicated web addresses.
Most likely the Help Desk URL would be like : https://helpdesk, https://helpnet, https://support, https://help or something similar. Behind this simple URL’s might hide more complicated links and URL’s like https://webserver1.mycompany.com/helpdeskcompany1/internalhelp.asp or something similar as the Help Desk site can be hosted on a web server that servers more than one web site. Sending such a link to the users and asking them to remember it when they need help its not something you want to do, as almost nobody will remember such a complicated link. Instead you will need to simplify this as much as possible and create aliases and point the users to one of the short links given as examples.
In order to do this, we can use simple techniques as CNAME DNS records and HTTP redirect.
Next Page : Adding CNAMES in the Windows DNS and creating the Help Desk URL
Adding CNAMES in Windows DNS
First you will need to create the A record for the actual server that hosts the Help Desk URL. As in our example, we presume the web server is called “Webserver1”. We will need to create an A record with the name of “Webserver1” that will point to the IP address of the server and also create CNAME records for all the aliases we want to use.
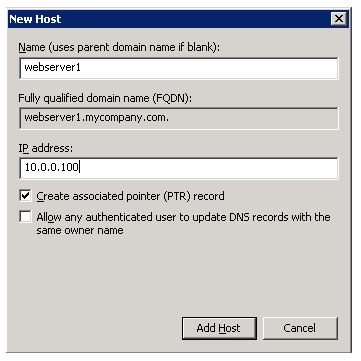
Go to Control Panel > Administrative Tools and open the “DNS” Manager. Expand the forwarding DNS zone for your domain (in our Example mycompany.com), right click the zone and select “New Host (A or AAAA)…”. In the Name field type the name of your web server and the IP address in the IP address field.
After creating the A record for the Web Server, we will need to also create all the aliases we want to use, so we will need to create some CNAMES. Select the zone again, right click it and select “New Alias (CNAME)”. In the “Alias name” field type the alias you want to use as for example “Helpdesk” then at the FQDN field type “webserver1.mycompany.com” and then press “OK”.

In the same way you need to create the CNAME’s for this aliases : helpnet, support, help or any other alias you want to use for for the Helpdesk URL.
Setting up the Web Server
As I stated before, your web server might host also other websites beside the Help Desk site and therefore we need to configure the web server to accept the requests for your newly created Helpdesk URL located at the https://webserver1.mycompany.com/helpdeskcompany1/internalhelp.asp . We presume that this Help Desk web application was installed and configured by some external software company and they will not issue any service and support for this application if you go in and start modifying the content of the site, therefore you will need to trick the Web Server a bit and redirect the users to that specific URL without changing the actual code for the company site or the application.
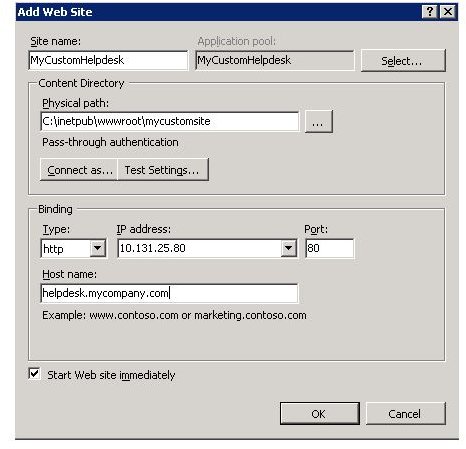
In our case, the company website, including the Help Desk application, is running on WebSserver1 that runs IIS as web server. Login on the web server machine, open Control Panel > Administrative Tools and open “Internet Information Services (IIS) Manager”. Expand the server name, find “Sites” folder and expand it. Right click the “Sites” folder and select “Add Web Site”. As site name write the name you want to have for the site as for example : “MyCustomHelpDesk”. Then browse for a folder on the hard disk where you want to have the files hosted, which should be something like “C:\inetpub\wwwroot\mycustomsite”. At the Binding put the IP address of the server or you can just leave it as default “All Unassigned”. Then at the hostname type “helpdesk.mycompany.com” which is one of the aliases we created for our web server. Then press OK.
Right click the newly created site and select “Edit Bindings”, select “Add” and add all the cnames we created, as hostnames so at the end you will have all the aliases created in the DNS as Hostnames on the IIS Website as host headers.
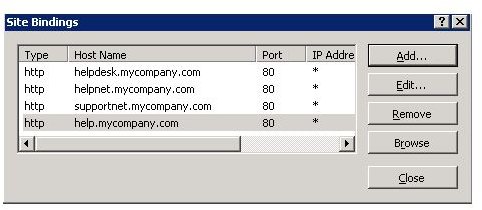
In this way the web server will know to accept all incoming requests for all the aliases you created.
Configuring the HTTP Redirect
We have added the CNAME’s to the Windows DNS, created the new Web Site, and the only thing we are missing now is to set up the HTTP redirect. On the Webserver computer, navigate to “C:\inetpub\wwwroot\mycustomsite” and create a new file named “index.htm”. You can create the file just by using Notepad. Open a notepad and write on one line:
Then “Save-As”, file name Ïndex.htm" and at the “Save as Type” select “All Files” then save it. We have now created the “Index.htm” file (which is one of the default files that will be displayed by the IIS Web server) which will redirect anyone who is visiting the site to the URL of the Help Desk. After all this, any user from inside your organization that will type in the browser : https://support or https://helpdesk or https://supportnet or https://help, will be automatically redirected to the actual Help Desk URL which is : https://webserver1.mycompany.com/helpdeskcompany1/internalhelp.asp
In the same way you can create any other short URL’s for your users. Creating a new Help Desk URL with Windows DNS and HTTP redirect was not so hard after all.


