
Uninstalling Windows Live Essentials is not as tricky or difficult as you might think. Basically you have three options to uninstall it: use Control Panel, Windows Live Installer or a third-party utility.
Uninstall From Control Panel
Uninstalling Windows Live Essentials is very easy that anyone can do. The following methods will help you remove Windows Live Essentials from your computer. If you only want to uninstall Windows Live Messenger from the computer, then read this article , which will help you do that.
Windows XP
Windows XP users follow these steps to uninstall Windows Live Essentials.
1. Press Windows Key + R together to open the Run window.
2. Type appwiz.cpl and hit the Enter key. This will bring up the Add/Remove window - the same one that you usually access by going into the Control Panel.
3. A list of installed programs on your computer will appear. Look for and select Windows Live Essentials.
4. After selecting Windows Live Essentials, click on Change/Remove.
5. In the new window that appears, select the Uninstall option and click Continue.
6. Now you will see the list of Windows Live Essential programs installed on your computer. Select all, or only those that you do not need, then click Continue.
7. Finally, follow the simple onscreen instructions and then restart the computer.
Windows / Windows 7
Vista and Windows 7 users follow these steps to uninstall Windows Live Essentials.
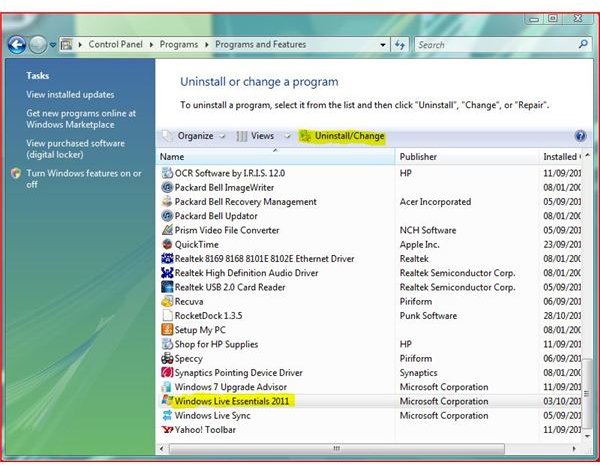
1. Open the Control Panel and then double-click on Programs and Features.
2. A list of installed programs on your computer will appear. Select Windows Live Essentials then click on Uninstall/Change.
3. In the new screen that appears, select the Uninstall option, and then click Continue.
4. Now tick the Windows Live Essential programs that don’t need and then click Continue.
5. The uninstallation process begins. Wait for a few seconds for it to complete then restart the computer.
Uninstall Using Windows Live Installer
The above methods of removing Windows Live Essentials are very easy and straightforward. They will work for you, but if for any reason they fail, here is what you can do.
The following method uses the Windows Live Installer to uninstall Windows Live Essentials from the computer, and whether you are running Windows 7, Windows Vista or Windows XP, the same method will be used to uninstall the program.
Open the drive where Windows is installed, in Windows Explorer\Computer and navigate to P****rogram files -> Windows live -> Installer. There is a file wlarp.exe, double-click on it.
In the new window that opens, select the Uninstall option and click Continue. Tick the Windows Live Essentials programs that you don’t need then click Continue. The Windows Live Essential programs will be uninstalled from the computer. Restart the computer when the process is complete.
Uninstall Using Software Uninstaller
The above methods of uninstalling Windows Live Essentials will work for you but if they fail, the last thing you can do is use an uninstaller utility that will help you remove Windows Live Essentials from the computer. There are many uninstallers available. You may try any of them for uninstalling Windows Live Essentials. I’ve used Perfect Uninstaller and Revo Uninstaller, but for removing some other programs from my computer, and they showed very good results. Once you have decided which one you will use, download and install it on your computer. This will help you get rid of Windows Live Essentials, with 100% results.
Now that you know all the ways how to remove Windows Live, go ahead follow the above methods and the Windows Live Essentials programs will be uninstalled from your computer in no time.


