AVG AntiVirus 2011 is still a major player in the free antivirus market. It’s a fairly nice tool that’s easy to use and offers decent protection. If you’d like some help downloading and using AVG AntiVirus 2011, read more below.
AVG AntiVirus 2011 Guide - Downloading and Installing
AVG AntiVirus 2011 is increasingly becoming a real pain to download. There’s nothing directly bad, but there’s a lot of little annoyances that you have to watch out for with eagle eyes.
Start out by going to the AVG free download website and click on the bottom right button to get the free version. I assume you want the free version. Getting the premium versions work about the same, because running simple scans doesn’t really differ between the setups. The price is for some extra convenience.
If you’re sticking with the free version, ignore the last chance ad for the premium edition and confirm that you want to download your free copy. Wait a moment and it should pull up your free download through its mirror at CNET. Download the installer. It should just take a second, because it’s a small file.
Run your installer and get ready for vigilance. You probably don’t want many of the “features” that they offer. I don’t think that the AVG gadget really offers much. Uncheck it. Move on and uncheck the options for using SafeSearch as your default search and the AVG toolbar, unless you really want to set these up for your browser.
After that, you should still need to confirm that you want the free edition and start the actual installation process. If you have any conflicting antivirus programs installed, it will force you to stop your AVG installation and uninstall them first. Once you’re ready, it will begin the long installation process. It has to download a fairly large set of files and then install them, so just do something else while you wait for it to finish.
Setup AVG AntiVirus 2011 Scan
Once you have AVG AntiVirus 2011 completely installed, launch the program. You’ll probably need to wait for a moment for the updater to update the definitions for the scanner. You’ll want to let it do this, since the definitions that came with the installation are probably fairly out-of-date.
Once it’s updated properly, you can just run a manual scan by clicking the “Scan Now” button on the left side. There should be a slider on the bottom of the scan screen that lets you choose the scan’s priority. “User sensitive” actually seems like a fine setting. It will use minimal resources while you’re actively using the computer, and switch to high priority when you’re away or inactive. Just sit back and let your manual scan run and scan your entire computer.
I imagine that you’ll want to do something a bit better than this though. You probably want to actually setup AVG AntiVirus 2011 scans for the future too. Below “Scan Now,” there’s a button for “Scan Options.” You can click this and choose to edit the scan schedule. It appears to be disabled by default, so you’ll have to do this at least once.
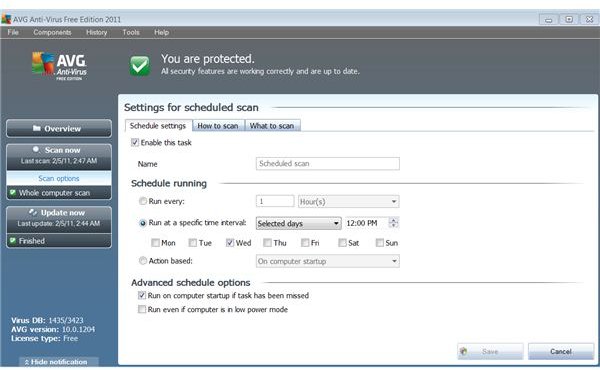
You can choose to have the scans run at set intervals, or you can choose to schedule scans for certain times and days. The ideal way to do this is to schedule scans around dinner or during general downtime. If you usually watch TV at a certain time, schedule the scan for then and let it run at high priority. The beauty of scheduling AVG scans is that you can minimize the inconvenience.
I did see an option to have the scan run when the computer starts up, but that seems awfully annoying. While it’s a good idea to let AVG 2011 finish scheduled scans that were paused early, it seems like a bad idea to slow down your startup activity right after you boot up. This is going to be the one time that you’re guaranteed to be using your computer.
Once this is done, you should be all set for your AVG Antivirus 2011 scans. Just stay updated and watch for any signs of trouble.
Screenshot by author courtesy of AVG Antivirus 2011 Free .


