We have just seen how to install a Linux distribution on our computer and how to run it together with Windows, so now we will look at installing Ubuntu by dividing our hard disk. We will take the partitioning a little bit further and use the Ubuntu installer’s Hard Disk Preparation tool.
Introduction
In our previous articles on installation and replacing Windows/running together we have talked about partitioning in detail. Throughout the articles we have discussed partitioning with GParted and by using Windows Vista’s own disk management tool, but have barely spoken about Ubuntu installer’s hard disk preparation tool (Ubuntu partition tool.) Now we will look at this Ubuntu disk tool in a little more detail.
There are two main partitioning methods present in the Ubuntu partition tool:
- Guided Ubuntu partition
- Manual Ubuntu partition
Before applying the techniques used in this article, be sure to back up all of your important data because we will be making some low-level changes to the system. In any case of failure, either from your side or from external factors (e.g. power failure), the files on your system will be corrupt and you will have to go for a reinstallation.
Guided Ubuntu Disk Partition - Use Entire Disk
This is a self-explanatory option. If you choose and go with this option, the Ubuntu disk partition tool will use all of your hard disk for installation (no partitioning at all of the system). All of your files/folders will be deleted, and the relevant Linux partitions will be created automatically. If you want to get your hands dirty and want more control, you have to go with manual partitioning.
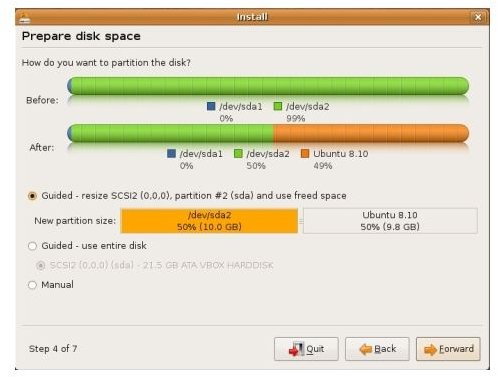
Resize Existing Partition and/or Use Free Space
If you have dedicated all of your hard disk to another operating system - no matter if it’s Windows, BSD, or Mac OS - then you have to make room for Ubuntu. To do that, select “Guided Partition - Resize Existing Partition” and set the partition size of the other operating system. To resize the partition of the other operating system, simply click and drag the graphics to the left. The remaining part will be allocated to the Ubuntu installation. If the other operating system is Windows, make sure that you have defragmented your hard disk.
If you have previously partitioned your hard disk and made some space available, then the Ubuntu installer will automatically recognize this space and will ask you whether you want to install to this available space. If you are happy with that, go on. If not, your only option will be to go to the manual partitioning.
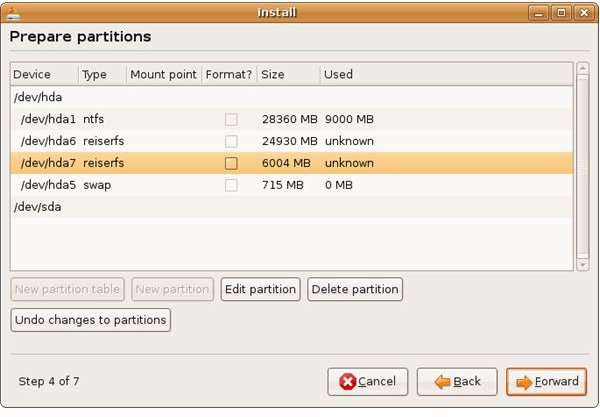
Manual Linux Partition
Welcome to your first step in your quest for becoming a real “power user.” To partition your hard disk, you have to know the Linux notation for hard disks. Windows assigns letters to devices and Linux assigns folders. Here are the comparisons:
Windows C:\ Linux: /dev/hda
Windows D:\ Linux: /dev/hdb (assuming D:\ is a physically separate hard disk)
If you have divided your hard disk into two, then the situation becomes:
Windows C:\ Linux: /dev/hda1
Windows D:\ Linux: /dev/hda2 (assuming D:\ is a physically separate hard disk)
Modern Linux distributions use “sda” for hard disks. So, you may see /dev/sda instead of /dev/hda. Let’s stick to the UNIX roots, and assume
/dev/hda : First physical disk in your computer
/dev/hdb : Second physical disk in your computer
/dev/hda1: First partition in your first hard disk
/dev/hda2: Second partition in your first hard disk
So, /dev/hdb3 will be the third partition on your second hard disk.
After that, we have to know what partitions must be present in a Linux installation: the two most important Linux partitions are / for root and /swap for swap partitions. In Windows, when the operating system can not utilize the main memory (RAM), it opens a file on the hard disk and uses it as a part of main memory, which is called the Pagefile. In Linux, there is the same thing but it is called “swap.” Windows creates the Pagefile on its own, but Linux assigns a separate Linux partition for it. And this special Linux partition has to be named and formatted as swap. The rule of thumb is to have a swap partition twice as big as your main memory; so if you have 1 Gigabyte of RAM, your swap space will be 2 Gigabytes.
For the Windows users, I recommend to divide the hard disk into two and have 2 partitions: one for system and program installation and second for storing files. This way, if you need to reinstall the system, your files will not be touched. You can do that in Linux too, but you need to create a /home directory for that. This is optional though, not a requirement.
To sum up, let’s see how we will partition our 40 Gigabyte free space to use with Ubuntu, assuming that we have 1 Gigabyte of RAM:
/ : root partition: 10 Gigabytes : ext3 filesystem : primary partition
/swap: swap partition: 2 Gigabytes : swap filesystem : primary partition
/home : 28 Gigabytes : ext3 filesystem : primary partition
Alternatively you can merge the root and home partitions:
/swap: swap partition: 2 Gigabytes : swap filesystem : primary partition
/ : root partition: 38 Gigabytes : ext3 filesystem : primary partition
Considering that we are targeting beginners in this series, I suggest you the latter option, which is to create a swap and a root Linux partition.
Conclusion
If you want to go further on partitioning, I recommend you to take a look at Linux Documentation Project ’s Partitioning How-To for detailed information on partition types, requirements, recovery and various related issues.
References
Article: Author’s own experience
Screenshots: Author’s own
This post is part of the series: Getting Started with Linux
We have created a “Getting Started with Linux” series to assist all the new users in their quest to start working with the most enjoyable operating system. We have some tips and tricks along the way so make sure you read everything carefully.


