
Your PC turns on, but that familiar beep and screen flash are gone. The Power On Self Test, or “POST” as it is called, does not happen. This article will explain how to troubleshoot a motherboard that won’t post.
Introduction to Motherboard Diagnostics
Does your computer turn on but not show the familiar Dell or Hewlett Packard, Gateway, ASUS (or other) screen? Does that familiar
beep remain silent? There can be a number of reasons for this. To get started, you’ll need to have easy access to the internals of your computer. If it is stuffed below your desk with no lighting, then rearrange things so that it is on your desk instead with nothing more than the keyboard, power, and monitor cable plugged in. You’ll not need mouse, network, USB, or any other cables. There needs to be adequate lighting so that you can see what you’re doing. Have a flashlight handy just in case. We’ll be looking at specific things.
You’ll also need a pad of paper and a pen or pencil, as we are going to take notes of where things are plugged in so that it can be put back together.
Now that you’ve got your computer hooked up on your desk as noted above, take the case cover off. The method can vary, so check with your computers’ manufacturer to see how to do so if you are unsure. Many generic PC’s have covers that have screws to hold them on, then the side slides off. That is always on the side of the computer opposite the USB plugs on the back where the screws are located.
If your computer is very dusty, disconnect it and take it outside and use a can of air (or an air compressor nozzle at a slight distance) to air it out and get rid of the dust. We need to see what we’re doing. Now hook it back up as mentioned and we’ll get down to business.
Motherboard Diagnostics 101 - The Easy Stuff
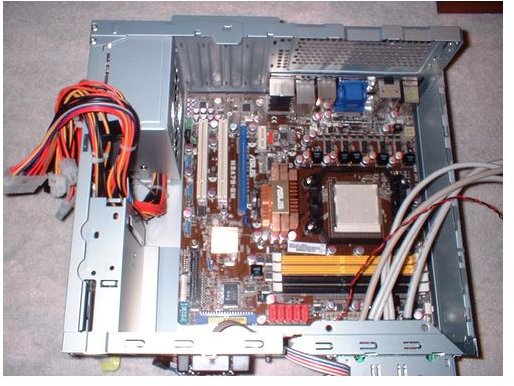
Now that your computer is clean and easy to see, lets take a peek inside.You’ll see many cables of various types. The multi-colored
ables are power cables. The small twisted cables (usually near the bottom, in pairs) hook up the front panel where the power button and status lights are. What we’re concerned with is the motherboard. This is the main board that your keyboard, mouse, and other cables plug in to.
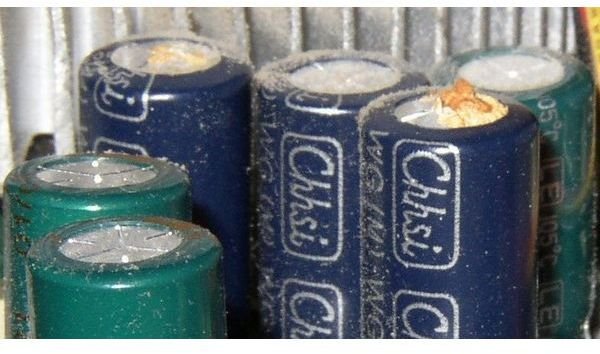
Before we start tearing things apart (we’ll get to that in a moment) lets take a good look. First and foremost, many older computers have defective capacitors. Those are the cylindrical components sticking up from the motherboard, generally about 5-15cm tall and 3-6mm around. Take a good look at them. Hopefully the tops of them flat. Are they bulging? Are they oozing out a yellow substance? Hopefully not! Here is a Google Image Search that shows what they are NOT supposed to look like. If the capacitors are bulging or oozing, then its time for a new motherboard.
If the motherboard or computer is under warranty, contact the manufacturer to get the motherboard replaced. If it is out of warranty, then you’ll need to find the exact same model of motherboard to replace it. If you can’t get the exact replacement, then you can look into getting the capacitors replaced, or “recapped” as it is called. There are plenty of motherboard recap services around. Check with your local computer repair pro’s to see who they recommend.
Are the capacitors fine? Its time to check a few other things then.
More Extensive Testing
So the capacitors are in fine shape, but the motherboard will still not post. Lets examine a few reasons why, and how we can check.
- Motherboard or component is grounded out to the case
- Memory has failed or is poorly connected
- Poor connection between components
- Power supply failure
Make sure that the computer is OFF before attempting any of the steps mentioned below. For safety, unplug the power from the computer. When its time to test it, plug it back in and then remove it when done testing. If you do not have a static strap to keep your body grounded to the computer, simply touch the computer before you touch any components.
If your computer has been acting normally and it is suddenly not working, its not likely grounded out as mentioned in the first bullet. It is possible however that one of the USB ports on the front or back of the computer has been damaged and is shorting out. Physically examine all the USB ports. Do they look OK? Will a USB cable plug into them easily? If one of the USB ports on the front of the computer appears to be damaged, locate the cable between it and the motherboard, and then unplug the cable from the motherboard. Turn on the computer. Does it post? Great! You’ve found your problem. No? Lets move on.
Now lets turn to the memory to see if it is causing the problem. The memory is a long “stick” that is plugged into the motherboard. Most of them look like this . We need to reseat (remove and put back) the memory. There will be retaining clips on either side. Unclip them by moving them away from the memory stick. Now you can raise the memory stick away from its socket. There’s no need to take it out all the way. Just unclip both sides, pull it out until its not touching, then put it right back in. You’ll feel a firm ‘snap’ when it goes in all the way. Make sure the clips are secured before proceeding. If you need explicit instructions, check out this great youtube video . Power the machine on. Does it POST? Great! Reseating the RAM took care of it. Not so great? Well… lets check some other things.
Each component in the computer plugs in with a cable to the other components. Unplug each cable and plug it right back in. For any additional cards that are plugged into the motherboard, remove them and reinstall them just like you did with the memory. Hopefully at this point, it posts. If not, then carefully note the location of every cable that plugs into the motherboard (here’s where you get to use your notepad), and remove all of them with the exception of the power switch cable and the power supply cables. The power supply cables are multi-colored and lead to the power supply. The power switch cable is usually two twisted wires, one green and one white. If you’re not sure, just trace it from the power switch to the motherboard. Try turning it on. Hopefully at this point you have a computer that posts. If not, there’s one more way to tell if your motherboard has failed or not.
Advanced Testing for a Motherboard That Will Not Post
Since it still will not POST, there are some more advanced things to try. Unplug everything from the motherboard except for the power switch wire and power cables as noted. Also remove the memory and remove any add-in cards that you previously reseated. By now there should be nothing but the power cables, power switch cable, keyboard, and video plugged in. If you removed the video card, that’s fine. You can leave it unplugged. Do not unplug the cable going from the main fan on the motherboard to the motherboard itself. That one is important to keep the processor cool. If there is a speaker that plugs into the motherboard, leave it plugged in also. We need to be able to hear any beep errors.
Now turn the computer on. Do all the fans stil come on? If not, make sure the power switch is still plugged in. With the computer on, it should now throw a proper fit! There is no memory installed, which will make the computer complain. It can only speak in beep codes at this point. It will likely beep 8 short beeps at you, and then repeat it over and over. If not, then your motherboard has failed completely and needs to be replaced. If it does beep at you, turn it off and reinstall one piece of memory. It should POST once you install the memory. If it doesn’t, you may need to replace the memory sticks. Swap each individual stick in and out until it posts. If it still doesn’t, then have a pro check to see if the memory is bad. If its bad, replace it. Otherwise you have a bad motherboard.
In Conclusion
Now you know how to troubleshoot a motherboard that will not POST. If you’re not sure about any of these steps, by all means have a knowledgeable friend help, or take it to a computer professional who can diagnose the problem for you. Even with all the steps outlined, there still may be something that a professional might see that you personally do not. I’ve seen many situations where a simple fix was all that was needed. I’ve seen stuck power and reset switches, failed USB connectors, faulty fans, and even burned motherboards.
I hope this article has proven helpful to you. If you do find that your motherboard needs replacement, be sure to check out this article on how to remove a motherboard for replacement.


