Microsoft Pro Photo Tools Review - Software to Help Geocode Your Digital Photographs
Pro Photo Tools (5 out of 5)
Microsoft Pro Photo Tools is a free program that can edit the header in your average photo. While it sounds simple, there are enough uses for this tool that I have divided this review into two parts – location geocoding, and everything else.
Geocoding is the act of adding GPS coordinates to a photo’s header. Why would you want to do this? I can think of two reasons and I’m sure there are more. My primary reason would be to have that information available when my failing memory can no longer link a photo with where it was taken. Another reason would be because photo web sites can use that information to link my photos with other photos of that location. Pro Photo Tools makes this process as easy as a search followed by a drag and drop.
Loading Images (5 out of 5)
When you start Pro Photo Tools, you will see a tree on the left where you can select which header information to modify. On the right are two tabs – Map Browse and Thumbnails. You can drag your photos into the Thumbnails tab or use the regular File Open menu. A handy slider at the bottom of this window lets you set the size of your thumbnails. Once your photos are loaded, click on the Location link on the left-side tree, then click on the Location tab. As you might imagine, an Internet connection is required to use the map feature.
Finding Locations (5 out of 5)
For this review, I used one image from Germany and two from Puerto Rico. In the map search box, I entered “Neuschwanstein, Germany”. Even though there is no town by that name, the map knew about this famous tourist transaction and brought up the right map.
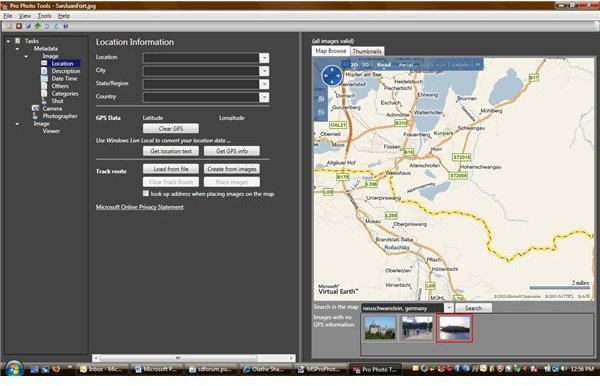
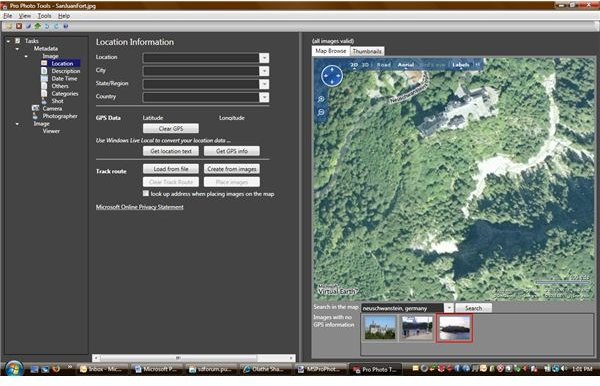
I zoomed in a bit for more detail, then switched to the Aerial view. At this point, I was able to see the castle, and I quickly located the bridge south of the castle where I shot the photograph.
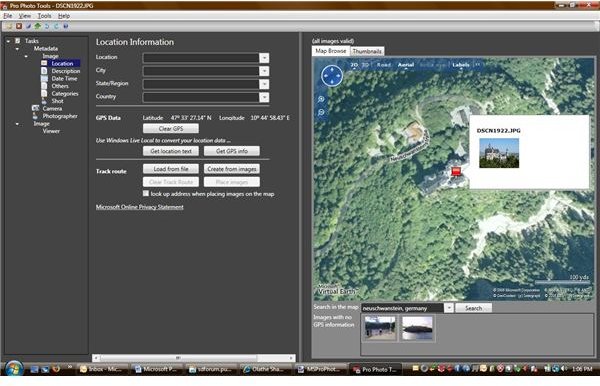
Geocoding (5 out of 5)
Then came the dilemma – did I geocode the picture for where it was taken, or its subject? In the end, I decided to geocode the subject as that would be most useful to the viewer. The act of geocoding is as simple as dragging your picture’s thumbnail to the right location on the map. Once you drop your photo, a pushpin appears and the photo vanishes from the thumbnail list at the bottom of the screen. You can hover over the pushpin to see the photos from that location.
Enhanced Searching (5 out of 5)
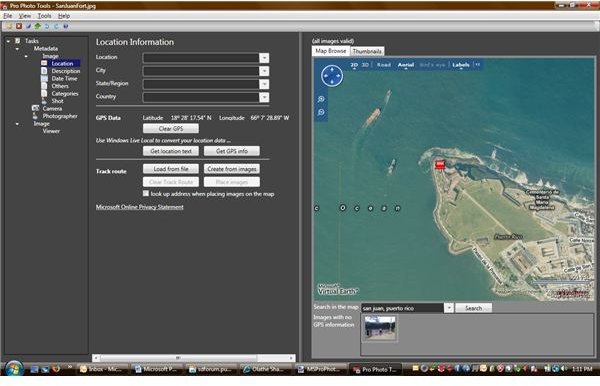
I did a similar text search for the next photo – “San Juan, Puerto Rico”. It was easy to zoom down far enough to see the fort that guards the harbor, and I dropped this file on the map.
The final image was a bit problematic. It was taken at the Arecibo National Radiotelescope, which is tucked into the mountains in the middle of the island. A search for “Arecibo, Puerto Rico” brought me to the town of Arecibo, on the north coast. Close, but no banana. I tried different combinations of Arecibo, Radio, Telescope, and similar terms, but it found nothing. I then tried a different tactic – I switched to the Aerial view and started looking for a perfectly-circular geologic feature. I had spent half an hour looking for it earlier but did not find it. This time, however, I saw it within a minute or so of searching. At full zoom, it is pretty obvious.

Other Features (5 out of 5)
Once I had all three images on the map, I then clicked on each thumbnail, then clicked the Get Location Text button. This action filled in the four location fields – Location, City, State/Region, and Country. While the information may or may not be accurate, it certainly seemed pretty close. It is also possible to load a sequence of images and create a route, or download a route from some GPS units. I did not use this feature but I can see it being useful to document a trip. Once the pictures had the location data, I selected them all with Ctrl-A and clicked the Save toolbar button.
The User Experience (5 out of 5)
I have no plans to geocode every single photo I’ve taken. However, the fact that Pro Photo Tools makes it so easy means that I certainly might geocode all the important ones. I was particularly impressed at the level of map detail – some areas even have an awesome 3D view. The detail level was certainly sufficient that I was able to place the photos exactly where they should be, and the location detail lookup was just icing on the cake. This tool has earned a prominent place in my toolbox. Oh, and did I mention it was free?
In Part 2, we’ll take a look at all the other features that Microsoft Pro Photo Tools has to offer.
This post is part of the series: Review of Microsoft Pro Photo Tools - Including Helpful Tutorials
It doesn’t let you alter your photographs, but you can do just about anything with the photo’s header data. One major feature links your photo to the location it was taken.