Here is a step by step tutorial on how to upload photos from your digital camera with Image Capture.
Importing Photos
Apple has equipped Mac computers with a whole host of original software to meet most of the major functions that the new, heavily multimedia and computer literate consumer would need. Image Capture is Apple’s photo software that will help to initialize an “image capture,” which allows you to import image files from a digital camera or similar device. Image Capture has been designed to be focused around a common workflow for importing photos that is pretty much the same every time you initialize the transfer. Here is a step by step Image Capture tutorial outlining how to upload photos from your digital camera to your computer.
Pug in Your Digital Camera
Start by making sure that your digital camera is set to the On position, otherwise your computer will not recognize it as the correct device.
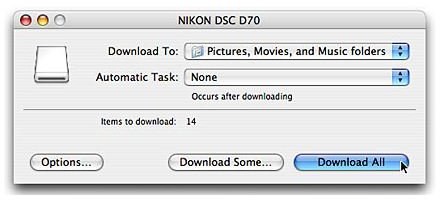
Use the USB, or similar, connection cable to plug the digital camera into your computer. Once you plug your digital camera into your computer and it is turned on, Image Capture will likely recognize it and open up, as long as it is set as the automatic software that should open when image carrying devices are attached to your computer. If not, you can easily select Image Capture to do this, and since iPhoto is often set as the automatic software for this you may have to make changes. A dialogue window will come up where Image Capture will recognize how many photos there are on your digital camera and you will have to choose the folder where you want these images to go. You now have the option to either select which photos you want to specifically import from your digital camera with Image Capture, or if you want to just use Download All to get the entire lot. The download process will then be initiated with Image Capture, one that is pretty free from any control and will go by quickly. Once it is finished you can feel free to close Image Capture, turn off your digital camera, and disconnect it. From here you will want to find the folder that you set in the Image Capture dialogue window, and make sure that the photos from the import session are all in place.
Choosing Image Capture
It may be a difficult choice whether or not to use Image Capture, but it is going to work better for some purposes than for others. If you want to browse through your photos and select the ones you want, you may want to just use iPhoto . If you are looking to set an independent folder for a batch of photos and do a huge download job from your digital camera to your computer then you may find that Image Capture is better suited for this. Image Capture is designed both for digital cameras and attached scanners, but iPhoto is better suited to the new ways that we capture, manage, and publish digital photos online.


