In this guide, I am going to show you how to blend two photos in Photoscape. This feature is hidden in the Combine section of Photoscape. We will take a look at blending two pictures and I will explain your options for blending more than two pictures in Photoscape.
Loading Photoscape and Selecting the Combine Option
If you are looking for a way to blend two photos in Photoscape , continue reading this guide. In this guide, I will show you how to blend two photos by using the Combine option. This option will allow you to blend two pictures in Photoscape together vertically or horizontally. You also have the option of blending more than two photos together, and I will also show you how to blend more than two photos.
To get started, load your Photoscape program. On the interface, look for the Combine option and click it. Photoscape will load and you can move to the next section to continue on with this Photoscape guide.
Locating the Photos You Want to Blend
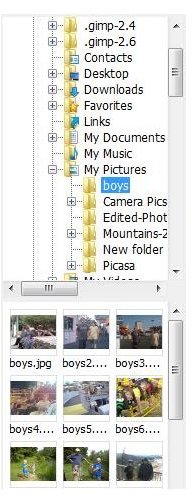
The next step is to load the folder with the photos you want to use. In the top, left panel of Photoscape, search for the folder with the photos you want to blend together. Select the folder by clicking it and the photos in that folder will appear in the bottom, left corner of Photoscape. When you have the photos open in the bottom panel, you can continue on with the next step.
Blending Your Photos and Changing the Blend Options
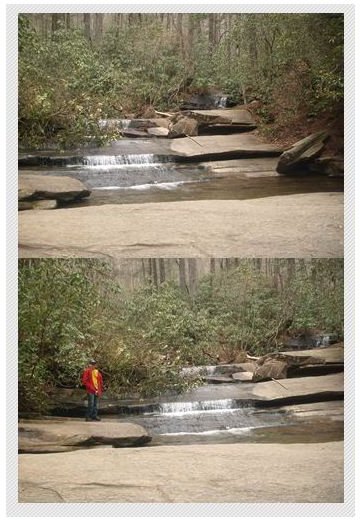
Let’s begin with blending two photos in Photoscape. Select the first photo in the left panel by clicking and holding your mouse. Drag the photo to the center panel where it says “Drag Photo Here”. Once you have the photo in the center, let go of the photo and it will remain there. Now grab the second photo the same way and drag it to the center panel. Once you let go of it, the two photos will be blended.
Once you have added your photos, you can change the blending options on the right side of the program. You can change the size of the photos, change how they are aligned, and more. Browse through the settings and change what you need to change. If you want to change the position of the photos, use the Down and Side tabs. That will change how the photos are blended.
If you add a photo and then want to remove it, right click the photo in the top strip of Photoscape. When the menu opens, select the Delete option and it will be removed from the page. If you would like to blend more than two photos in Photoscape, continue adding photos the same way you did when you were blending two. When you blend more photos, you can use the checkered option also. Simply click the Checkered tab and you will see the photos blend into a checkered pattern.
Saving the Blended Photo
When you are finished blending the two photos in Photoscape, you will want to save your new photo. In the top, right corner of the program, you will see the Save button, click it. A box will open and you will need to give the new photo a name. Then click the file format box and select the type of file you want to save it as. Most photos are saved as a jpeg. Once you have that information, click Save and your new blended photo will be saved.
If you need more help on using Photoscape, please see the guide on Alternative Ways to Open Photoscape .
Image Credits
All screenshots were taken by the author for educational purposes only.


