Want to make a lens cover for your favorite lens? It’s a cheap and easy way to protect your lens, and you may already have the materials that you need for this project. Make your own DIY lens cap today!
Save Money on a Lens Cap
If you’ve lost the lens cover that camera with your lens, you don’t need to waste money buying a new one. Make a lens cover using every day materials and save some money in the process. Knowing how to make a lens cover is also especially helpful if have an older camera or lens. You may not be able to even find a cap to fit your lens. It costs you about $10 to make a lens cover if you don’t already have the materials.
Materials
The first step is to gather up your supplies:
- Glue
- Cardboard
- Black or Silver Paint
- Tape
You can use nearly any type of cardboard for this project, including the box that your latest Amazon purchase came in. It doesn’t matter if there’s writing on it. You are going to paint over the lettering anyway. Standard glue like Elmer’s glue works fine for this project, and you just need a spray paint color that matches your lens. So, the glue, the tape and the paint shouldn’t cost you more than $10 if you don’t have any on hand.
Cutting and Pasting Your Cover
Now that you have your materials, you need to measure the size of your lens. If you want, use the lens as your guide, and simply trace an outline of the lens onto your cardboard.
Cut out your lens section, and cut out an additional strip of cardboard, approximately 0.4 inches wide. Then, cut this strip to fit around the diameter of your camera lens . Tape the two ends of the strip together, tight enough that they won’t fall off the lens.
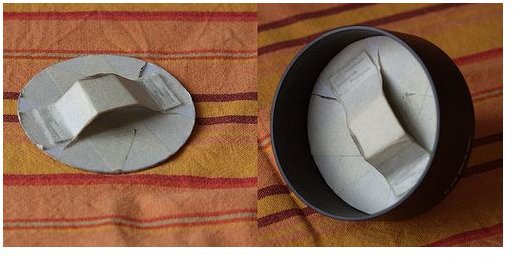
Remove the strip from the lens and place it on a level surface. Take the circle of cardboard that you just cut out, and glue it to rim. The circle will be the interior section of your lens cap. Use as little glue as possible; just use enough so that the circle sticks to the rim. But, don’t use too much that you are oozing glue all over the place. You have your choice of gluing the circle to the extreme edge of the rim or just inside it.
Put the two sections back on your lens, and leave it on until the glue is completely dry. When it is dry, wrap the lens in paper tape to make it stiffer. You can also use brown paper and glue if you can’t find paper tape.
Painting Your Cap
Finally, use your spray paint, and paint the entire cap. Let the cap dry, and then put on a second coat if the lens cover needs it. You can also use black leather to line the front of your cap to make it look more professional.
Then, just use your lens cover like a regular cover, and you can even attach it to a string like a lens cap keeper so that you don’t lose your DIY lens cap.
Source: Do-it-yourself Lens Caps, https://jay.fedka.com/index _files/Page413.htm.


